The Best 5 Ingredient Berry Cobbler
Imagine a bubbling, golden crust hugging sweet, juicy berries—all made with just five pantry staples. It is the easiest, most crowd-pleasing dessert recipe in my arsenal, and I guarantee it will become your new go-to for family movie nights!
10 mins
45 mins
55 mins
8 Servings
Dessert
Baking
American / Southern
Vegetarian
Let’s be real for a second—life is busy. Between soccer practice, laundry mountains that never seem to shrink, and the eternal question of ‘what’s for dinner?’, dessert often falls to the bottom of the priority list. But there is something about the smell of sweet berries and buttery dough baking in the oven that turns a chaotic Tuesday into a cozy memory. That is exactly why I am obsessed with this 5-Ingredient Berry Cobbler.
This isn’t just a recipe; it is a survival tool for the modern mom. It is the kind of dessert you can throw together while helping with homework, using ingredients you almost certainly already have in your kitchen. There is no rolling out pie crusts, no tempering eggs, and absolutely no stress involved. Just simple, honest ingredients coming together to create magic.
Whether you have a bag of frozen fruit that’s been sitting in the freezer for months or you just came back from the farmers market with a fresh haul, this cobbler adapts to you. It is warm, gooey, slightly crisp on the edges, and begs to be topped with a big scoop of vanilla ice cream. Trust me, once you make this, your family will be asking for it every single week!
History & Origins
The humble cobbler is a dessert deeply rooted in American history, born out of necessity and improvisation. It dates back to the early British American colonies. Settlers brought their favorite recipes for suet puddings and fruit pies from Europe, but they lacked the traditional ingredients and equipment to make them perfectly. Without suitable brick ovens or specific pie tins, they had to ‘cobble’ together what they had.
Originally, these desserts were cooked in Dutch ovens over open fires. The topping wasn’t the neat pastry crust we see in pies; instead, it was clumps of biscuit dough or batter dropped over stewed fruit. As it baked, the topping would puff up and look like a cobblestone street, which is one of the most popular theories on how it got its name. Over the centuries, the recipe has evolved, especially in the American South, where the ‘batter style’ cobbler (like this one!) became a staple because of its simplicity and the abundance of sweet summer fruits.
Why This Recipe Works
You might be wondering, ‘How can something so simple taste so complex?’ The science behind this specific 5-ingredient method is actually pretty fascinating! This recipe uses the ‘cuppa-cuppa-cuppa’ method (popularized in the South), which relies on a specific ratio of flour, sugar, and milk.
First, by melting the butter in the pan before adding anything else, you create a non-stick barrier that also fries the edges of the batter, giving you that irresistible crispy, golden crust. Secondly, the order of operations is critical. We pour the batter over the butter, and the fruit over the batter, but we do not stir. This allows the self-rising flour to work its magic. As the batter heats up, the leavening agents in the flour release gas, causing the dough to rise through the fruit. This encapsulates the berries, creating pockets of jammy goodness surrounded by cake-like fluffiness. It is culinary chemistry at its finest!
Why You’ll Love This Recipe
- ✓Only 5 pantry staple ingredients required
- ✓Ready for the oven in less than 10 minutes
- ✓Works perfectly with fresh or frozen fruit
- ✓No mixer or special equipment needed
- ✓Creates a magical self-rising crust
- ✓Kid-friendly and impossible to mess up
Equipment You’ll Need
- ✓9×13 inch Baking Dish
- ✓Medium Mixing Bowl
- ✓Whisk or Fork
- ✓Measuring Cups
- ✓Oven Mitts
Ingredients
- ✓1/2 cup Unsalted Butter (1 stick)
- ✓1 cup Self-Rising Flour
- ✓1 cup Granulated Sugar
- ✓1 cup Whole Milk
- ✓2 to 3 cups Mixed Berries (fresh or frozen blackberries, blueberries, raspberries, or strawberries)
Instructions
- Preheat and Prep: Preheat your oven to 350°F (175°C). While the oven is warming up, place the stick of butter directly into your 9×13 inch baking dish. Put the dish in the oven for a few minutes until the butter is completely melted. Watch it closely so it doesn’t burn!
- Mix the Batter: While the butter is melting, grab a medium bowl. Whisk together the 1 cup of self-rising flour and 1 cup of granulated sugar. Slowly pour in the 1 cup of milk and whisk until the batter is smooth. It should look like a thin pancake batter.
- The Pour (Crucial Step): Remove the hot baking dish with the melted butter from the oven. Pour the batter directly over the melted butter. DO NOT STIR. I repeat, resist the urge to mix them! Let the batter sit on top of the butter.
- Add the Fruit: Gently scatter your 2-3 cups of berries over the top of the batter. Again, DO NOT STIR the fruit into the batter. Just let them fall where they may. This layering is what creates the magic texture.
- Bake to Perfection: Place the dish back into the oven and bake for 45 to 50 minutes. You are looking for a golden-brown crust that has risen to the top, with fruit bubbling around the edges.
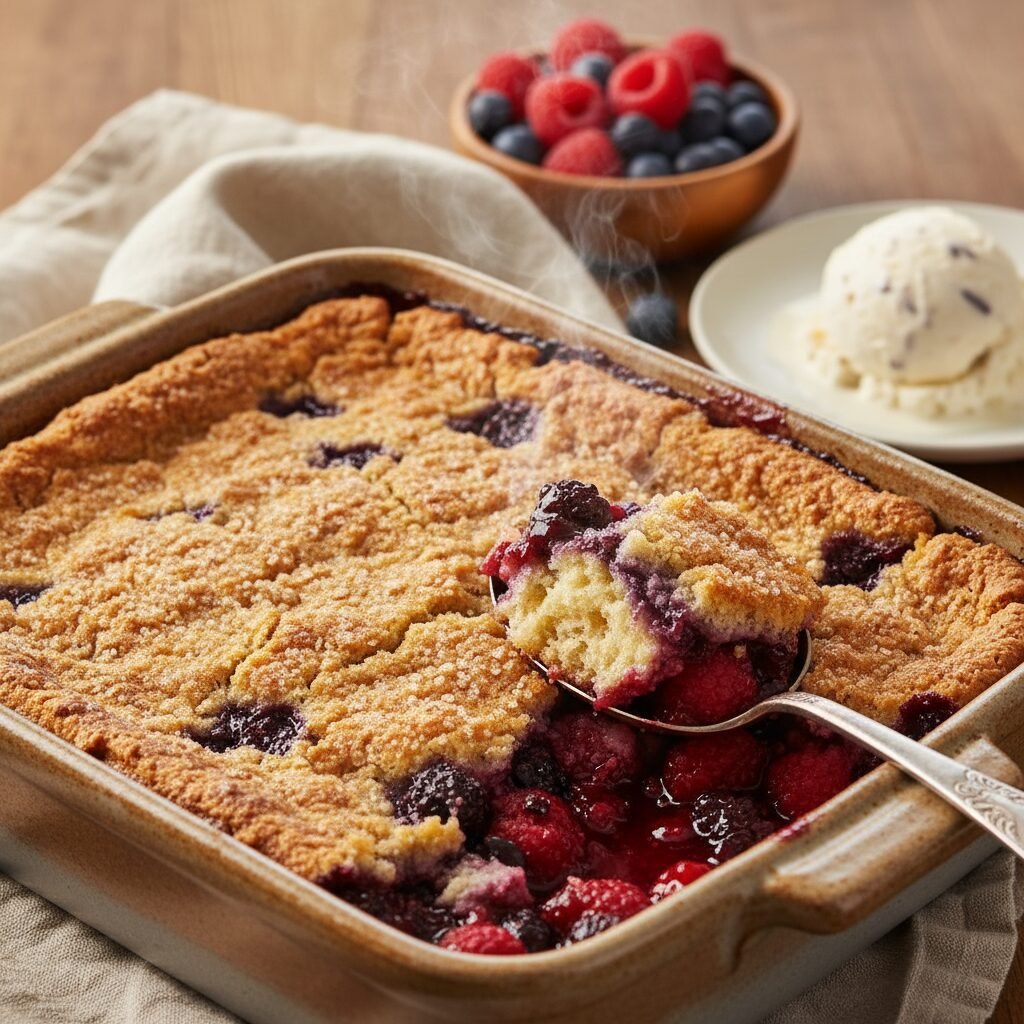
- Cool and Serve: Remove from the oven and let it sit for about 5-10 minutes. This allows the fruit filling to thicken slightly. Serve warm, ideally with a scoop of vanilla bean ice cream!
Expert Cooking Tips
- ✓Self-Rising Substitute: If you don’t have self-rising flour, simply use 1 cup all-purpose flour mixed with 1 1/2 teaspoons baking powder and 1/4 teaspoon salt.
- ✓Don’t Skimp on Butter: Real butter provides the flavor and the crispy edges. Margarine won’t give you the same rich result.
- ✓Room Temp Milk: If you have time, let your milk come to room temperature; it mixes better with the flour and sugar, preventing lumps.
- ✓Frozen Fruit: If using frozen fruit, do not thaw it first! Use it straight from the freezer to prevent the cobbler from becoming too watery.
Substitutions and Variations
This recipe is incredibly forgiving! If you are out of whole milk, you can use 2% milk or even almond milk, though the crust will be slightly less rich. For the sugar, you can swap half of the white sugar for brown sugar if you want a deeper, caramel-like flavor. As for the fruit, while berries are my favorite, sliced peaches (fresh or canned/drained) work beautifully in this recipe too. If you are gluten-free, use a 1:1 gluten-free baking flour blend that includes xanthan gum, but make sure to add the baking powder and salt as if it were all-purpose flour.
Common Mistakes to Avoid
The number one mistake people make with this recipe is stirring the layers. It feels unnatural to just dump ingredients on top of each other, but you have to trust the process! If you stir, you will end up with a mushy, purple cake rather than a cobbler with distinct textures. Another mistake is overfilling the dish; fruit bubbles up significantly, so stick to a 9×13 pan to avoid oven spills. Lastly, don’t underbake it. If the center looks jiggly or pale, give it another 5-10 minutes. You want that crust to be fully cooked and crisp.
Serving Suggestions
This cobbler is a star on its own, but let’s be honest—it needs ice cream. A giant scoop of high-quality vanilla bean ice cream melting into the warm crust is non-negotiable in my house. If you want to get fancy for a dinner party, a dollop of freshly whipped cream with a sprinkle of cinnamon or lemon zest adds a lovely fresh touch. For a breakfast twist (yes, we eat this for breakfast!), try it with a spoonful of Greek yogurt to balance the sweetness.
Storage and Reheating Tips
If you somehow have leftovers (which is rare!), cover the baking dish tightly with plastic wrap or aluminum foil. It can stay at room temperature for up to 2 days, but I prefer to store it in the refrigerator for up to 4 days to keep the fruit fresh. To reheat, simply scoop a portion into a bowl and microwave for 30 seconds, or put the whole dish back in the oven at 300°F until warm. Note that the crust will soften over time, but it will still taste delicious.
Nutrition Facts (Estimated)
| Serving Size | 1 slice |
| Calories | 320 kcal |
| Fat | 14g |
| Saturated Fat | 8g |
| Unsaturated Fat | 5g |
| Trans Fat | 0g |
| Cholesterol | 35mg |
| Sodium | 180mg |
| Carbohydrates | 48g |
| Fiber | 3g |
| Sugar | 28g |
| Protein | 4g |
Frequently Asked Questions
Can I use water instead of milk?
Technically yes, but I strongly advise against it. Milk adds necessary fat and protein that makes the crust tender and rich. Water will result in a tougher, rubbery texture that isn’t nearly as appetizing.
My cobbler came out soggy, what happened?
This usually happens if the fruit was too juicy or if you stirred the batter. If using frozen fruit with a lot of ice crystals, try tossing them in a tablespoon of flour before adding them. Also, ensure your oven is fully preheated so the rising action starts immediately.
Can I reduce the amount of sugar?
You can reduce the sugar in the batter to 3/4 cup without ruining the structure, but I wouldn’t go lower than that. The sugar helps tenderize the flour and creates the crispy crust. If your fruit is very sweet, you can skip sprinkling any extra sugar on top.
Is this recipe vegan friendly?
It can be! Swap the butter for a high-quality vegan butter stick (not a spread) and use a plant-based milk like oat milk or soy milk. The texture might vary slightly, but it will still be delicious.
Can I use canned pie filling?
Yes, you can use canned pie filling instead of loose fruit. However, pie filling is already sweetened and thickened, so the result will be much sweeter and gooier. I prefer frozen or fresh fruit for a fresher taste.
Why do I need self-rising flour?
Self-rising flour already contains baking powder and salt evenly distributed throughout. This ensures the batter rises uniformly around the fruit. It simplifies the ingredients list and guarantees a fluffy result.
Can I make this ahead of time?
Cobbler is best served warm right out of the oven. However, you can measure out your dry ingredients and wet ingredients separately earlier in the day. Do not mix the batter until you are ready to bake, or the baking powder will lose its potency.
What if I only have a smaller baking dish?
If you use a smaller dish (like an 8×8), you should halve the recipe. If you put the full amount in a smaller dish, the batter will be too thick, it won’t cook through in the middle, and it will likely overflow in your oven.
Conclusion
And there you have it—the easiest, most delicious dessert you will ever add to your recipe box. This 5-Ingredient Berry Cobbler proves that you don’t need a culinary degree or hours in the kitchen to create something that feels like a warm hug. It is the perfect way to use up summer berries or brighten up a cold winter night with frozen fruit.
I really hope you give this a try for your next family dinner or potluck. It’s sweet, buttery, and perfectly imperfect. If you make it, please snap a photo and tag me on Pinterest or Instagram—I love seeing your creations! Now, go preheat that oven and get ready for the smell of heaven to fill your kitchen. Happy baking, friends!