Ruffles Marshmallow Treats
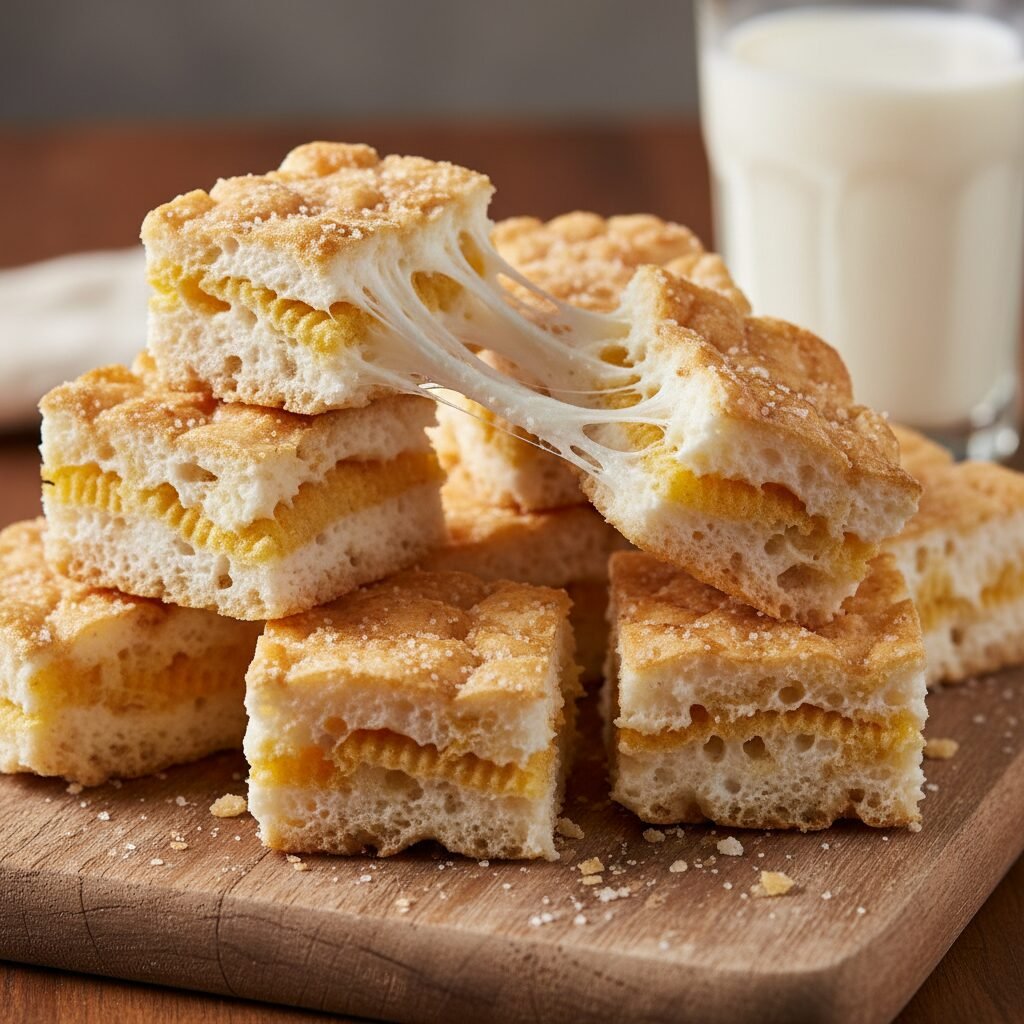
If you love the combination of sweet and salty, prepare to meet your new obsession. These gooey marshmallow bars swap out traditional cereal for crunchy, salty potato chips, creating a texture and flavor profile that is absolutely addictive.
5 minutes
5 minutes
10 minutes
16 squares
Dessert
Stovetop / No-Bake
American
Gluten Free
Let’s be honest for a second: the classic Rice Krispie treat is a hall-of-famer in the world of easy, no-bake desserts. It’s nostalgic, reliable, and kid-friendly. But sometimes, your tastebuds crave something a little more… complex. Enter the Ruffles Marshmallow Treat. Imagine that same buttery, marshmallow-pull goodness you grew up with, but instead of airy puffed rice, you bite into the substantial crunch of a salty, ridged potato chip.
This recipe is the holy grail for anyone who can’t decide between a bag of chips and a candy bar during movie night. It hits every single pleasure point: the salt cuts through the intense sweetness of the marshmallows, and the buttery finish ties it all together. It is casually known in some circles as ‘crack’ because you genuinely cannot stop eating it.
The best part? It is arguably easier than baking cookies or brownies. There is no flour to measure, no eggs to crack, and absolutely no oven required. It is the perfect last-minute treat for PTA bake sales, potlucks, or just a Tuesday night when you need a little comfort food. Trust me, once you try the potato chip version, you might never go back to cereal again.
History & Origins
The original marshmallow cereal treat was invented in 1939 by Mildred Day and Malitta Jensen at the Kellogg’s test kitchen. It was a brilliant marketing move to sell more cereal. However, the concept of binding crunchy things with melted marshmallows is a technique that home cooks have been experimenting with for decades.
The specific innovation of using potato chips instead of cereal is a more modern twist, likely rising to popularity in the early 2010s alongside the ‘swalty’ (sweet + salty) food trend. We saw bacon entering cupcakes and sea salt topping caramel; naturally, the humble potato chip found its way into the marshmallow pot. While no single person claims the invention of the Ruffles treat, it has become a staple in the Pinterest food community and a favorite ‘secret weapon’ recipe for moms who want to bring the empty platter home from the party.
Why This Recipe Works
This recipe works on the fundamental culinary principle of flavor layering and contrast. Sweetness on its own can be cloying and one-dimensional. When you introduce salt, it suppresses the bitterness and enhances the perception of sweetness while adding its own savory depth. This is why we put salt on watermelon or caramel.
Texturally, Ruffles are superior to standard flat chips for this application. The ridges provide structural integrity, meaning they don’t turn into complete dust when you mix them with the heavy marshmallow mixture. They maintain a distinct crunch that stands up to the chewiness of the cooled marshmallow. Additionally, the high fat content of the chips pairs with the butter to create a rich mouthfeel that puffed rice simply cannot achieve.
Why You’ll Love This Recipe
- ✓Only 3 main ingredients required
- ✓Ready in under 15 minutes
- ✓Perfect balance of sweet and salty
- ✓No-bake recipe keeps the kitchen cool
- ✓Ridges hold extra marshmallow goo
- ✓Great for using up leftover party chips
Equipment You’ll Need
- ✓Large stockpot or Dutch oven
- ✓9×13 inch baking dish
- ✓Silicone spatula
- ✓Parchment paper or aluminum foil
- ✓Non-stick cooking spray
Ingredients
- ✓1 bag (8-9 oz) Ruffles Original Potato Chips (or similar ridged chips)
- ✓1 bag (10 oz) Mini Marshmallows (plus 1 extra cup for texture if desired)
- ✓5 tablespoons Unsalted Butter
- ✓1 teaspoon Vanilla Extract (optional but recommended)
- ✓Pinch of Sea Salt (optional, for topping)
Instructions
- Prep the Pan: Line a 9×13 inch baking pan with parchment paper or aluminum foil. Lightly grease it with non-stick cooking spray or rub with a wrapper of butter. This step is crucial because this mixture is sticky!
- Crush the Chips: Open the bag of chips to let air out. Gently crush the chips with your hands while they are still in the bag. You want bite-sized pieces, not dust. Think ‘chunky’ rather than ‘crumbs’.
- Melt the Butter: In a large stockpot or Dutch oven, melt the 5 tablespoons of butter over low heat. Low and slow is the key here to avoid browning or burning the butter, which can change the flavor profile too much.
- Add Marshmallows: Add the 10oz bag of mini marshmallows to the melted butter. Stir constantly with a silicone spatula until completely melted and smooth. If you are adding vanilla extract, stir it in now. Remove the pot from the heat immediately.
- Fold in Chips: Pour the crushed chips into the pot. If you reserved extra marshmallows for texture, add them now too. Fold the mixture gently. You want to coat every chip in the marshmallow goo without crushing the chips further.
- Press into Pan: Transfer the sticky mixture into your prepared pan. Grease your hands with a little butter or cooking spray (or use a piece of wax paper) and gently press the mixture down to an even layer. Do not pack it down hard, or the treats will be tough to eat.
- Cool and Cut: Let the treats set at room temperature for about 30 minutes to an hour. Once firm, lift them out of the pan using the parchment paper lining and cut into squares.
Expert Cooking Tips
- ✓Freshness Matters: Ensure your marshmallows are fresh. Stale marshmallows don’t melt smoothly and result in hard treats.
- ✓Don’t Overcook: As soon as the marshmallows are melted, take the pot off the heat. Overcooking the sugar makes the final product rock hard.
- ✓Greased Hands: The mixture is incredibly sticky. Rubbing a little butter on your hands before pressing the mixture into the pan is a lifesaver.
- ✓The Ridge Factor: Stick to ridged chips like Ruffles. Thin, flat chips tend to get soggy and break down too much in the warm mixture.
- ✓Butter Choice: I list unsalted butter to control the sodium since the chips are salty, but if you are a true salt lover, salted butter works great too.
Substitutions and Variations
If you don’t have Ruffles on hand, any ridged potato chip will work. For a fun twist, some adventurous moms use Cheese Puffs or Cheetos for a neon-orange, ultra-savory version! If you are vegan, simply swap the butter for a plant-based butter stick and ensure you buy vegan marshmallows (like Dandies). You can also brown the butter first for a ‘gourmet’ nutty flavor profile.
Common Mistakes to Avoid
The biggest mistake people make is crushing the chips too fine. If you turn the chips into powder, you lose the texture and the treat becomes dense and heavy. Keep the pieces about the size of a quarter. Another common error is pressing the mixture too firmly into the pan. This removes the air pockets and results in a brick-like texture that is hard to chew. Use a light hand!
Serving Suggestions
These are fantastic on their own, but if you want to elevate them for a party, try drizzling melted dark chocolate over the top. The bitterness of dark chocolate pairs beautifully with the salt and sugar. They are best served at room temperature with a cold glass of milk. For a festive touch, add sprinkles immediately after pressing them into the pan.
Storage and Reheating Tips
Store these treats in an airtight container at room temperature. They will stay fresh for up to 3 days. Do not refrigerate them! The cold air in the fridge will cause the sugar in the marshmallows to crystallize and the chips to lose their crunch, resulting in a hard, stale texture. If you need to stack them, place wax paper between layers to prevent sticking.
Nutrition Facts (Estimated)
| Serving Size | 1 square |
| Calories | 185 |
| Fat | 8g |
| Saturated Fat | 3.5g |
| Unsaturated Fat | 4g |
| Trans Fat | 0g |
| Cholesterol | 10mg |
| Sodium | 160mg |
| Carbohydrates | 28g |
| Fiber | 0.5g |
| Sugar | 14g |
| Protein | 1g |
Frequently Asked Questions
Can I use flat potato chips instead of ridges?
You can, but the texture won’t be as good. Flat chips tend to break into smaller crumbs and can get soggy faster. Ridges add a necessary structural crunch.
Why did my treats turn out hard?
This usually happens if you overcooked the marshmallows or pressed the mixture too hard into the pan. Melt the marshmallows on low heat and stop as soon as they are smooth.
Are these gluten-free?
Generally, yes! Most plain potato chips and marshmallows are gluten-free. However, always check the specific packaging of your chips to ensure they weren’t processed on shared equipment.
Can I freeze these treats?
It is not recommended. Freezing potato chips can make them soggy upon thawing, and the marshmallow texture can become weirdly chewy and wet.
Can I use marshmallow fluff instead of marshmallows?
Marshmallow fluff has a different consistency and won’t set up the same way. It’s best to stick to standard marshmallows for structural integrity.
How do I cut them cleanly?
Wait until they are fully cooled. Spray your knife with a little non-stick cooking spray before slicing to prevent the marshmallow from dragging.
Can I add mix-ins like chocolate chips?
Yes! But wait until the mixture has cooled slightly before folding them in, otherwise, the chocolate will melt into a muddy mess.
My chips are stale, can I still use them?
Please don’t! The beauty of this recipe is the crunch. Stale chips will result in a chewy, unappetizing texture.
Conclusion
There you have it—the salty, sweet, crispy, chewy treat that is about to become your family’s most requested dessert. Ruffles Marshmallow Treats are the ultimate proof that sometimes the simplest ingredients make the most magic. Whether you are making them for a movie marathon, a picnic, or just because it’s a Tuesday, these bars deliver pure joy in every bite. Go grab that bag of chips and get mixing!