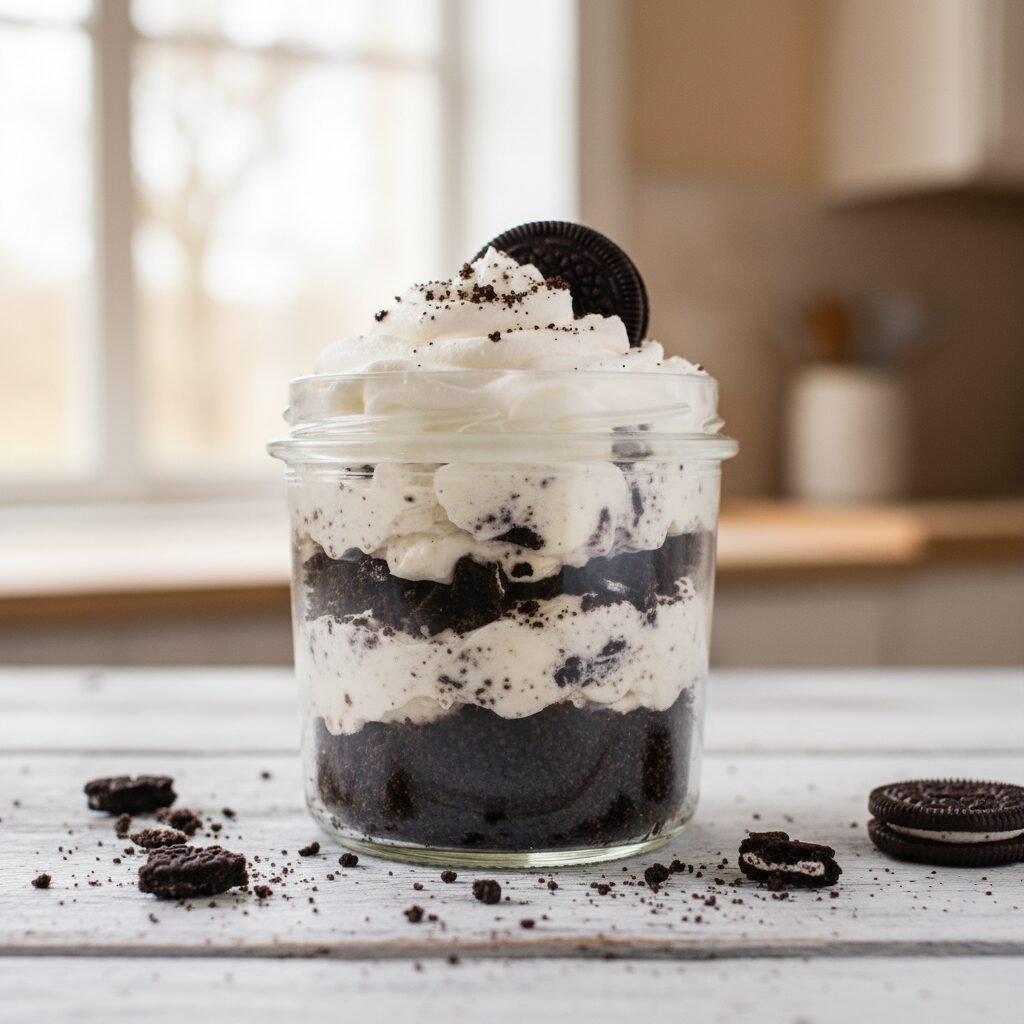
No Bake Oreo Cheesecake Cups
These individual cheesecake cups are the ultimate crowd-pleaser, combining a crunchy chocolate crust with a velvety, cookies-and-cream filling. Best of all, they require absolutely no baking and come together in just 20 minutes!
20 minutes
0 minutes
4 hours 20 minutes (includes chilling)
12 servings
Dessert
No-Bake
American
Vegetarian
Hey there, busy mamas and dessert lovers! If you are looking for the ultimate sweet treat that requires zero oven time and guarantees smiles all around the dinner table, you have landed in the right place. Let’s be honest, sometimes we just crave that rich, tangy goodness of a cheesecake but simply do not have the time (or the patience) for water baths, cracking tops, and hours of baking. That is exactly where these No Bake Oreo Cheesecake Cups come to the rescue!
Imagine a dessert that combines the nostalgic, crunchy perfection of milk’s favorite cookie with a smooth, airy, and decadent cheesecake mousse. These little cups are not just adorable; they are perfectly portioned, making them a massive hit at birthday parties, baby showers, or just a Tuesday night when you need a little chocolate therapy. The contrast between the buttery Oreo crust and the fluffy, creamy filling is absolute magic.
As a mom, I am all about recipes that my kids can help with, and this one is a winner in that department. My little ones love crushing the cookies and stirring the batter. Plus, since there is no hot oven involved, it is a safe and fun kitchen activity for the whole family. Whether you are meal prepping for a gathering or just need a quick fix for your sweet tooth, this recipe is about to become your new best friend.
History & Origins
While cheesecake itself traces its roots all the way back to ancient Greece (yes, really!), the modern version we know and love—rich with cream cheese—is a distinctly American innovation from the late 19th century. The game really changed in 1872 when a dairyman named William Lawrence accidentally created cream cheese while trying to make Neufchâtel. This happy accident paved the way for the dense, New York-style cheesecakes we adore today.
However, the no-bake revolution came a bit later, gaining massive popularity in the mid-20th century as refrigerators became a standard household appliance and convenience foods took center stage. Home cooks wanted the elegance of a fancy dessert without the fuss of baking custard.
Enter the Oreo. Introduced by Nabisco in 1912, the Oreo quickly became the best-selling cookie in the United States. It wasn’t long before creative bakers started incorporating these chocolate wafers into crusts and fillings. Combining the ease of a no-bake refrigerator cake with the iconic flavor of Oreos created a modern classic that bridges the gap between sophisticated patisserie and childhood comfort food.
Why This Recipe Works
You might be wondering, how does a cheesecake stay firm without eggs and baking? The science behind these No Bake Oreo Cheesecake Cups is actually quite fascinating and relies on the properties of fat and temperature. Unlike a baked cheesecake which relies on the coagulation of egg proteins to set the structure, a no-bake version relies on the stabilization of fats found in the cream cheese and the heavy whipping cream.
When you beat the heavy cream, you are mechanically trapping air bubbles inside the fat network, creating a foam (whipped cream). When this is gently folded into the cream cheese mixture, it lightens the texture, transforming a dense block of cheese into a light mousse. The sugar not only sweetens the deal but also helps to stabilize the water content in the cheese.
Furthermore, chilling the dessert is the critical final step. As the butter in the crust and the fats in the filling cool down in the refrigerator, they solidify, giving the cups their shape and structure. This ensures that when you peel back the wrapper or dig in with a spoon, you get that perfect, sliceable consistency without ever turning on the heat.
Why You’ll Love This Recipe
- ✓Ready in under 30 minutes active time
- ✓No oven required keeping your kitchen cool
- ✓Perfectly portioned for parties and easy serving
- ✓Kid-friendly recipe that is fun to make
- ✓Rich, creamy texture with crunchy cookie bits
- ✓Can be made ahead of time for stress-free hosting
Equipment You’ll Need
- ✓Standard Muffin Tin
- ✓Paper Cupcake Liners
- ✓Large Mixing Bowl
- ✓Electric Hand Mixer or Stand Mixer
- ✓Ziploc Bag and Rolling Pin (for crushing cookies)
- ✓Spatula
- ✓Tablespoon or Cookie Scoop
Ingredients
- ✓24 Oreo cookies (divided usage)
- ✓4 tablespoons unsalted butter, melted
- ✓16 oz (2 blocks) full-fat cream cheese, softened to room temperature
- ✓1/2 cup powdered sugar (confectioners’ sugar)
- ✓1 teaspoon pure vanilla extract
- ✓1 cup heavy whipping cream (cold) OR 8oz tub of Cool Whip
- ✓Optional: Mini Oreos or whipped cream for garnish
Instructions
- Prepare the Pan: Line a standard 12-cup muffin tin with paper cupcake liners. This makes removal and serving super easy and mess-free.
- Make the Crust: Take 12 of the Oreo cookies and crush them into fine crumbs. You can do this using a food processor or by placing them in a Ziploc bag and rolling over them with a rolling pin. Combine the crumbs with the melted butter in a small bowl until the mixture looks like wet sand.
- Press the Crust: Place about 1 tablespoon of the crust mixture into the bottom of each muffin liner. Use the back of a spoon or the bottom of a shot glass to press it down firmly to create a solid base.
- Beat Cream Cheese: In a large mixing bowl, beat the softened cream cheese using an electric mixer on medium speed until it is completely smooth and creamy. There should be no lumps!
- Add Sweetness: Add the powdered sugar and vanilla extract to the cream cheese. Beat again until well combined and fluffy.
- Whip the Cream: If using heavy whipping cream, whip it in a separate cold bowl until stiff peaks form. If using Cool Whip, skip this step. Gently fold the whipped cream (or Cool Whip) into the cream cheese mixture using a spatula. Be gentle so you don’t deflate the air!
- Add Cookie Crunch: Roughly chop the remaining 12 Oreo cookies into chunks. Fold these chunks into the cheesecake batter.
- Fill the Cups: Spoon or pipe the cheesecake mixture evenly over the prepared crusts in the muffin tin. Smooth the tops with the back of a spoon.
- Chill: Place the muffin tin in the refrigerator for at least 4 hours (or overnight) to allow the cheesecake to set completely.
- Serve: Once set, remove the cups from the tin. Top with extra whipped cream and a mini Oreo if desired before serving.
Expert Cooking Tips
- ✓Room Temperature is Key: Ensure your cream cheese is completely softened to room temperature before mixing. If it is cold, you will end up with lumpy cheesecake, and nobody wants that!
- ✓Don’t Overmix the Cream: When folding in the whipped cream, use a gentle hand. You want to keep the mixture light and airy, not dense.
- ✓Firm Crust: Really press down hard on the crust layer. If it is too loose, it will crumble when you try to peel the paper wrapper off.
- ✓Clean Cuts: If you want to serve these without wrappers, you can freeze them for an hour before peeling the paper off for a smooth edge.
Substitutions and Variations
This recipe is super versatile! If you are looking to switch things up, here are a few ideas. For a lighter version, you can use low-fat cream cheese (Neufchâtel) and a lite whipped topping, though the texture will be slightly softer. If you are gluten-free, simply swap the standard Oreos for Gluten-Free Oreos—they taste exactly the same! You can also experiment with different Oreo flavors like Golden Oreos, Mint Oreos, or Peanut Butter Oreos to change the flavor profile completely.
Common Mistakes to Avoid
The biggest mistake people make with no-bake cheesecake is not chilling it long enough. I know it is tempting to dive right in, but if you don’t give it at least 4 hours, the filling will be gloopy and won’t hold its shape. Another common pitfall is using granulated sugar instead of powdered sugar. Granulated sugar can leave a grainy texture because it doesn’t dissolve as easily in the cold cream cheese mixture. Stick to powdered sugar for that silky smooth mouthfeel!
Serving Suggestions
These cups are adorable on their own, but dressing them up makes them party-ready! I love serving them with a dollop of fresh whipped cream and a mini Oreo on top. You could also drizzle them with chocolate sauce or salted caramel for extra decadence. For a pop of color, add a fresh strawberry slice or a raspberry on top—the fruit acidity cuts through the richness beautifully.
Storage and Reheating Tips
Store these cheesecake cups in the refrigerator in an airtight container for up to 5 days. Keep the liners on until you are ready to serve to prevent them from drying out. You can also freeze them! Place the finished cups in a freezer-safe container and freeze for up to 3 months. Thaw them in the fridge for about 30 minutes before eating for a frozen treat texture, or fully thaw for the mousse texture.
Nutrition Facts (Estimated)
| Serving Size | 1 cup |
| Calories | 380 kcal |
| Fat | 26g |
| Saturated Fat | 14g |
| Unsaturated Fat | 10g |
| Trans Fat | 0g |
| Cholesterol | 65mg |
| Sodium | 240mg |
| Carbohydrates | 34g |
| Fiber | 1g |
| Sugar | 28g |
| Protein | 4g |
Frequently Asked Questions
Can I use low-fat cream cheese?
Yes, you can use low-fat cream cheese, but avoid the ‘fat-free’ variety as it doesn’t set well. Full-fat brick style cream cheese yields the best, creamiest results.
Why is my filling runny?
This usually happens if the whipped cream wasn’t whipped to stiff peaks before folding, or if you overmixed the batter, knocking the air out. It could also mean it hasn’t chilled long enough.
Can I make this in a pie dish instead of cups?
Absolutely! This recipe fits perfectly into a standard 9-inch pie dish. You may need to chill it a bit longer (6+ hours) to ensure the center sets firmly.
Do I have to use Cool Whip?
No, you don’t! I actually prefer using real heavy whipping cream whipped to stiff peaks for a fresher taste, but Cool Whip works great as a convenient stabilizer.
How do I get the paper liners off cleanly?
If the cheesecake is sticking to the paper, pop the cups in the freezer for about 20-30 minutes. This firms up the edges and allows the wrapper to peel off cleanly.
Can I use a food processor for the filling?
I recommend using a hand mixer. A food processor can over-process the cream cheese and make the mixture too runny, especially once the cream is added.
Is this recipe gluten-free?
It can be! Just use Gluten-Free Oreos. All other ingredients (cream cheese, sugar, cream, butter) are naturally gluten-free.
Can I make these ahead of time?
Yes, these are the perfect make-ahead dessert. You can make them 1-2 days before your event and keep them in the fridge.
Conclusion
And there you have it—the easiest, most delicious No Bake Oreo Cheesecake Cups you will ever make! This recipe is a true lifesaver for busy moms who want to provide a homemade treat without spending hours in the kitchen. The combination of the buttery crust and the fluffy, cookie-filled cream is simply irresistible. I promise you, these will disappear from the dessert table faster than you can say ‘Oreo’!
If you try this recipe, please leave a comment below and let me know how it turned out. Did you customize it with different flavors? I love hearing your creative twists. Happy un-baking, friends!