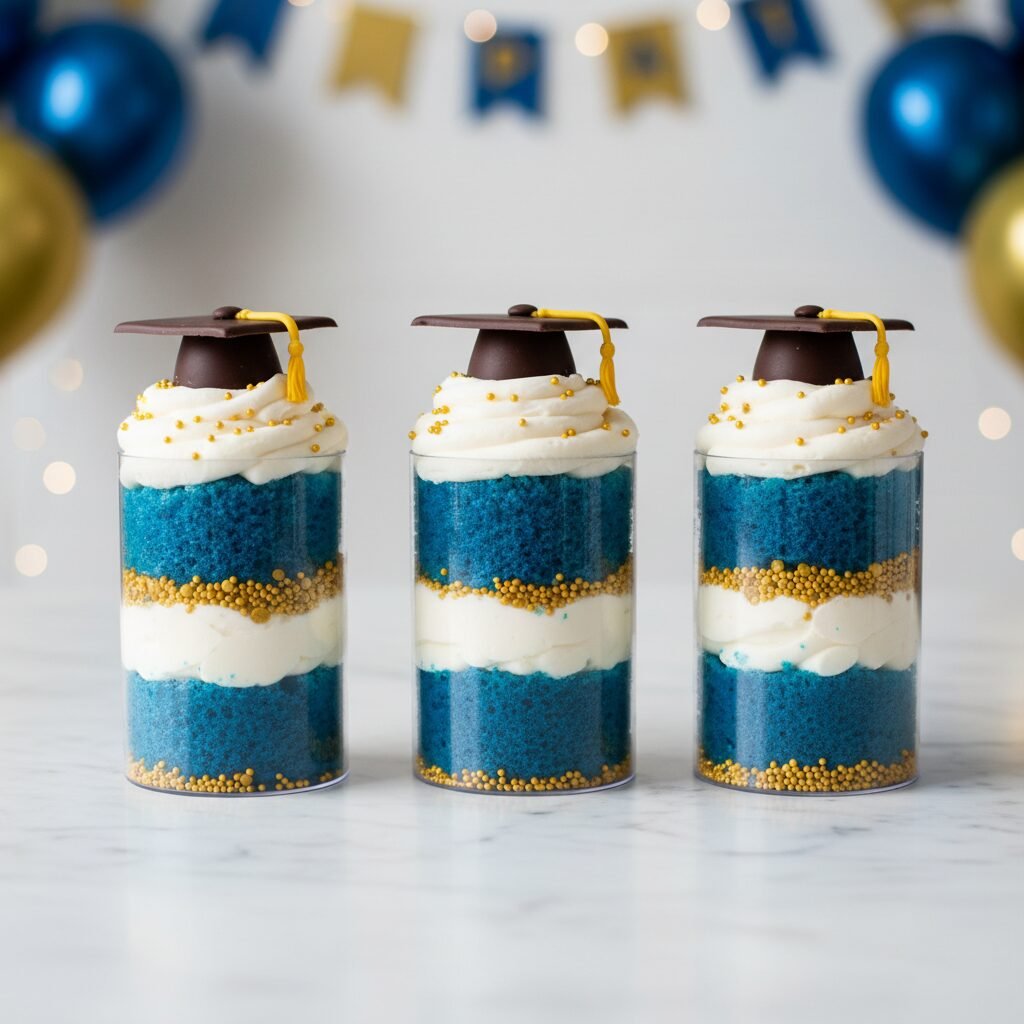
Graduation Themed Push Up Cake Pops
Can you believe graduation season is already here? If you are looking for a show-stopping dessert that is totally mess-free and customizable to your grad’s school colors, these Push Up Cake Pops are the answer!
45 minutes
25 minutes
1 hour 10 minutes
24 Push Up Pops
Dessert
Baking & Assembly
American
Vegetarian
Hey there, busy mamas and party planners! Can you believe it? The caps are flying, the tassels are turning, and our babies (okay, maybe they aren’t babies anymore, but they always will be to us) are graduating! Whether it is a kindergarten moving-up ceremony, a high school graduation, or a college commencement, the pride we feel during this season is just overwhelming. But let’s be real for a second—planning the after-party can be a little stressful. You want everything to be picture-perfect, delicious, and ideally, not a huge mess to clean up afterwards.
Enter the Graduation Push Up Cake Pop. If you spend any time on Pinterest, you have probably seen these adorable treats popping up on your feed, and for good reason! They are essentially a deconstructed cupcake layered inside a clear, push-up container (think back to those Flintstones sherbet treats we loved as kids). They are portable, you don’t need a fork to eat them, and the best part? You can customize the layers to match the school colors perfectly!
In this post, I am going to walk you through exactly how to make these. We are talking moist layers of cake, fluffy buttercream, and festive sprinkles, all topped off with adorable mini graduation caps. It is a dessert table game-changer that looks like you spent a fortune at a bakery, but is actually super fun and easy to DIY at home. Let’s get baking!
History & Origins
So, where did this genius idea come from? To understand the push-up cake pop, we have to take a little trip down memory lane. Do you remember the Push-Up ice cream treats from the 90s? Usually orange sherbet or rainbow cream, they came in a cardboard cylinder with a plastic stick you pushed to get the goods. They were a staple of ice cream trucks everywhere.
Fast forward to the late 2000s and early 2010s, the baking world saw a massive explosion of the Cake Pop, popularized by the legendary blogger Bakerella. Cake pops were cute, bite-sized, and on a stick. However, they were also notoriously finicky to make—often falling off the stick or cracking. Creative bakers started looking for a sturdier vessel for portable cake.
Around 2011, plastic push-up pop containers hit the market specifically for bakers. Instead of ice cream, people started layering cupcakes, brownies, and fillings inside. It solved the structural issues of the traditional cake pop while keeping the fun, portable nature. Since then, they have become a massive trend for weddings, birthdays, and especially graduations because the clear container shows off the beautiful layers, allowing you to create themed color palettes that really pop!
Why This Recipe Works
You might be wondering, “Why go through the trouble of layering cake when I could just make cupcakes?” Well, let me tell you why this works so well from a culinary and hosting perspective. First, it is all about the moisture retention. Because the cake is enclosed in a plastic cylinder, it stays incredibly moist for much longer than a standard cupcake sitting in a paper liner. The air can’t get to it, so you can make these a day or two in advance without worrying about them drying out.
Secondly, it is the perfect frosting-to-cake ratio. With a cupcake, you get a mountain of frosting on top and dry cake at the bottom. With a push-up pop, you are building lasagna-style layers. Every single bite ensures you get a mix of cake, filling, and sprinkles. It creates a balanced texture and flavor profile all the way down.
Finally, from a party perspective, they are mess-free. There are no crumbs falling on the floor, no sticky wrappers to collect, and guests can walk around and mingle while eating them with one hand. Plus, the visual impact of seeing the school colors layered in the glass-like plastic is unbeatable for photos!
Why You’ll Love This Recipe
- ✓Totally customizable to match any school colors
- ✓Mess-free and portable for mingling guests
- ✓Can be made 2 days in advance
- ✓No forks or plates required
- ✓Fun nostalgia factor for parents and grandparents
- ✓Looks professionally made with minimal effort
Equipment You’ll Need
- ✓24 Plastic Push-Up Pop Containers (available online or at craft stores)
- ✓Sheet Pan (13×18 inch) or 2 9×13 Cake Pans
- ✓Round Cookie Cutter (sized to fit inside the push-up container, usually 1.5 to 2 inches)
- ✓Piping Bags
- ✓Large Star Piping Tip (like Wilton 1M)
- ✓Stand Mixer or Hand Mixer
- ✓Cooling Rack
Ingredients
- ✓1 box White Cake Mix (plus ingredients listed on box: eggs, oil, water)
- ✓Gel Food Coloring (in your grad’s school colors)
- ✓2 cups Unsalted Butter, softened
- ✓4 cups Powdered Sugar
- ✓2 tsp Vanilla Extract
- ✓2-3 tbsp Heavy Cream or Milk
- ✓1 cup Themed Sprinkles (gold, silver, or school colors)
- ✓24 Mini Chocolate Squares (like Ghirardelli) or black fondant
- ✓24 Mini Tassels (can be made of fondant or bought as paper toppers)
- ✓Mini M&Ms or Sour Belts (for creating the grad cap details)
Instructions
- Prep the Cake Batter: Preheat your oven to 350°F (175°C). Prepare the white cake mix according to the package instructions. If you want two different colored cake layers (e.g., Blue and Gold), divide the batter into two bowls and use gel food coloring to dye them.
- Bake the Cake: Grease a large 13×18 inch sheet pan (jelly roll pan). Pour the batter in and spread it evenly. A sheet pan is best because it creates a thin layer of cake perfect for cutting circles. Bake for about 15-20 minutes or until a toothpick comes out clean. If using 9×13 pans, the cake will be thicker, and you might need to slice the circles in half horizontally later.
- Cool Completely: Let the cake cool completely in the pan. This is crucial! If the cake is warm, it will melt your frosting and become a mess. For easier cutting, pop the cooled sheet pan in the freezer for 20 minutes.
- Cut the Circles: Using your round cookie cutter (test it in your container first to ensure a snug fit), cut out as many circles as possible. You will need about 2 to 3 circles per push-up pop.
- Make the Buttercream: While the cake chills, beat the softened butter until creamy (about 3-5 minutes). Slowly add powdered sugar, vanilla, and heavy cream. Whip on high for another 3 minutes until light and fluffy. Put the frosting into a piping bag fitted with a star tip.
- Assemble Base Layer: Take a push-up container (ensure the stick is pushed all the way down). Drop one cake circle into the bottom. Use a chopstick or the handle of a wooden spoon to gently push it flat if needed.
- Pipe and Sprinkle: Pipe a swirl of buttercream on top of the cake circle. Sprinkle a pinch of your themed sprinkles over the frosting.
- Repeat Layers: Add a second cake circle on top of the frosting. Pipe another swirl of frosting. Add sprinkles. If your container is tall enough, you can add a third layer, but usually, two cake layers with a generous frosting swirl on top is perfect.
- The Grand Finale (The Topper): For the top layer, pipe a nice tall swirl of frosting. To make the edible graduation cap: place a mini chocolate square on top. Use a dot of frosting to adhere a mini M&M to the center and a small piece of sour belt or fondant to look like a tassel. Alternatively, use paper toppers for ease!
- Serve or Store: Place the lids on the containers if you are transporting them, or serve them immediately on a stand.
Expert Cooking Tips
- ✓Freezing is Key: I cannot stress this enough—semi-freezing the cake sheet makes cutting the circles so much cleaner. You won’t get as many crumbs!
- ✓Don’t Waste Scraps: You will have leftover cake between the circles. Crumble this up and mix with a little frosting to make traditional cake pops for another day, or layer the crumbs in the push pops for a ‘confetti’ look.
- ✓Check the Size: Push-up containers vary in diameter. Measure your container before buying a cookie cutter. If you don’t have a cutter, a small glass or even the push-up container itself can sometimes be used to cut the cake.
- ✓Transporting: If you don’t have a stand specifically for these, take a cardboard box, wrap it in wrapping paper, and poke ‘X’ holes in it to stand the pops upright.
Substitutions and Variations
If you are short on time, you don’t have to bake from scratch! You can buy store-bought mini cupcakes or even donut holes to stuff inside. For a lighter version, swap the buttercream for Cool Whip or stabilized whipped cream (just keep them refrigerated). If you have a gluten-free grad, simply use a gluten-free cake mix; the assembly remains exactly the same. You can also swap the cake for brownies or blondies for a richer treat!
Common Mistakes to Avoid
The biggest mistake people make is overfilling the layers. Remember, you need to fit the lid on if you are traveling! Another common issue is using cake that is too warm; this causes condensation inside the plastic tube which fogs it up and makes it look messy. Always ensure your components are completely cool. Lastly, don’t pack the cake down too hard; you want it to look fluffy and appetizing, not compressed into a dense puck.
Serving Suggestions
These look amazing displayed on a tiered stand. You can tie a small ribbon around the handle of each pop in the school colors for an extra touch. If you are feeling crafty, print out stickers with the graduation year or the grad’s face and stick them on the outside of the cylinder! Serve these alongside a milk bar or coffee station—the sweetness pairs perfectly with a latte.
Storage and Reheating Tips
One of the best things about these is their shelf life. Once assembled with the lids on, they can be stored in the refrigerator for up to 3 days. The plastic keeps them airtight. If you want to make them way in advance, you can freeze the assembled pops (without the fondant toppers) for up to a month! Just let them thaw in the fridge overnight before the party. If using buttercream, they are best served at room temperature, so pull them out of the fridge an hour before the party starts.
Nutrition Facts (Estimated)
| Serving Size | 1 Pop |
| Calories | 320 |
| Fat | 14g |
| Saturated Fat | 6g |
| Unsaturated Fat | 8g |
| Trans Fat | 0g |
| Cholesterol | 35mg |
| Sodium | 180mg |
| Carbohydrates | 45g |
| Fiber | 1g |
| Sugar | 28g |
| Protein | 3g |
Frequently Asked Questions
Where can I buy the push-up containers?
You can find them on Amazon, at Michael’s, Hobby Lobby, or sometimes in the baking aisle of Walmart. They usually come in packs of 12 or 24.
Can I wash and reuse the containers?
Yes! Most of these containers are made of durable plastic. Collect them after the party, wash them in warm soapy water (usually not dishwasher safe), and save them for the next birthday or holiday.
How much cake batter do I need for 24 pops?
One standard box of cake mix (baked in a sheet pan) typically yields enough rounds for about 20-24 push pops, assuming you use 2 layers of cake per pop.
Can I use store-bought frosting?
Absolutely. To make store-bought frosting taste better and pipe easier, whip it with a hand mixer for a minute to incorporate air before putting it in the piping bag.
How do I display them if I don’t have a stand?
A DIY trick is to use a block of floral foam or Styrofoam. Wrap it in tissue paper or foil, and push the sticks into it. It holds them perfectly upright!
My cake rounds are breaking when I move them, what do I do?
Your cake is likely too soft. Pop the sheet pan back in the freezer for 10-15 minutes. The colder the cake, the easier it is to handle.
Can I put ice cream in these?
Yes, you can! However, you have to serve them immediately from the freezer. For a graduation party where food sits out, cake is the safer and more stable option.
What if I don’t have a piping bag?
You can use a large Ziploc bag! Just fill it with frosting, snip off one of the bottom corners, and squeeze. It won’t have the star shape, but it works perfectly for getting the frosting inside the tube cleanly.
Conclusion
And there you have it, mamas! The cutest, most festive, and surprisingly easy graduation treat that will have everyone asking, “How did you make these?!” These Graduation Push Up Cake Pops are more than just a dessert; they are a fun experience for your guests and a beautiful way to honor your grad’s big achievement. Whether you are doing high school colors or college themes, these little pops of joy are sure to be the highlight of the dessert table.
Don’t forget to take a picture of your masterpiece before they all disappear! If you try this recipe, I would love to see your school spirit creations. Tag me on Instagram or leave a comment below with your grad’s colors. Happy baking, and congratulations to the Class of 2024!