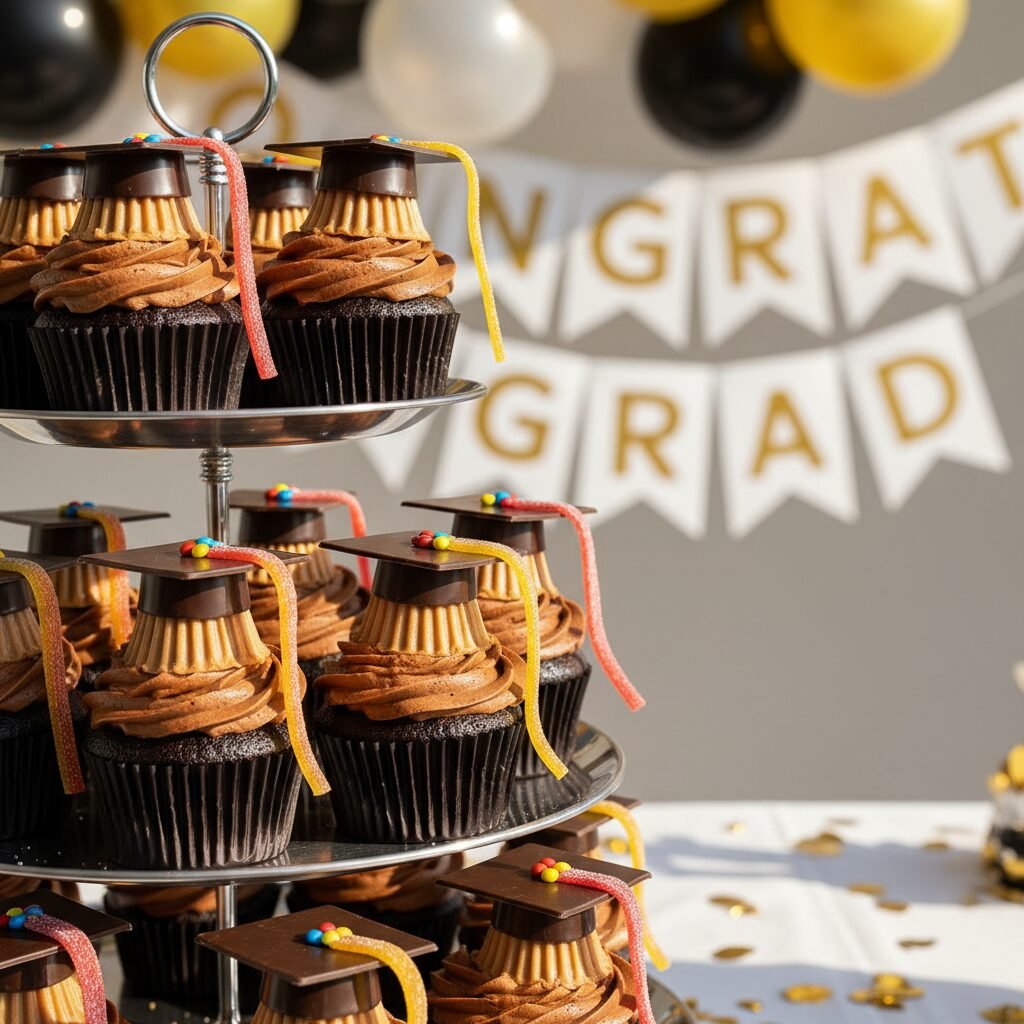
Graduation Cap Cupcakes
Can you believe the big day is finally here? Celebrate the Class of 2024 with these incredibly cute and surprisingly easy-to-assemble Graduation Cap Cupcakes! They are the perfect sweet centerpiece for your open house, adding a personalized touch that looks professionally made but comes straight from your kitchen.
30 minutes
20 minutes
1 hour 30 minutes
24 Cupcakes
Dessert
Baking & Assembly
American
Vegetarian
Where did the time go? It feels like just yesterday we were packing their backpacks for the first day of kindergarten, and now we are planning open houses and ordering caps and gowns. Graduation season is filled with such a whirlwind of emotions—pride, excitement, and yes, a little bit of sadness that our babies are growing up. But amidst the tears and the cheering, there is also a party to plan! And if you are anything like me, you want a dessert that screams ‘celebration’ without requiring a degree in pastry arts to pull off.
Enter these Graduation Cap Cupcakes. They have been a Pinterest sensation for years, and for good reason. They strike that perfect balance between adorable thematic decor and actual deliciousness. We aren’t just putting a plastic topper on a store-bought cake here; we are building a mini edible mortarboard out of chocolate! These cupcakes are always the first thing to disappear from the dessert table because they are just so fun to look at (and eat).
The best part? You can customize the tassel colors to match your grad’s school colors—whether it is high school, college, or even a kindergarten graduation. It is a sweet, edible salute to their hard work. So, grab your apron and let’s make a treat worthy of that diploma!
History & Origins
While cupcakes have been around since the late 18th century (originally called ‘number cakes’ because of the easy-to-remember ratios of ingredients), the specific trend of the Graduation Cap Cupcake is a product of the modern DIY crafting boom. The concept of the ‘mortarboard’ hat dates back to medieval scholars and clergy, symbolizing high status and intelligence. The square shape is thought to represent a book or the quadrangle of a university campus.
In the culinary world, creative moms and bakers started realizing around the early 2010s that a simple square of chocolate—specifically the Ghirardelli squares or After Eights—perfectly mimicked the flat top of the academic cap. By flipping a peanut butter cup upside down to act as the skull cap, a new classic party treat was born. It is a modern tradition that combines historical symbolism with our love for chocolate-on-chocolate treats.
Why This Recipe Works
This recipe works because it relies on structural candy engineering rather than complicated piping skills. Many themed cakes require fondant, which can be tricky to work with and often doesn’t taste very good. Here, we are using recognizable, beloved candies to do the heavy lifting.
The base is a sturdy but moist chocolate cupcake that can hold the weight of the topper. The ‘cap’ is constructed using a mini peanut butter cup (which provides height and a solid base) and a flat chocolate square. Because both components are chocolate, they fuse together easily with a dab of melted chocolate ‘glue.’ The result is a stable decoration that won’t wilt in the heat of a graduation party, unlike delicate buttercream flowers. Plus, the mix of textures—fluffy cake, creamy frosting, and the snap of the chocolate square—is immensely satisfying.
Why You’ll Love This Recipe
- ✓No advanced decorating skills required
- ✓Completely customizable school colors
- ✓Uses store-bought candy hacks
- ✓Perfect for making in large batches
- ✓Kid-friendly assembly process
Equipment You’ll Need
- ✓Standard 12-cup muffin tin
- ✓Cupcake liners (school colors preferred)
- ✓Stand mixer or hand mixer
- ✓Wire cooling rack
- ✓Small piping bag or Ziploc bag
- ✓Kitchen shears
Ingredients
- ✓For the Cupcakes:
- ✓1 1/2 cups all-purpose flour
- ✓1 1/2 cups granulated sugar
- ✓3/4 cup unsweetened cocoa powder
- ✓1 1/2 teaspoons baking soda
- ✓3/4 teaspoon baking powder
- ✓3/4 teaspoon salt
- ✓2 large eggs, room temperature
- ✓3/4 cup buttermilk
- ✓3/4 cup warm water
- ✓1/4 cup vegetable oil
- ✓1 teaspoon pure vanilla extract
- ✓For the Decoration (The Caps):
- ✓24 Ghirardelli Chocolate Squares (or similar flat square chocolates)
- ✓24 Mini Reese’s Peanut Butter Cups, unwrapped
- ✓1 cup Chocolate Frosting (homemade or store-bought)
- ✓Sour Belts or Airheads (in school colors) for tassels
- ✓24 Mini M&Ms (color matched to tassel)
Instructions
- Step 1: Preheat and Prep. Preheat your oven to 350°F (175°C). Line two standard muffin tins with cupcake liners. If you can find liners that match the school colors, it adds a great touch!
- Step 2: Mix Dry Ingredients. In the bowl of a stand mixer or a large mixing bowl, whisk together the flour, sugar, cocoa powder, baking soda, baking powder, and salt until well combined.
- Step 3: Add Wet Ingredients. Add the eggs, buttermilk, warm water, oil, and vanilla extract. Beat on medium speed for about 2 minutes. The batter will be very thin—don’t worry, this ensures a super moist cupcake!
- Step 4: Bake. Fill the cupcake liners about 2/3 full. Bake for 18-21 minutes, or until a toothpick inserted into the center comes out clean. Remove from the oven and let them cool in the pan for 5 minutes before transferring to a wire rack to cool completely.
- Step 5: Prepare the Caps. While the cupcakes cool, prepare your ‘mortarboards.’ Unwrap the peanut butter cups and the chocolate squares. Using a small dab of melted chocolate or frosting as glue, attach the wide bottom of the peanut butter cup to the center of the chocolate square. Let these set for 10 minutes.
- Step 6: Make the Tassels. Using kitchen shears, cut the sour belts or Airheads into thin strips, about 1.5 inches long. These will be your tassels.
- Step 7: Assemble the Cap. Use a tiny dot of frosting to attach one end of the candy strip (tassel) to the center top of the chocolate square. Place a mini M&M over the end of the tassel and press down gently to secure it. This acts as the button on the cap.
- Step 8: Final Assembly. Frost your cooled cupcakes with a swirl of chocolate frosting. Gently press the assembled candy cap (peanut butter cup side down) into the frosting. Adjust the angle so it looks jaunty and cute!
Expert Cooking Tips
- ✓Don’t rush the cooling: If you put the chocolate caps on warm cupcakes, the peanut butter cups will melt and your caps will slide off.
- ✓Handling Chocolate: Handle the chocolate squares as little as possible to avoid leaving fingerprints. You can wear food-safe gloves if you want them to look pristine.
- ✓The Glue: Melted chocolate works better than frosting for attaching the tassel to the square because it hardens firmly, whereas frosting stays soft.
- ✓Color Coordination: If you can’t find sour belts in the specific school color, you can use fondant or simply use a contrasting bright color like yellow (gold) or white.
Substitutions and Variations
If you are dealing with a peanut allergy, absolutely skip the Reese’s cups! You can substitute them with Rolo candies (which are slightly tapered but work great) or even a large marshmallow dipped in chocolate. For the chocolate squares, After Eights are a good minty alternative, though they are rectangular, so you might need to trim them. If you want a vanilla version, use white chocolate squares and white mini peanut butter cups!
Common Mistakes to Avoid
The biggest mistake is overfilling the cupcake liners. If the cupcakes dome too much, it’s hard to get the cap to sit flat. Aim for a flat top by filling them just under 2/3 full. Another common issue is the tassel falling off; make sure your ‘glue’ (melted chocolate or royal icing) has fully set before moving the cupcakes.
Serving Suggestions
Serve these on a tiered cupcake stand for a dramatic display at the graduation party. Scatter some confetti or extra mini M&Ms around the base of the stand. These pair wonderfully with a cold glass of milk or a scoop of vanilla ice cream. If it’s an outdoor party, keep them in the shade—chocolate caps hate the sun!
Storage and Reheating Tips
These cupcakes can be stored in an airtight container at room temperature for up to 2 days. However, if your home is warm, I recommend storing them in the refrigerator to prevent the chocolate caps from blooming or melting. Bring them back to room temperature about 30 minutes before serving for the best texture.
Nutrition Facts (Estimated)
| Serving Size | 1 Cupcake |
| Calories | 320 |
| Fat | 14g |
| Saturated Fat | 6g |
| Unsaturated Fat | 7g |
| Trans Fat | 0g |
| Cholesterol | 45mg |
| Sodium | 180mg |
| Carbohydrates | 45g |
| Fiber | 2g |
| Sugar | 28g |
| Protein | 4g |
Frequently Asked Questions
Can I use a box mix instead of scratch?
Absolutely! We moms are busy. A Devil’s Food box mix works perfectly. Just add an extra egg or swap the water for milk to make it taste homemade.
Can I make the chocolate caps in advance?
Yes, you can assemble the caps (peanut butter cup + square + tassel) up to a week in advance. Store them in a cool, dry place in a single layer.
How do I transport these without them toppling?
Transport is tricky! I recommend a dedicated cupcake carrier with deep wells. If you don’t have one, use a shallow box and pack the gaps between cupcakes with tissue paper or mini marshmallows to keep them steady.
What if I can’t find flat chocolate squares?
You can make your own! Melt chocolate, spread it thinly on parchment paper, let it set, and cut it into squares with a warm knife. Or, use graham crackers dipped in chocolate.
Are these gluten-free?
The recipe as written is not, but you can easily swap the flour for a 1:1 Gluten-Free flour blend. Ensure your candy decorations are also certified gluten-free.
Can I use frosting to glue the pieces together?
Yes, but melted chocolate or ‘candy melts’ act as a stronger cement. Frosting can shift if the room gets warm.
How do I get the school colors exactly right?
If candy aisles fail you, use white fondant. You can dye it with gel food coloring to match the specific school shade perfectly, then cut strips for the tassels.
Can I freeze these cupcakes?
You can freeze the baked, unfrosted cupcakes. I do not recommend freezing them with the candy caps attached, as the chocolate may bloom (turn white) and the candy colors might bleed upon thawing.
Conclusion
There you have it—a dessert that is as smart as your graduate! These Graduation Cap Cupcakes are more than just a sweet treat; they are a labor of love that celebrates a massive milestone. Whether your graduate is heading off to college, a trade, or the workforce, sending them off with a little bit of chocolate and a lot of pride is the best way to go. Congratulations to the Class of 2024, and congratulations to you, Mom, for getting them there!