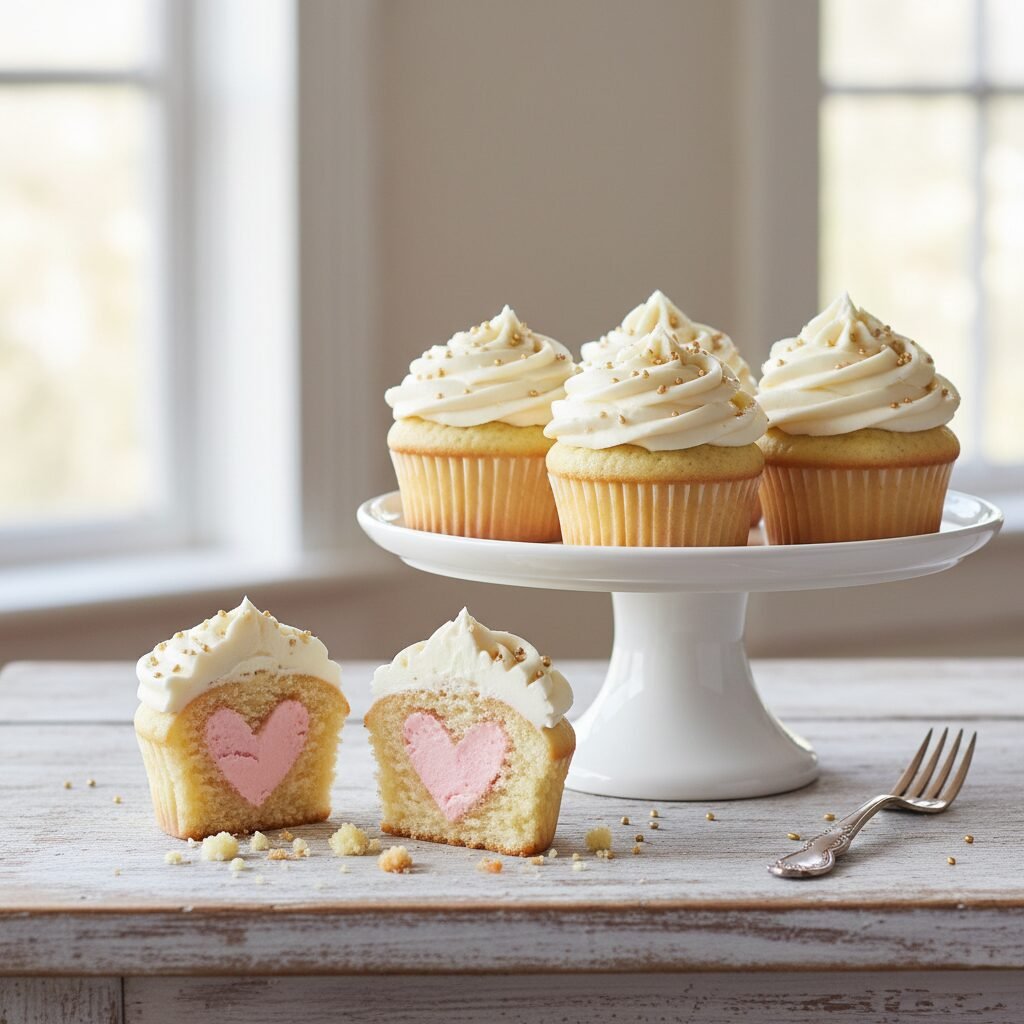
Gender Reveal Cupcakes
Get ready for the cutest surprise ever! These fluffy vanilla cupcakes hold a secret pink or blue center that is revealed only after that first exciting bite. They are the perfect way to share your big news with family and friends.
30 minutes
20 minutes
1 hour 10 minutes
12 Cupcakes
Dessert
Baking
American
Vegetarian
Oh my gosh, is there anything more exciting than finding out if you are having a boy or a girl? The anticipation, the butterflies, and that magical moment when you finally get to share the news with your loved ones—it is truly one of the best parts of pregnancy! As a mom, I know that you want that moment to be picture-perfect. While confetti cannons and balloon pops are fun, I am a firm believer that the best celebrations always involve something delicious.
Enter these Gender Reveal Cupcakes. Imagine a platter of gorgeous, innocent-looking vanilla cupcakes topped with fluffy white clouds of cream cheese frosting. They look like standard bakery treats, but hidden inside is a sweet secret: a core of bright pink or baby blue filling! Watching your guests take that first bite and seeing the room erupt in cheers is a memory you will cherish forever. Plus, unlike a balloon pop, you get to eat the evidence!
This recipe is designed for the busy Pinterest mom. We are using a foolproof homemade vanilla base that is moist and tender, paired with a filling method that is surprisingly easy to pull off. Whether you are hosting a huge bash or a small family dinner, these cupcakes add that personal, homemade touch that says ‘made with love.’
History & Origins
Believe it or not, the concept of the ‘Gender Reveal Party’ is a relatively new phenomenon in the grand timeline of parenting traditions. It all started back in 2008 when a blogger named Jenna Karvunidis cut into a cake with pink frosting inside to announce she was having a girl. Her post went viral, and suddenly, a new tradition was born!
Before this, parents usually found out in the doctor’s office or at birth. The idea of turning the announcement into a separate event gave moms and dads a special way to celebrate the halfway mark of pregnancy. While trends have evolved into elaborate smoke bombs and light shows, the classic ‘cake cutting’ (or in this case, cupcake biting) remains the most intimate and sweet way to share the news. It brings everyone back to the table to share a meal and a moment together.
Why This Recipe Works
You might have seen recipes where the food coloring is baked directly into the batter. While that works, heat can sometimes alter the color, turning a pretty pink into a rusty orange or a baby blue into a greenish-gray. That is not the vibe we want!
This recipe works best because we use the ‘coring and filling’ method. By baking a neutral vanilla cupcake first and then creating a hollow center to fill with colored frosting or sprinkles, we ensure the color stays vibrant and true. The contrast between the white cake, the white top frosting, and the bright center creates a stunning visual pop. Additionally, the cream cheese frosting adds a tangy richness that balances the sweetness of the vanilla cake perfectly.
Why You’ll Love This Recipe
- ✓Foolproof vanilla base that stays moist for days
- ✓Vibrant hidden center that guarantees a perfect surprise
- ✓Rich and tangy cream cheese frosting
- ✓Highly photogenic for your Pinterest board
- ✓Fun and interactive for guests
Equipment You’ll Need
- ✓12-cup standard muffin tin
- ✓Cupcake liners (white or neutral colors)
- ✓Stand mixer or electric hand mixer
- ✓Apple corer or melon baller (for hollowing)
- ✓Piping bags and large round tip
- ✓Wire cooling rack
Ingredients
- ✓For the Cupcakes:
- ✓1 1/2 cups all-purpose flour
- ✓1 1/2 tsp baking powder
- ✓1/4 tsp salt
- ✓1/2 cup unsalted butter, softened
- ✓1 cup granulated sugar
- ✓2 large eggs, room temperature
- ✓2 tsp pure vanilla extract
- ✓1/2 cup whole milk, room temperature
- ✓For the Filling (The Surprise):
- ✓1/2 cup vanilla buttercream (reserved from frosting batch below)
- ✓Pink or Blue gel food coloring
- ✓Optional: Pink or Blue sprinkles for extra texture
- ✓For the Cream Cheese Frosting:
- ✓8 oz cream cheese, cold
- ✓1/2 cup unsalted butter, softened
- ✓4 cups powdered sugar
- ✓1 tsp vanilla extract
- ✓1-2 tbsp heavy cream (if needed for consistency)
- ✓Gender neutral sprinkles (gold, silver, or white) for decoration
Instructions
- Step 1: Prep the Oven – Preheat your oven to 350°F (175°C). Line a 12-cup muffin tin with your favorite cupcake liners.
- Step 2: Mix Dry Ingredients – In a medium bowl, whisk together the flour, baking powder, and salt. Set this aside.
- Step 3: Cream Butter and Sugar – In a large bowl or stand mixer, beat the softened butter and granulated sugar together on medium-high speed until it looks light, fluffy, and pale yellow (about 3 minutes).
- Step 4: Add Wet Ingredients – Beat in the eggs one at a time, scraping down the sides of the bowl as needed. Stir in the vanilla extract.
- Step 5: Combine – Reduce the mixer speed to low. Add half of the flour mixture, then the milk, then the remaining flour mixture. Mix just until combined. Do not overmix, or the cupcakes will be dense!
- Step 6: Bake – Divide the batter evenly among the cupcake liners (they should be about 2/3 full). Bake for 18-20 minutes, or until a toothpick inserted into the center comes out clean. Let them cool completely on a wire rack.
- Step 7: Make the Frosting – While cupcakes cool, beat the butter and cream cheese together until smooth. Slowly add powdered sugar and vanilla. Beat on high for 3-5 minutes until fluffy. Scoop out about 1/2 cup of frosting into a small bowl for the filling.
- Step 8: Color the Surprise – Tint the small bowl of reserved frosting with your pink or blue gel food coloring. If you want, mix in some colored sprinkles here too!
- Step 9: Core the Cupcakes – Once cupcakes are completely cool, use an apple corer or a small knife to remove the center of each cupcake. Keep the little plugs of cake you remove!
- Step 10: Fill and Seal – Pipe or spoon the colored frosting into the hole. Trim the bottom off the little cake plug you removed and place the flat top back over the hole to seal the surprise inside.
- Step 11: Frost and Decorate – Pipe a generous swirl of the white cream cheese frosting over the top to completely hide the seam. Top with gender-neutral sprinkles (gold stars or white pearls look elegant).
Expert Cooking Tips
- ✓Ensure all refrigerated ingredients (eggs, butter, milk) are at room temperature before baking for the smoothest batter.
- ✓Use gel food coloring instead of liquid drops; gel provides a vibrant color without watering down the filling.
- ✓Do not skip the cooling step! If you try to core a warm cupcake, it will crumble and fall apart.
- ✓If you don’t have an apple corer, the wide end of a large piping tip works perfectly to punch out the centers.
Substitutions and Variations
If you need to make these gluten-free, simply swap the all-purpose flour for a high-quality 1:1 Gluten-Free Baking Flour blend. To make them dairy-free, use plant-based butter sticks and a dairy-free cream cheese alternative (though the texture of the frosting may be slightly softer). If you prefer not to use a frosting filling, you can fill the centers entirely with colored sprinkles for a ‘pinata’ style cupcake!
Common Mistakes to Avoid
The biggest mistake is overmixing the batter. Once you add the flour, stop mixing as soon as the white streaks disappear. Overmixing develops gluten and makes the cupcakes tough. Another common error is frosting too soon. If the cupcakes are even slightly warm, the butter in the frosting will melt, and your beautiful swirls will slide right off. Finally, make sure you cover the filled center completely with the top frosting so no pink or blue peeks out!
Serving Suggestions
Serve these beauties on a white tiered cake stand to let the decorations shine. They pair wonderfully with a ‘Mom-osa’ bar (sparkling juice and fruit) or a classic coffee and tea station. If you are doing a ‘Team Boy vs. Team Girl’ theme, you can use blue and pink napkins, but keep the cupcakes themselves neutral until the big bite!
Storage and Reheating Tips
Because of the cream cheese frosting, these cupcakes should be stored in the refrigerator. They will stay fresh in an airtight container for up to 3 days. Let them sit at room temperature for about 30 minutes before serving so the frosting softens up. You can bake the cupcakes a day ahead and store them unfrosted at room temperature, then fill and frost on the day of the party.
Nutrition Facts (Estimated)
| Serving Size | 1 Cupcake |
| Calories | 380 kcal |
| Fat | 18g |
| Saturated Fat | 10g |
| Unsaturated Fat | 7g |
| Trans Fat | 0g |
| Cholesterol | 65mg |
| Sodium | 190mg |
| Carbohydrates | 52g |
| Fiber | 0.5g |
| Sugar | 28g |
| Protein | 4g |
Frequently Asked Questions
Can I use a boxed cake mix instead of scratch?
Absolutely! A white or vanilla boxed mix works perfectly. Just follow the instructions on the box, bake, cool, and then proceed with the coring and filling steps.
How do I give the baker the gender result without knowing myself?
Ask your doctor to write the gender on a slip of paper and seal it in an envelope. Give the envelope to a trusted friend or family member who is willing to bake these for you (or fill them), so you can be surprised too!
Can I freeze these cupcakes?
Yes, but it is best to freeze them unfrosted and unfilled. Wrap the baked cupcakes tightly in plastic wrap and freeze for up to 3 months. Thaw before filling and decorating.
What if I am having twins?
Double the fun! You can fill half the cupcakes pink and half blue if they are different genders, or make a custom color blend (like purple) if you want to be creative. Or, put two different colored hearts inside one larger cupcake!
Will the filling melt inside the cupcake?
Since we are adding the filling after the cupcakes are baked and cooled, the filling will stay perfectly intact and creamy.
How much filling do I need per cupcake?
You only need about 1-2 teaspoons of filling per cupcake. You don’t want to hollow out too much cake, or it loses structural integrity.
Can I use whipped cream instead of buttercream?
Whipped cream is not stable enough to hold up inside the cupcake or under the weight of the top frosting for long periods. Stick to buttercream or a thick ganache.
How do I transport these without ruining the frosting?
Use a dedicated cupcake carrier with deep wells. This keeps them from sliding around and tipping over during the drive.
Conclusion
These Gender Reveal Cupcakes are more than just a dessert; they are the centerpiece of a life-changing moment! There is something so sweet and nostalgic about a homemade treat holding such a big secret. Whether it is pink or blue, the love you put into baking these is the real gift. So preheat that oven, whip up some frosting, and get ready for the cheers, the tears, and the joy. Congratulations, mama!