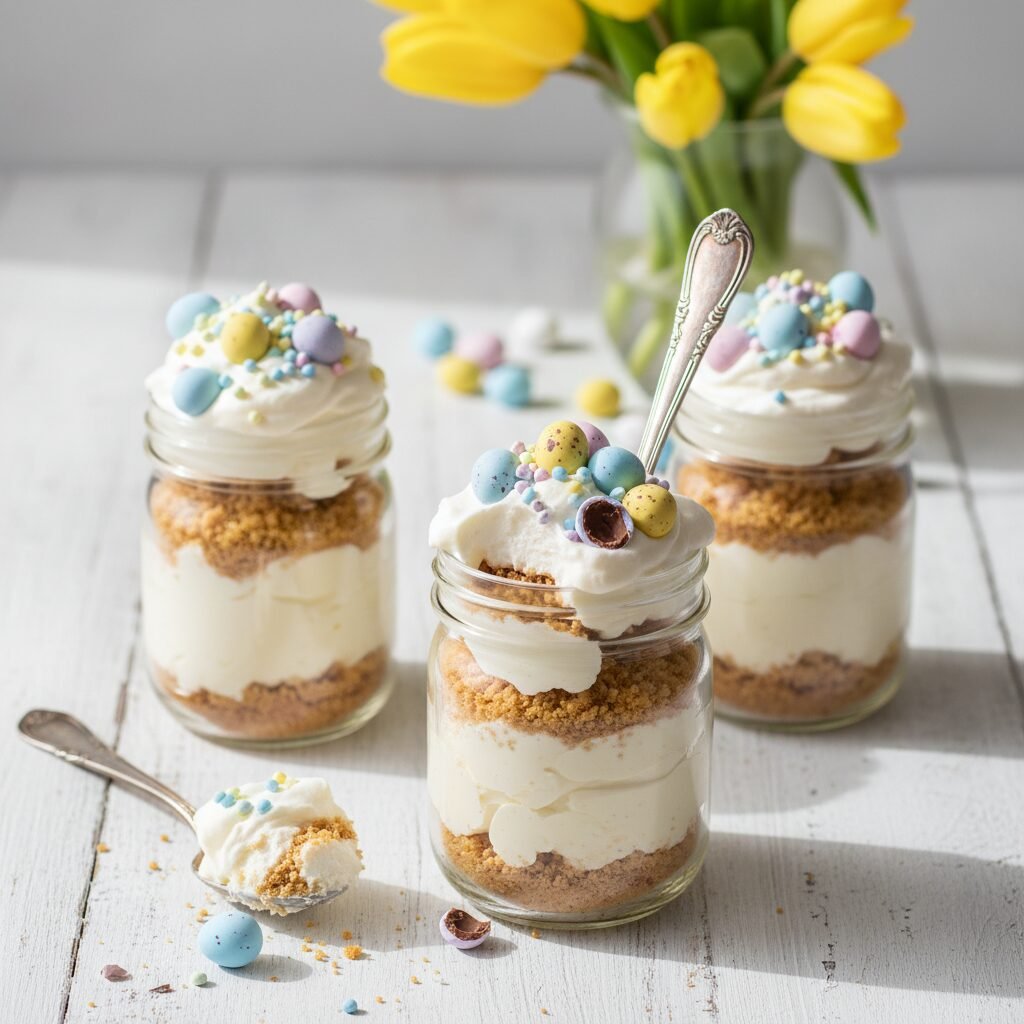
Easter Egg Cheesecake Jars
If you need a stress-free, adorable dessert for your Easter brunch, look no further! These individual cheesecake jars are layered with crunchy cookies, creamy filling, and everyone’s favorite speckled chocolate eggs.
25 minutes
0 minutes
2 hours 25 minutes (includes chilling)
6 servings (8oz jars)
Dessert
No-Bake / Assembly
American
Vegetarian
Spring is finally in the air, and if you are anything like me, you are probably scrolling through Pinterest looking for that perfect Easter dessert that screams “Springtime” but doesn’t require spending four hours in a hot kitchen. Enter the Easter Egg Cheesecake Jar. These little beauties are the answer to every busy mom’s prayers during the holiday rush. They are vibrant, festive, and honestly, almost too cute to eat—almost!
There is something undeniably charming about individual desserts. Maybe it is the fact that you don’t have to fight over the biggest slice, or maybe it is just seeing those beautiful, distinct layers through the glass. Whatever the reason, these cheesecake jars are always a showstopper. We are taking the classic, beloved flavor of vanilla bean cheesecake and giving it a festive upgrade with crushed Cadbury Mini Eggs (or your favorite speckled chocolate egg). The best part? No oven required. That’s right, this is a completely no-bake recipe, leaving your oven free for the ham or roasted veggies.
Whether you are hosting a large family brunch, a casual neighborhood egg hunt, or just want a sweet treat to enjoy after the kids have gone to bed, these jars fit the bill. They are creamy, crunchy, and packed with chocolatey goodness. Plus, they are incredibly fun to assemble, making them a great kitchen activity to do with the little ones!
History & Origins
While cheesecake itself has roots tracing back to ancient Greece (where it was served to athletes during the first Olympic Games in 776 B.C.!), the modern cream cheese version we know and love is a distinctly American innovation from the late 19th century. New York-style cheesecake set the standard for dense, baked cakes, but the no-bake cheesecake emerged as a lighter, fluffier alternative that gained massive popularity in the mid-20th century with the rise of convenient refrigeration and pre-packaged cream cheese.
The concept of serving cake in a jar—often called a verrine in French pastry terms—is a more recent culinary trend. It gained traction in the early 2010s alongside the mason jar obsession that took over the crafting and food blogging world. Serving desserts in jars isn’t just an aesthetic choice; it solves the structural integrity issues of softer, creamier fillings that might not hold up in a traditional slice. By combining the ancient love for cheese-based cakes with the modern, practical presentation of a jar, we get a dessert that is rooted in history but perfectly tailored for today’s grab-and-go, Instagram-ready culture.
Why This Recipe Works
This recipe works so well because it is a masterclass in texture contrast. In every spoonful, you get the sandy, buttery crunch of the graham cracker base, the ultra-smooth and airy richness of the whipped cream cheese filling, and the sharp, crisp snap of the candy shell from the Easter eggs. It keeps the palate interested from the first bite to the last.
From a flavor perspective, the tanginess of the cream cheese cuts through the sweetness of the white sugar and the milk chocolate eggs, preventing the dessert from becoming cloying. By folding in whipped heavy cream rather than baking eggs into the batter, we achieve a mousse-like consistency that feels light and refreshing—perfect for a heavy Easter meal. The glass jar also serves a functional purpose: it allows us to use a softer, creamier filling than a standard cheesecake would require, as we don’t need it to stand up on a plate on its own.
Why You’ll Love This Recipe
- ✓Completely No-Bake: Keeps your kitchen cool and oven free.
- ✓Make-Ahead Friendly: Can be prepared up to 2 days in advance.
- ✓Portion Controlled: Individual servings mean no slicing mess.
- ✓Kid-Approved: Little ones love the colors and the chocolate eggs.
- ✓Highly Customizable: Swap the crust or candy to suit your taste.
- ✓Visual Stunner: The layers look beautiful on any holiday table.
Equipment You’ll Need
- ✓Electric Hand Mixer or Stand Mixer
- ✓6 Small Mason Jars or Glass Tumblers (8oz size)
- ✓Large Mixing Bowl
- ✓Ziploc Bag and Rolling Pin (for crushing cookies)
- ✓Piping Bags (or large freezer bags with corner snipped)
- ✓Rubber Spatula
Ingredients
- ✓1 1/2 cups Graham Cracker crumbs (approx. 10-12 full sheets)
- ✓6 tablespoons Unsalted Butter, melted
- ✓16 oz (2 blocks) Cream Cheese, softened to room temperature
- ✓1 cup Heavy Whipping Cream, cold
- ✓1 cup Powdered Sugar, sifted
- ✓1 teaspoon Pure Vanilla Extract
- ✓1 teaspoon Lemon Juice (optional, for tang)
- ✓1 1/2 cups Cadbury Mini Eggs (or similar pastel chocolate eggs), roughly crushed
- ✓Pastel Food Coloring (Pink, Blue, Purple) – optional
- ✓Whipped Cream and extra whole eggs for garnish
Instructions
- Prepare the Crust: Place your graham crackers in a large Ziploc bag and crush them into fine crumbs using a rolling pin. Pour crumbs into a bowl and mix with the melted butter until the texture resembles wet sand.
- Press the Base: Spoon about 2-3 tablespoons of the crumb mixture into the bottom of each jar. Use a muddler or the back of a spoon to press it down firmly to create a solid crust. Set jars aside.
- Whip the Cream: In a medium bowl, whip the cold heavy cream until stiff peaks form. Be careful not to over-whip into butter! Set this aside in the fridge.
- Make the Filling: In a large mixing bowl, beat the softened cream cheese until it is completely smooth and creamy. There should be no lumps. Add the powdered sugar, vanilla extract, and lemon juice. Beat again until light and fluffy.
- Combine: Gently fold the whipped cream into the cream cheese mixture using a rubber spatula. Use a ‘cut and fold’ motion to keep the mixture airy. Do not stir vigorously.
- Add the Crunch: Gently fold in about 1 cup of the crushed Easter eggs. Reserve the rest for topping.
- Color (Optional): If you want colored layers, divide the batter into separate bowls and gently stir in a drop of pastel food coloring into each.
- Assemble: Transfer the cheesecake filling into a piping bag. Pipe the filling into the jars over the crust. If doing layers, pipe one color, add a sprinkle of crumbs or crushed eggs, and then pipe the next color.
- Chill: Refrigerate the jars for at least 2 hours to allow the filling to set and the flavors to meld.
- Garnish and Serve: Just before serving, top with a dollop of fresh whipped cream and the remaining whole or crushed Easter eggs.
Expert Cooking Tips
- ✓Room Temperature is Key: Ensure your cream cheese is completely at room temperature before mixing. If it is cold, you will end up with lumpy cheesecake, and nobody wants that!
- ✓Crushing the Eggs: When crushing the chocolate eggs, place them in a bag and whack them gently with a rolling pin or heavy pan. You want big chunks, not dust.
- ✓Clean Layers: If you smear filling on the side of the glass while piping, wipe it with a damp paper towel wrapped around your finger before adding the next layer for a professional look.
- ✓Salted Butter: If you love a sweet and salty combo, swap the unsalted butter in the crust for salted butter. It highlights the chocolate flavor beautifully.
Substitutions and Variations
This recipe is incredibly versatile! Here are some easy swaps:
- Cookie Base: Not a fan of graham crackers? Use crushed Oreos (for a dirt cake vibe), Nilla Wafers, or even Biscoff cookies for a spiced touch.
- Lighter Version: You can use light cream cheese and a whipped topping (like Cool Whip) instead of heavy cream to reduce the calories slightly, though the texture will be less rich.
- Gluten-Free: Simply use gluten-free graham crackers or gluten-free ginger snaps for the base. The filling is naturally gluten-free.
- Candy Variations: If chocolate eggs aren’t your thing, try chopped Reese’s Peanut Butter Eggs, pastel M&Ms, or even chopped Peeps for a marshmallow twist.
Common Mistakes to Avoid
Even though this is a simple recipe, there are a few pitfalls to avoid:
- Overmixing the Cream: Once you add the whipped cream to the cheese mixture, be gentle. If you mix too hard, you will knock the air out, and the filling will be heavy and runny instead of mousse-like.
- Using Tub Cream Cheese: Always use the brick-style cream cheese. The spreadable kind in tubs has a higher water content and won’t set properly, leading to soupy jars.
- Rushing the Chill: It is tempting to eat them right away, but that 2-hour chill time is crucial for the texture to firm up. If you skip it, it will feel more like pudding than cheesecake.
Serving Suggestions
These jars are stunning on their own, but you can dress them up for a party! Tie a rustic twine or a pastel satin ribbon around the neck of each jar with a cute spoon tucked in. Serve them alongside a fresh fruit platter to balance the richness. For an adult brunch, these pair wonderfully with a crisp sparkling wine or a light Moscato.
Storage and Reheating Tips
Refrigerator: These jars can be stored in the fridge for up to 3-4 days. Cover the tops with plastic wrap or the jar lids to keep them fresh.
Freezer: While you can freeze the cheesecake filling, the candy eggs might “bleed” their color or become too hard when frozen. It is best to enjoy these fresh from the fridge. If you must freeze them, do so without the candy topping, and add the eggs just before serving.
Nutrition Facts (Estimated)
| Serving Size | 1 Jar (approx 8oz) |
| Calories | 480 |
| Fat | 32g |
| Saturated Fat | 19g |
| Unsaturated Fat | 11g |
| Trans Fat | 0g |
| Cholesterol | 95mg |
| Sodium | 310mg |
| Carbohydrates | 45g |
| Fiber | 1g |
| Sugar | 38g |
| Protein | 6g |
Frequently Asked Questions
Can I make these ahead of time?
Absolutely! In fact, they are better if made a day in advance. This gives the crust time to soften slightly and the filling time to firm up perfectly.
Do I have to use jars?
No, you can use small clear plastic cups, wine glasses, or even small ramekins. Anything clear works best to show off the layers.
My filling is too runny, what happened?
You likely either overmixed the whipped cream or used a ‘spreadable’ cream cheese tub. Unfortunately, you can’t thicken it easily once mixed, but you can freeze it for a semi-frozen treat!
Can I use granulated sugar instead of powdered?
It is not recommended. Powdered sugar contains cornstarch which helps stabilize the filling, and it dissolves instantly without leaving a gritty texture.
Is this recipe safe for pregnant women?
Yes! Since there are no raw eggs in this recipe (unlike some traditional mousses), it is perfectly safe for everyone to enjoy.
How do I get the crumbs to stay at the bottom?
Packing them down firmly with a muddler or the back of a spoon is key. The melted butter acts as a glue once it chills.
Can I use low-fat cream cheese?
You can use Neufchâtel cheese (1/3 less fat), but avoid fat-free versions as they often contain stabilizers that result in a weird texture.
What size jars should I use?
8oz (half-pint) jars are standard, but 4oz jars are great for smaller, bite-sized portions for kids or large parties.
Conclusion
There you have it—the cutest, easiest, and most delicious treat to grace your Easter table this year. These Easter Egg Cheesecake Jars are sure to become a new family tradition. They offer all the decadence of a fancy bakery dessert with none of the stress. So grab your mixer, steal a few chocolate eggs for yourself (I won’t tell!), and whip up a batch of these creamy delights. Happy Easter and happy no-baking!