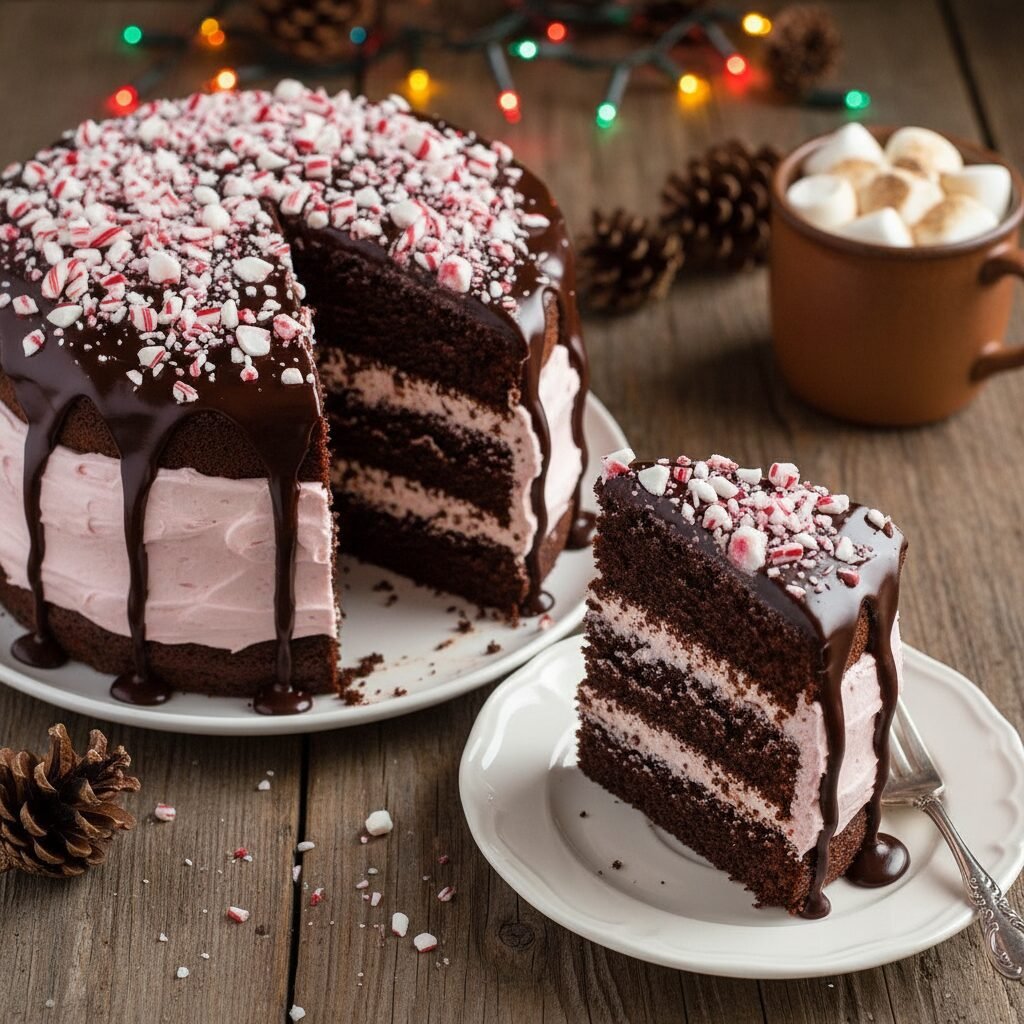
Chocolate Peppermint Layer Cake
Get ready to dazzle your holiday guests with this breathtaking Chocolate Peppermint Layer Cake! With layers of rich, fudgy chocolate cake and cool, creamy peppermint frosting, it tastes just like a cozy mug of hot cocoa in cake form.
45 minutes
35 minutes
2 hours 30 minutes
12-16 servings
Dessert
Baking
American
Vegetarian
Hey there, holiday bakers! Is there anything more nostalgic than the scent of peppermint and chocolate wafting through the kitchen during the winter months? I don’t think so! Every year, as soon as the first snowflake hits the ground, my kids are begging for something festive, and this Chocolate Peppermint Layer Cake is our absolute favorite tradition.
This isn’t just any cake; it is a celebration on a plate. We are talking about three towering layers of the moistest, darkest chocolate cake you have ever tasted, sandwiched between clouds of fluffy, pink peppermint buttercream. To top it all off, we drizzle a luxurious chocolate ganache down the sides and sprinkle it with crushed candy canes. It looks like it came straight out of a bakery window, but I promise you, it is totally achievable right in your own kitchen.
Whether you are hosting a big Christmas Eve dinner, looking for a showstopper for the office potluck, or just want to treat your family to a cozy weekend baking project, this cake delivers. It strikes that perfect balance of rich decadence and refreshing mint that keeps you coming back for just one more sliver. So, grab your apron and let’s make some holiday magic happen!
History & Origins
The marriage of chocolate and peppermint is a love story that dates back centuries. While chocolate has been enjoyed for thousands of years, starting with the Mayans and Aztecs, the addition of peppermint is a more recent European innovation. Peppermint itself is a hybrid mint, a cross between watermint and spearmint, which became popular in 18th-century England.
The iconic candy cane, which plays a starring role in this cake’s decoration, originated in Germany around the 17th century. Legend has it that a choirmaster in Cologne bent sugar sticks into the shape of a shepherd’s crook to keep children quiet during services! It wasn’t until the early 20th century that the red stripes and peppermint flavor became the standard we know and love today.
Combining the cooling sensation of peppermint oil with the rich, fatty mouthfeel of chocolate became a confectionery staple in the Victorian era. Today, it is the quintessential flavor profile of the American holiday season. This cake pays homage to that history, elevating humble candy shop flavors into an elegant dessert fit for a celebration.
Why This Recipe Works
You might be wondering, what makes this specific recipe foolproof? It all comes down to the science of moisture and flavor balance. First, we use a combination of oil and buttermilk in the batter. While butter adds flavor, oil is superior for keeping cakes moist for days because it remains liquid at room temperature. The acidity in the buttermilk reacts with the baking soda to create a tender, airy crumb.
Secondly, we employ the “blooming” technique. By adding hot coffee to the batter at the very end, we bloom the cocoa powder. This releases the flavor compounds in the cocoa, resulting in a deeper, more intense chocolate taste without making the cake bitter. Don’t worry, the cake won’t taste like coffee; it just tastes like better chocolate.
Finally, the frosting uses a classic American Buttercream base but with heavy cream whipped in for lightness. The peppermint extract cuts through the sweetness of the powdered sugar and the richness of the chocolate, providing a refreshing finish that cleanses the palate after every rich bite.
Why You’ll Love This Recipe
- ✓Incredibly moist chocolate sponge that stays fresh for days
- ✓Silky, fluffy peppermint buttercream that isn’t too sweet
- ✓Festive candy cane crunch for texture
- ✓Rich ganache drip for a bakery-style finish
- ✓Perfect for Christmas parties and holiday gifting
Equipment You’ll Need
- ✓Three 8-inch round cake pans
- ✓Stand mixer or electric hand mixer
- ✓Large mixing bowls
- ✓Wire cooling rack
- ✓Offset spatula
- ✓Bench scraper (for smooth sides)
- ✓Parchment paper
- ✓Squeeze bottle or spoon (for ganache drip)
Ingredients
- ✓For the Chocolate Cake:
- ✓2 cups granulated sugar
- ✓1 3/4 cups all-purpose flour
- ✓3/4 cup dark unsweetened cocoa powder
- ✓1 1/2 teaspoons baking powder
- ✓1 1/2 teaspoons baking soda
- ✓1 teaspoon salt
- ✓2 large eggs, room temperature
- ✓1 cup whole milk or buttermilk, room temperature
- ✓1/2 cup vegetable oil (or melted coconut oil)
- ✓2 teaspoons pure vanilla extract
- ✓1 cup boiling hot coffee (or boiling water)
- ✓For the Peppermint Buttercream:
- ✓1 1/2 cups (3 sticks) unsalted butter, softened
- ✓6-7 cups powdered sugar, sifted
- ✓1/4 cup heavy cream
- ✓1 1/2 teaspoons peppermint extract
- ✓1 teaspoon vanilla extract
- ✓Pinch of salt
- ✓Red gel food coloring (optional)
- ✓For the Ganache & Garnish:
- ✓1/2 cup semi-sweet chocolate chips
- ✓1/2 cup heavy cream
- ✓1/2 cup crushed candy canes or peppermint candies
Instructions
- Step 1: Prep the Oven and Pans. Preheat your oven to 350°F (175°C). Grease three 8-inch round cake pans with butter or cooking spray. I highly recommend lining the bottoms with parchment paper rounds and dusting the sides with cocoa powder to prevent sticking.
- Step 2: Mix Dry Ingredients. In the bowl of a stand mixer or a large bowl, whisk together the sugar, flour, cocoa powder, baking powder, baking soda, and salt. Make sure there are no large lumps of cocoa.
- Step 3: Add Wet Ingredients. Add the eggs, buttermilk, oil, and vanilla extract to the dry ingredients. Beat on medium speed for about 2 minutes. The batter will look thick at this stage.
- Step 4: The Hot Coffee. Reduce the mixer speed to the lowest setting. Carefully pour in the boiling hot coffee. Mix just until combined. The batter will be very thin and liquidy—this is exactly what you want! Do not panic.
- Step 5: Bake. Divide the batter evenly between the three prepared pans. Bake for 30-35 minutes, or until a wooden toothpick inserted into the center comes out clean or with just a few moist crumbs. Do not overbake!
- Step 6: Cool. Remove cakes from the oven and let them cool in the pans for about 10 minutes. Then, turn them out onto a wire rack to cool completely. They must be 100% cool before frosting, or your buttercream will melt.
- Step 7: Make the Buttercream. While the cakes cool, beat the softened butter in a stand mixer on medium-high speed until it is pale and creamy (about 5 minutes). Reduce speed to low and gradually add the powdered sugar, one cup at a time.
- Step 8: Flavor and Whip. Add the heavy cream, peppermint extract, vanilla, and salt. Increase speed to high and whip for another 3-5 minutes until light and airy. If you want pink frosting, add a drop of red gel coloring now.
- Step 9: Assemble. Place one cake layer on your serving stand. Spread a generous layer of buttercream on top. Repeat with the second layer. Place the third layer on top (bottom side up for a flat top). Frost the entire outside of the cake with a thin ‘crumb coat’ and chill for 20 minutes. Then, apply the final thick layer of frosting and smooth with an offset spatula.
- Step 10: The Ganache Drip. Place chocolate chips in a heat-proof bowl. Heat the 1/2 cup heavy cream until it just begins to simmer, then pour it over the chocolate. Let it sit for 5 minutes, then whisk until smooth. Let it cool slightly until it thickens a bit. Using a spoon or squeeze bottle, drip the ganache down the edges of the chilled cake and fill in the top.
- Step 11: Garnish. Immediately sprinkle the crushed candy canes over the wet ganache. Slice and enjoy!
Expert Cooking Tips
- ✓Room Temperature is Key: Ensure your eggs, buttermilk, and butter are at room temperature. This helps the batter emulsify properly, leading to a better rise and texture.
- ✓Quality Cocoa: Since chocolate is the main flavor, use a high-quality cocoa powder like Ghirardelli or Valrhona for the best depth of flavor.
- ✓Don’t Skip the Coffee: Even if you don’t like coffee, use it! It enhances the chocolate flavor significantly. If you absolutely must avoid caffeine, use decaf or boiling water.
- ✓Chill Before Dripping: Make sure your frosted cake is chilled for at least 20 minutes before adding the warm ganache. This prevents the warm chocolate from melting your beautiful buttercream work.
Substitutions and Variations
If you need to tweak this recipe for dietary needs or pantry shortages, here are some easy swaps. For a Gluten-Free version, swap the all-purpose flour for a high-quality 1:1 Gluten-Free Baking Flour blend (one that includes xanthan gum). To make this Dairy-Free, use unsweetened almond milk with a teaspoon of vinegar instead of buttermilk, and use plant-based butter sticks and coconut cream for the frosting.
If you don’t have buttermilk on hand, you can make a quick substitute by adding 1 tablespoon of white vinegar or lemon juice to a cup of regular milk and letting it sit for 5 minutes until it curdles.
Common Mistakes to Avoid
The most common mistake people make is overmixing the batter once the flour is added. Overmixing develops gluten, which leads to a tough, rubbery cake rather than a tender one. Mix until just combined!
Another frequent mishap is frosting a warm cake. I know it’s tempting to rush, but if the cake retains any heat, your butter-based frosting will slide right off, creating a sad, melty mess. Patience is a virtue in baking!
Lastly, be careful with peppermint extract. It is very potent. Measure carefully, because too much can make your beautiful cake taste like toothpaste.
Serving Suggestions
This cake is a star on its own, but you can elevate the experience even further. Serve a slice with a steaming mug of hot cocoa or a peppermint mocha latte for the ultimate cozy vibe. If you want to cut the richness, a scoop of high-quality vanilla bean ice cream or a dollop of unsweetened whipped cream on the side is perfection. For a holiday party, serve it on a white platter garnished with fresh mint leaves and whole candy canes for a festive display.
Storage and Reheating Tips
Because of the buttercream and ganache, this cake is best stored in an airtight cake container. It can stay at room temperature for up to 2 days (unless your kitchen is very hot). For longer storage, keep it in the refrigerator for up to 5 days. Just remember to let the slices come to room temperature before eating—cold buttercream has a waxy texture and the chocolate flavor is muted when cold.
You can also freeze the cake layers (unfrosted) for up to 3 months. Wrap them tightly in plastic wrap and then foil. Thaw them in the fridge overnight before decorating.
Nutrition Facts (Estimated)
| Serving Size | 1 slice |
| Calories | 650 |
| Fat | 34g |
| Saturated Fat | 18g |
| Unsaturated Fat | 14g |
| Trans Fat | 0g |
| Cholesterol | 85mg |
| Sodium | 320mg |
| Carbohydrates | 82g |
| Fiber | 4g |
| Sugar | 55g |
| Protein | 6g |
Frequently Asked Questions
Can I make this cake ahead of time?
Absolutely! You can bake the layers up to 2 days in advance. Wrap them tightly in plastic wrap and store them at room temperature or in the fridge. You can also make the buttercream a week ahead and store it in the fridge; just re-whip it before using.
Why did my cake sink in the middle?
This usually happens if the oven door was opened too early, causing a sudden temperature drop, or if there was too much leavening (baking powder/soda). Avoid opening the oven until at least 25 minutes have passed.
Can I use fresh mint instead of extract?
For the frosting, I don’t recommend fresh mint leaves as they can turn brown and alter the texture. Extract provides that clean, crisp candy cane flavor we are looking for.
My ganache is too runny, what do I do?
If your ganache is too thin, let it sit at room temperature for another 10-15 minutes. As it cools, it will thicken up. If it’s still too runny, you can melt a few more chocolate chips and whisk them in.
Can I use 9-inch pans instead?
Yes, you can use two 9-inch pans instead of three 8-inch pans. The baking time might need to be increased by 5-10 minutes. Just keep an eye on them!
Do I have to use the coffee?
You don’t have to, but I strongly encourage it! If you skip it, simply replace the hot coffee with boiling water. The cake will still be delicious, just slightly less intense in chocolate flavor.
How do I get my frosting so smooth?
A bench scraper is the secret tool! Also, running your metal spatula under hot water and drying it off before the final swipe can help melt the outer layer of butter just enough to create a glass-like finish.
Can I make these into cupcakes?
Yes! This recipe will make about 24-30 standard cupcakes. Bake them for 18-22 minutes at 350°F.
Conclusion
There you have it, friends! The only recipe you will ever need for a Chocolate Peppermint Layer Cake. I hope this cake brings as much joy to your kitchen as it does to mine. It is messy, it is sweet, and it is absolutely wonderful—just like the best holiday memories.
If you try this recipe, please snap a photo and tag me! I love seeing your beautiful creations. Happy baking, and may your holidays be filled with peace, love, and lots of chocolate!