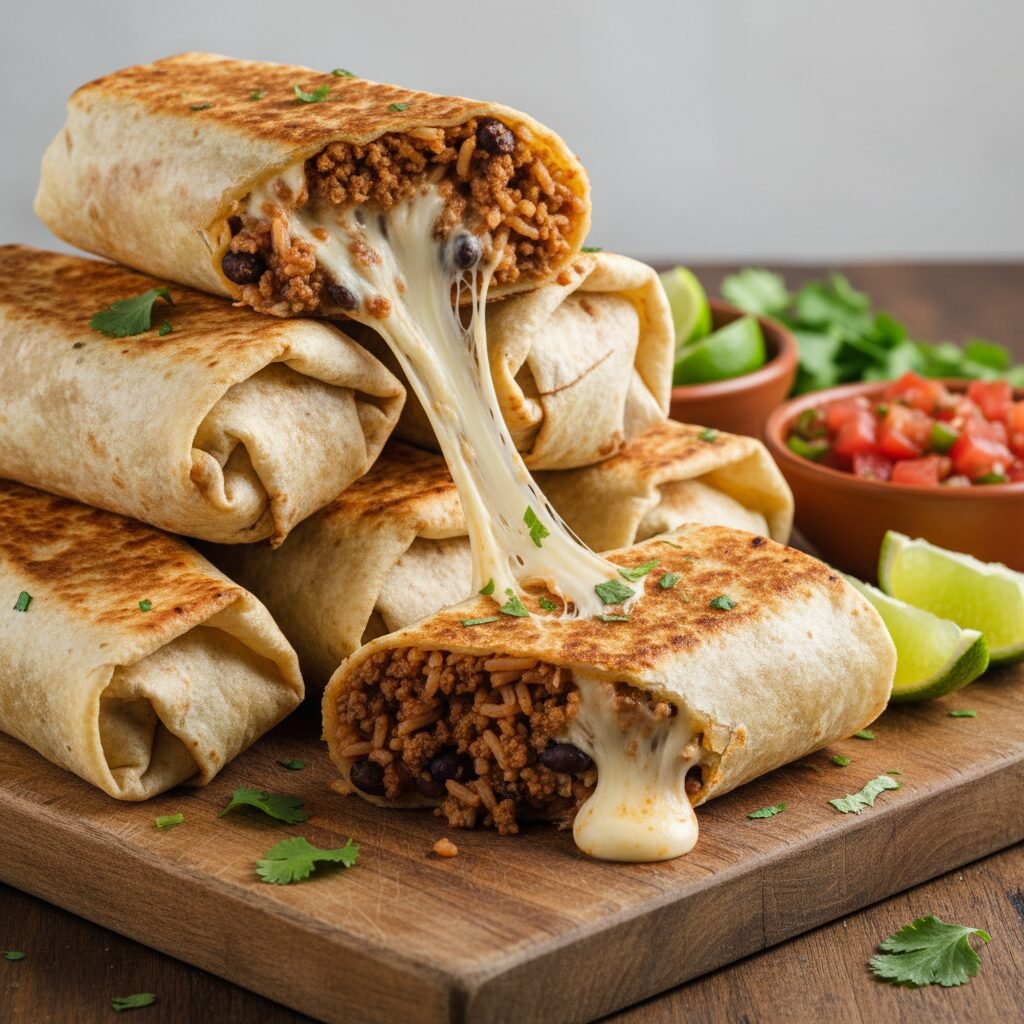
Cheesy Beef Burritos
If you are looking for a dinner win that gets the whole family running to the table, this is it! These cheesy beef burritos are hearty, comforting, and surprisingly easy to throw together on a busy Tuesday night.
15 minutes
20 minutes
35 minutes
6 Large Burritos
Main Course
Stovetop
Mexican-American
Omnivore
Let’s be real for a second, mamas: finding a meal that everyone agrees on—from the picky toddlers to the hungry teenagers and the ‘I’m fine with whatever’ husbands—is like finding a unicorn. But today, I am handing you that unicorn on a silver platter (or rather, a warm flour tortilla). These Cheesy Beef Burritos are absolutely going to change your weeknight dinner game.
We are talking about juicy, perfectly seasoned ground beef, savory beans, fluffy rice, and an unapologetic amount of melted cheese, all wrapped up in a soft, toasted tortilla. It is comfort food at its finest. I started making these years ago when I needed a ‘copycat’ recipe to stop our late-night fast-food runs, and honestly? These are a million times better. You know exactly what is going into them, you can control the sodium, and you can sneak in veggies if you are feeling sneaky!
The best part is that these are the ultimate meal prep champions. I usually make a double batch on Sunday, freeze half, and boom—instant lunch or dinner for those chaotic days when cooking feels impossible. Grab your skillet, and let’s get rolling!
History & Origins
While we often associate the massive, rice-and-bean-stuffed burrito with places like San Francisco’s Mission District, the humble origins of the burrito trace back to Northern Mexico. In the state of Sonora, the burrito (which translates to ‘little donkey’) was likely a practical way for vaqueros (cowboys) and workers to transport their lunch.
The legend goes that a man named Juan Méndez used a donkey to carry food to people during the Mexican Revolution, wrapping the food in large homemade flour tortillas to keep it warm. The ‘food of the little donkey’ eventually just became the ‘burrito.’ While authentic Mexican burritos are usually quite slender containing only meat and maybe beans, the version we know and love in the US—stuffed to the brim with rice, cheese, salsa, and sour cream—is a beautiful evolution of Tex-Mex and Mission-style cuisine that prioritizes heartiness and flavor variety in every bite.
Why This Recipe Works
This recipe hits the trifecta of culinary satisfaction: texture, temperature, and flavor balance. First, we use a mix of ground beef and refried beans. The beans act as a binder, keeping the meat moist and preventing that dry, crumbly texture you sometimes get with homemade tacos.
Secondly, we don’t just roll them; we toast them. By searing the finished burrito in a hot skillet, we create a crispy exterior shell that contrasts beautifully with the gooey, cheesy interior. This step also seals the seam, ensuring your burrito doesn’t explode while you’re eating it. Finally, the combination of cumin, chili powder, and garlic in the seasoning cuts through the richness of the cheese and sour cream, creating a perfectly balanced bite that keeps you coming back for more.
Why You’ll Love This Recipe
- ✓Ready in under 40 minutes
- ✓Freezer-friendly for easy meal prep
- ✓Kid-approved and customizable
- ✓Better than Taco Bell
- ✓Budget-friendly ingredients
- ✓Crispy toasted exterior
Equipment You’ll Need
- ✓Large Skillet or Sauté Pan
- ✓Spatula
- ✓Measuring Cups and Spoons
- ✓Cheese Grater (freshly grated melts best!)
- ✓Aluminum Foil (for storage)
Ingredients
- ✓1 lb Lean Ground Beef (85/15 is perfect)
- ✓1 packet Taco Seasoning (or 2 tbsp homemade blend)
- ✓1/3 cup Water
- ✓1 can (16 oz) Refried Beans
- ✓1 cup Mexican Rice (cooked)
- ✓2 cups Cheddar or Monterey Jack Cheese, shredded
- ✓6 Large Flour Tortillas (Burrito size)
- ✓1/2 cup Sour Cream (optional)
- ✓1/2 cup Salsa or Pico de Gallo
- ✓1 tbsp Vegetable Oil or Butter (for toasting)
Instructions
- Cook the Beef: In a large skillet over medium-high heat, brown the ground beef. Break it up with a wooden spoon as it cooks. Once fully browned, drain the excess grease.
- Season the Meat: Add the taco seasoning and water to the beef. Simmer for 3-5 minutes until the sauce thickens and coats the meat. Stir in half of the refried beans directly into the meat mixture—this is my secret trick to keep the filling together!
- Prep the Tortillas: This is crucial! Microwave your tortillas for 20-30 seconds or warm them in a dry pan. Cold tortillas will crack when you try to roll them.
- Assemble the Layer: Lay a warm tortilla flat. Spread a spoonful of the remaining plain refried beans in the center. Top with a scoop of Mexican rice, a generous portion of the cheesy beef mixture, and a handful of shredded cheese.
- Add Fresh Elements: If you are serving immediately, add a dollop of sour cream and salsa now. (Skip this if freezing).
- The Roll: Fold the sides of the tortilla in over the filling. Then, bring the bottom flap up and over the filling, tucking it tightly as you roll away from you until sealed.
- The Sear (Don’t skip this!): Wipe out your skillet and add a little oil or butter over medium heat. Place the burritos seam-side down in the pan. Cook for 2-3 minutes per side until golden brown and crispy. This seals the burrito and melts the cheese inside.
Expert Cooking Tips
- ✓Grate your own cheese: Pre-shredded cheese has anti-caking agents that prevent it from melting perfectly. A block of sharp cheddar makes a huge difference.
- ✓Don’t overfill: It is tempting to stuff them, but if you overfill, they will burst during the searing process. Keep the filling to the center.
- ✓Warm the tortillas: I cannot stress this enough! A cold tortilla is a brittle tortilla. 20 seconds in the microwave creates steam and makes them pliable.
- ✓The Seam-Side Down Rule: Always start searing with the seam side down. The heat effectively ‘welds’ the tortilla shut so it doesn’t unroll.
Substitutions and Variations
Cooking is all about flexibility, right? Here are some easy swaps:
- Meat: Swap ground beef for ground turkey or chicken for a lighter option. You can even use lentils or walnut meat for a vegetarian twist.
- Beans: Not a fan of refried beans? Use whole black beans or pinto beans (drained and rinsed).
- Cheese: Pepper Jack adds a nice kick, or use Queso Quesadilla for superior meltability.
- Tortillas: Low-carb tortillas work, but watch the heat as they burn faster than traditional flour ones.
Common Mistakes to Avoid
The biggest mistake people make is rolling cold tortillas. This leads to cracks and leaks. Another common issue is soggy burritos. This happens if your beef mixture is too wet or if you add too much liquid salsa before freezing. Ensure your meat sauce is thick and reduced before assembling. Lastly, don’t skip the searing step! A pale, soft burrito just doesn’t have that satisfying crunch or structural integrity.
Serving Suggestions
These burritos are a meal in themselves, but if you want a full fiesta feast, serve them with a side of Mexican Street Corn (Elote) or some chips and homemade Guacamole. I also love drizzling them with a spicy queso sauce or green enchilada sauce if we are eating them ‘wet’ style with a fork and knife.
Storage and Reheating Tips
Fridge: Wrap tightly in foil or plastic wrap and store for up to 3-4 days. Reheat in the microwave or oven.
Freezer (The Mom Hack): Wrap individual cooled burritos in foil, then place them in a heavy-duty freezer bag. They last for up to 3 months. To reheat, unwrap and microwave for 2-3 minutes, flipping halfway through, or bake at 350°F for 20 minutes.
Nutrition Facts (Estimated)
| Serving Size | 1 Burrito |
| Calories | 580 |
| Fat | 28g |
| Saturated Fat | 12g |
| Unsaturated Fat | 14g |
| Trans Fat | 1g |
| Cholesterol | 85mg |
| Sodium | 980mg |
| Carbohydrates | 55g |
| Fiber | 6g |
| Sugar | 3g |
| Protein | 26g |
Frequently Asked Questions
Can I make these ahead of time?
Absolutely! These are perfect for meal prep. You can assemble them completely, wrap them in foil, and keep them in the fridge for 3 days or freeze them for months.
How do I stop my burrito from falling apart?
The key is warming the tortilla before rolling so it stretches, tucking the sides in tight, and searing the burrito seam-side down to seal it shut.
Can I bake these instead of pan-frying?
Yes! Place them seam-side down in a baking dish, brush with a little oil or melted butter, and bake at 400°F for about 15-20 minutes until golden.
Is this spicy?
Not usually. Standard taco seasoning is mild. If you want heat, add diced jalapeños, cayenne pepper, or hot sauce to the beef mixture.
Can I use corn tortillas?
I wouldn’t recommend it for burritos. Corn tortillas are smaller and much more fragile; they are better suited for tacos or enchiladas.
What kind of rice should I use?
I prefer Spanish or Mexican-style rice (red rice) for flavor, but plain white rice with some cilantro and lime juice mixed in works great too.
Why are my burritos soggy after freezing?
Make sure all your ingredients (meat, rice, beans) have cooled to room temperature before rolling. Steam trapped inside the foil turns into water, which makes the tortilla soggy.
Can I add veggies?
Please do! Diced bell peppers, onions, zucchini, or corn can be sautéed right along with the beef for extra nutrition.
Conclusion
There you have it, friends! The Cheesy Beef Burrito recipe that is going to save your sanity on busy weeknights. It is warm, cheesy, filling, and undeniably delicious. Whether you are making them fresh for dinner or stocking your freezer for future emergencies, this recipe is a keeper. Don’t forget to tag me on Pinterest or Instagram if you make them—I love seeing your creations! Happy cooking!