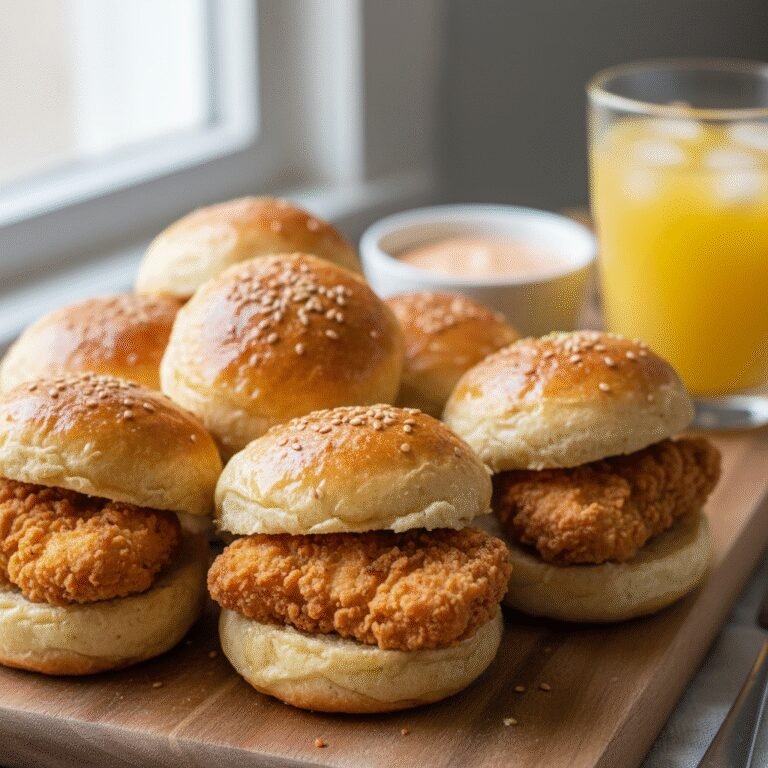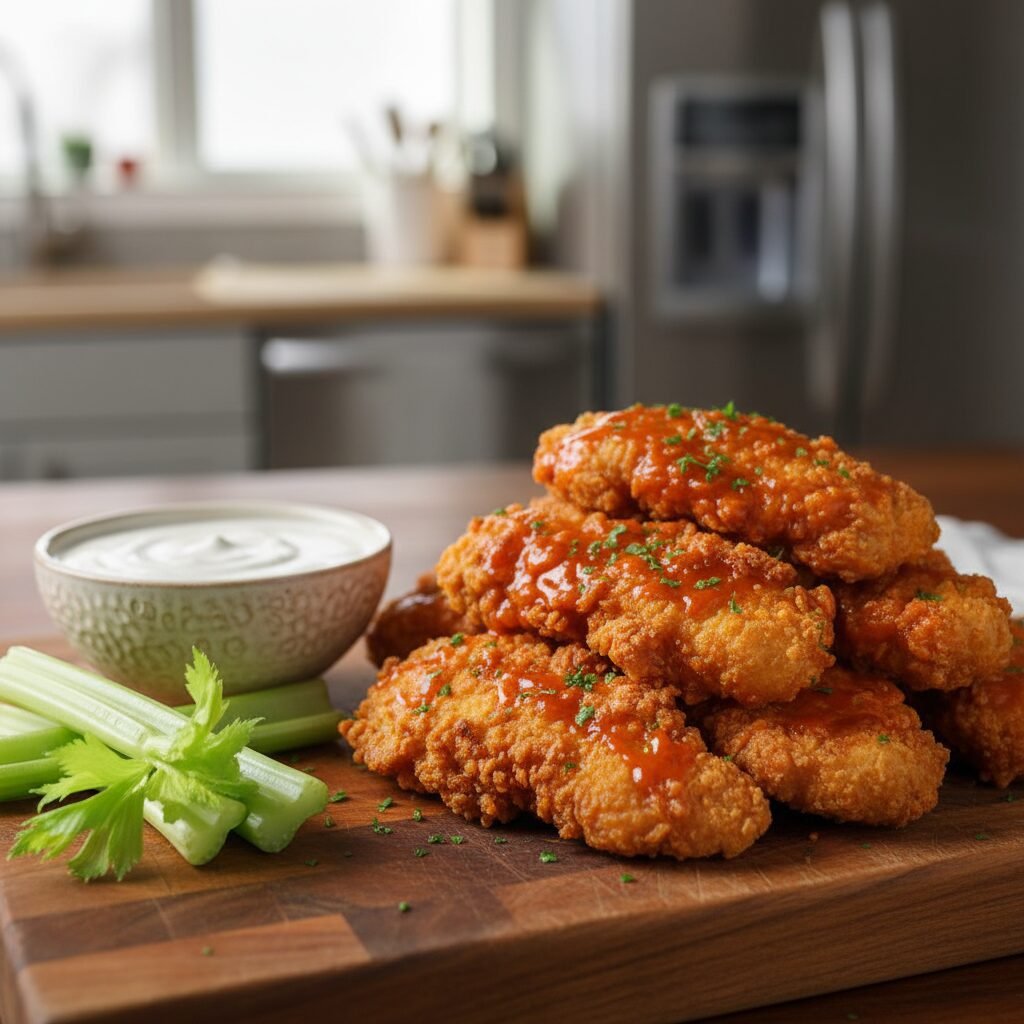
Buffalo Chicken Tenders
Craving that signature spicy kick without the deep fryer mess? These Buffalo Chicken Tenders deliver the perfect crunch and heat, paired with a cooling dip that the whole family will love.
20 minutes
20 minutes
40 minutes
4 Servings
Main Course
Baking
American
Low Carb
There is something undeniably comforting about the combination of crispy breading, tender chicken, and the tangy heat of buffalo sauce. For many of us, Buffalo Chicken Tenders are a staple of casual dining and game day spreads, evoking memories of lively weekends and shared platters. However, recreating that restaurant-quality crunch at home—without the hassle and health concerns of deep-frying—can often feel like a culinary challenge. This recipe bridges that gap, offering a professional-grade method to achieve golden, crispy tenders right in your oven.
Designed for the busy mother who refuses to compromise on flavor, this dish balances the fiery zest of traditional Buffalo sauce with the wholesome nature of home-cooked ingredients. By utilizing a specific breading technique and a high-heat baking method, we ensure the chicken remains juicy on the inside while the exterior shatters with every bite. It is a versatile meal that transitions effortlessly from a fun appetizer for guests to a hearty main course for a Tuesday night dinner.
Furthermore, making these tenders from scratch allows you complete control over the spice level and the quality of ingredients. Gone are the processed frozen strips of the past; in their place is fresh, high-quality poultry coated in a homemade spice blend. Whether you are serving a crowd of hungry football fans or looking for a way to spice up your weekly meal rotation, these Buffalo Chicken Tenders are guaranteed to become a requested favorite in your household.
History & Origins
The story of Buffalo Chicken Tenders is a fascinating convergence of two distinct culinary inventions: the Buffalo wing and the chicken tender. The origin of the Buffalo wing is widely attributed to Teressa Bellissimo of the Anchor Bar in Buffalo, New York. Legend has it that in 1964, faced with a surplus of chicken wings and a hungry group of her son’s friends, she deep-fried the wings and tossed them in a mixture of hot sauce and butter, serving them alongside celery and blue cheese dressing. This happy accident sparked a global phenomenon, cementing the flavor profile of cayenne pepper and vinegar as a staple of American cuisine.
Parallel to this, the invention of the chicken tender (or chicken finger) is often claimed by the Puritan Backroom in Manchester, New Hampshire. In 1974, they began serving strips of chicken breast meat, battered and fried, distinguishing them from the bone-in wing. The marriage of these two concepts—the boneless convenience of the tender and the iconic sauce of the wing—was inevitable. It provided a cleaner, more substantial eating experience while retaining the beloved flavors of the original Buffalo wing. Today, this hybrid dish is a ubiquitous item on menus across North America, celebrated for its bold flavor and ease of eating.
Why This Recipe Works
The success of this recipe lies in the science of texture and flavor balance. First, we address the chicken itself. By using chicken tenderloins or sliced breast meat, we ensure a lean protein base. However, lean meat can dry out quickly. To combat this, we often employ a brief marinade in buttermilk. The lactic acid and calcium in the buttermilk work to break down the protein structures in the chicken, resulting in a significantly more tender bite.
For the coating, we utilize a three-step dredging process: flour, egg wash, and Panko breadcrumbs. The initial flour layer adheres to the moist chicken, creating a dry surface for the egg to cling to. The egg then acts as the glue for the Panko. Unlike traditional breadcrumbs, Panko flakes are larger and airier, which absorb less oil and crisp up more effectively in the oven, simulating the texture of fried food.
Finally, the sauce is an emulsion of hot sauce (typically a cayenne-vinegar base like Frank’s RedHot) and melted butter. The butter is crucial; it not only mellows the sharp acidity and heat of the vinegar and peppers but also adds a velvety richness that coats the tenders evenly. When the hot tenders are tossed in this emulsion, the breading absorbs just enough sauce to be flavorful without immediately becoming soggy, provided they are served promptly.
Why You’ll Love This Recipe
- ✓Oven-baked for a healthier, mess-free alternative to frying
- ✓Uses Panko breadcrumbs for superior crunch and texture
- ✓Customizable heat levels suitable for various family preferences
- ✓High-protein meal that pairs perfectly with fresh vegetables
- ✓Ready in under 45 minutes for quick weeknight cooking
Equipment You’ll Need
- ✓Large baking sheet
- ✓Wire cooling rack (oven safe)
- ✓Three shallow bowls for dredging
- ✓Whisk
- ✓Small saucepan
- ✓Tongs
- ✓Chef’s knife
- ✓Cutting board
Ingredients
- ✓1.5 lbs Chicken Tenderloins (tendon removed) or chicken breasts sliced into strips
- ✓1 cup Buttermilk (low-fat or regular)
- ✓1 cup All-Purpose Flour
- ✓2 large Eggs, beaten
- ✓2 cups Panko Breadcrumbs
- ✓1 tsp Garlic Powder
- ✓1 tsp Onion Powder
- ✓1/2 tsp Smoked Paprika
- ✓1/2 tsp Salt
- ✓1/2 tsp Black Pepper
- ✓1/2 cup Frank’s RedHot Sauce (or preferred cayenne pepper sauce)
- ✓4 tbsp Unsalted Butter, melted
- ✓1/2 tsp Worcestershire Sauce (optional for depth)
- ✓Cooking spray (olive oil or avocado oil based)
Instructions
- Prepare the Chicken: If using whole chicken breasts, slice them into 1-inch wide strips. If using tenderloins, remove the white tendon for a better texture. Place the chicken in a bowl and pour the buttermilk over it. Let it soak for 15-20 minutes while you prep the oven and ingredients. This step ensures tenderness.
- Preheat and Prep: Preheat your oven to 400°F (200°C). Line a large baking sheet with foil or parchment paper for easy cleanup, and place a wire rack on top. Spray the wire rack generously with cooking spray to prevent sticking.
- Set Up Dredging Station: Arrange three shallow bowls. In the first bowl, whisk together the flour, salt, pepper, garlic powder, onion powder, and smoked paprika. In the second bowl, beat the two eggs. In the third bowl, place the Panko breadcrumbs.
- Coat the Chicken: Remove a piece of chicken from the buttermilk, allowing excess to drip off. Dredge it first in the seasoned flour, shaking off excess. Dip it into the egg wash ensuring it is fully coated. Finally, press it firmly into the Panko breadcrumbs to ensure a thick, even crust. Place the breaded tender on the prepared wire rack.
- Bake: Repeat with all chicken strips, arranging them on the wire rack so they do not touch. Lightly spray the tops of the tenders with cooking spray. Bake for 10 minutes, then flip the tenders carefully, spray the other side, and bake for another 8-10 minutes until golden brown and cooked through (internal temperature of 165°F/74°C).
- Make the Sauce: While the chicken bakes, combine the hot sauce, melted butter, and Worcestershire sauce in a small bowl or saucepan. Whisk until the mixture is smooth and emulsified.
- Sauce and Serve: Once the chicken is done, transfer the hot tenders to a large mixing bowl. Pour the buffalo sauce over the tenders and toss gently to coat. Alternatively, serve the sauce on the side for dipping to maintain maximum crispiness. Serve immediately with celery sticks and ranch or blue cheese dressing.
Expert Cooking Tips
- ✓Use a Wire Rack: This is the most critical tip for baked tenders. Elevating the chicken allows hot air to circulate underneath, preventing the bottom from becoming soggy.
- ✓Toast the Panko: For an even deeper golden color, you can pre-toast your Panko breadcrumbs in a dry skillet for 2-3 minutes before using them for breading.
- ✓Don’t Overcrowd: Ensure there is space between each tender on the rack. Overcrowding creates steam, which is the enemy of crispiness.
- ✓Dry the Chicken: Before the buttermilk soak, pat the chicken dry. This helps the marinade work better, and subsequently helps the flour adhere properly during the dredging process.
Substitutions and Variations
For those with dietary restrictions or specific pantry limitations, this recipe is highly adaptable. To make this dish Gluten-Free, simply swap the all-purpose flour for a 1:1 gluten-free flour blend and use gluten-free Panko or crushed cornflakes. If you are Dairy-Free, you can create a buttermilk substitute by adding a tablespoon of lemon juice or vinegar to almond milk, and use a plant-based butter alternative for the sauce. For a Lower Carb version, almond flour can replace the all-purpose flour, and crushed pork rinds can be an excellent substitute for Panko breadcrumbs.
Common Mistakes to Avoid
The most common mistake when making oven-baked tenders is sogginess. This usually happens if the oven temperature is too low or if the chicken is placed directly on the baking sheet without a rack. Another frequent error is over-saucing. If the tenders are swimming in sauce, the breading will dissolve quickly. It is best to toss them lightly right before serving or serve the sauce on the side. Finally, ensure you do not overcook the chicken; tenderloins are thin and can dry out if left in the oven too long. Trust your meat thermometer.
Serving Suggestions
Presentation is key for an appetizing family meal. Serve these Buffalo Chicken Tenders on a rustic wooden board or a large white platter to make the vibrant orange color pop. Accompaniments are traditional for a reason: cool, crisp celery and carrot sticks provide a necessary textural contrast and help cleanse the palate from the heat. A high-quality Blue Cheese or Ranch dressing is non-negotiable for dipping. For a complete dinner, pair these with seasoned sweet potato fries, a crisp coleslaw, or a large Caesar salad to balance the meal.
Storage and Reheating Tips
These tenders are best enjoyed fresh, but leftovers can be stored in an airtight container in the refrigerator for up to 3 days. Do not microwave leftovers, as this will result in rubbery chicken and mushy breading. To reheat, place the tenders back on a wire rack in a 350°F (175°C) oven or an air fryer for 5-8 minutes until they are heated through and the exterior has crisped up again. If you plan to freeze them, do so before adding the sauce. Freeze the baked tenders in a single layer, then transfer to a freezer bag; reheat from frozen in the oven.
Nutrition Facts (Estimated)
| Serving Size | 3 Tenders |
| Calories | 385 kcal |
| Fat | 18g |
| Saturated Fat | 9g |
| Unsaturated Fat | 8g |
| Trans Fat | 0g |
| Cholesterol | 145mg |
| Sodium | 1250mg |
| Carbohydrates | 22g |
| Fiber | 1g |
| Sugar | 1g |
| Protein | 34g |
Frequently Asked Questions
Can I make these in an Air Fryer?
Absolutely. Preheat your air fryer to 400°F (200°C). Spray the basket and the tenders with oil. Cook for 10-12 minutes, flipping halfway through, until crispy and 165°F internally.
How can I make this less spicy for kids?
You can reduce the amount of hot sauce in the butter mixture, or simply leave a portion of the tenders plain (unsauced) for the children. A honey-butter glaze is a great kid-friendly alternative.
Why is my breading falling off?
Breading usually falls off because the chicken was too wet before the flour step, or the flour layer was too thick and didn’t absorb the egg. Shake off excess flour thoroughly before the egg wash.
Can I use frozen chicken?
You must fully thaw the chicken before starting this recipe. Breading frozen chicken will result in uneven cooking and a soggy crust.
What is the best hot sauce to use?
Frank’s RedHot Original Cayenne Pepper Sauce is the industry standard for authentic Buffalo flavor. However, Crystal or Texas Pete are also excellent choices.
Can I prep these ahead of time?
You can bread the chicken and place it on the rack in the fridge for up to 4 hours before baking. This resting period can actually help the breading adhere better.
Do I have to use tenderloins?
No, you can use boneless, skinless chicken breasts cut into 1-inch strips. Just keep the pieces uniform in size for even cooking.
Is the buttermilk necessary?
While not strictly mandatory, buttermilk acts as a tenderizer. If you skip it, just dip the dried chicken directly into the flour, but the end result may be slightly less juicy.
Conclusion
Mastering these Buffalo Chicken Tenders gives you a powerful tool in your culinary arsenal: a dish that feels indulgent and restaurant-worthy but is wholesome enough for a regular weeknight rotation. By baking instead of frying, you save on cleanup and calories without sacrificing that essential crunch. Whether you are gathering around the TV for the big game or sitting down for a family dinner, this recipe brings warmth, flavor, and satisfaction to the table. Enjoy the process of creating something delicious from scratch, and watch these tenders disappear from the plate in record time.