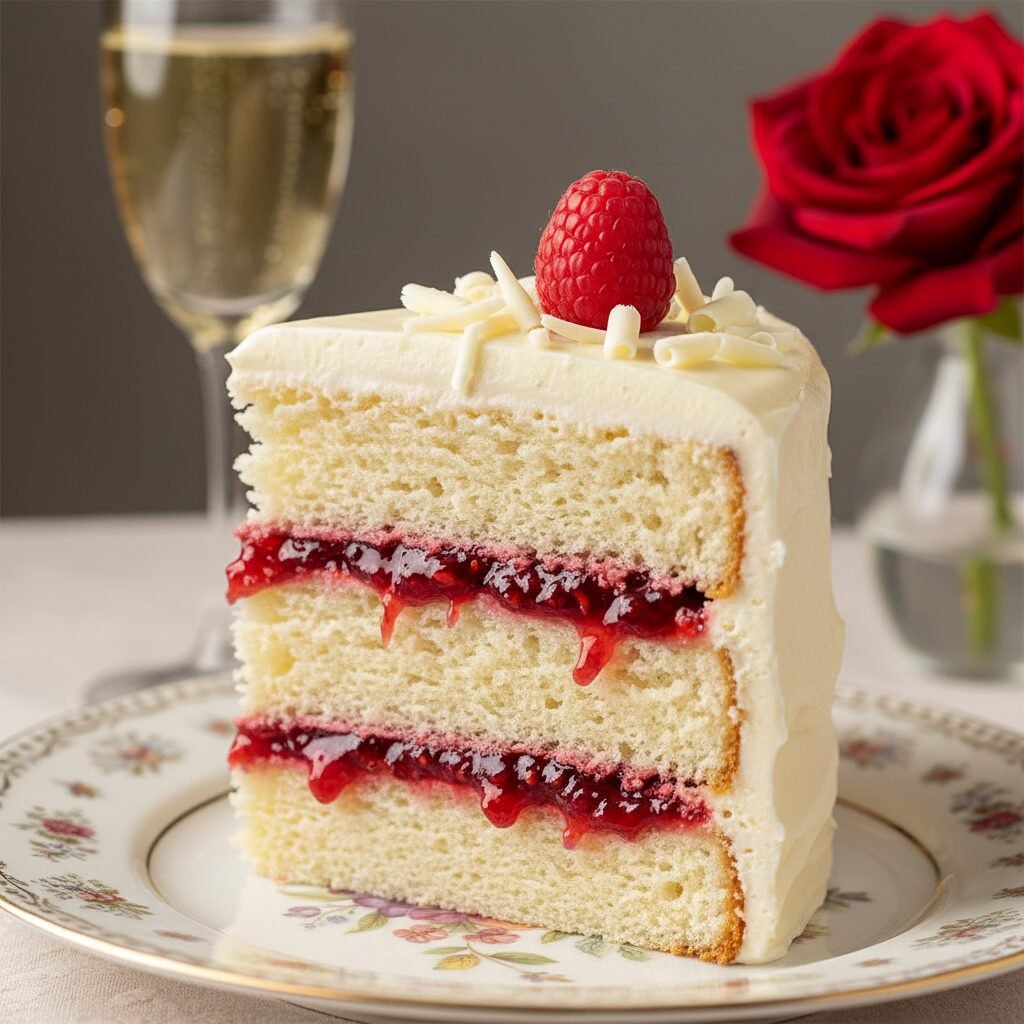
Anniversary Cake
Nothing says ‘I love you’ quite like a homemade masterpiece. This White Chocolate Raspberry Anniversary Cake combines fluffy vanilla layers with a tart berry filling and creamy white chocolate frosting for a dessert that tastes just as elegant as it looks.
45 minutes
35 minutes
2 hours 30 minutes (includes cooling)
12-14 servings
Dessert
Baking
American
Vegetarian
Happy Anniversary, friends! Whether you are celebrating one year of wedded bliss, a decade of partnership, or just a special date night that deserves a little extra sparkle, this cake is your new best friend. There is something incredibly intimate and special about baking a cake from scratch for the one you love. Sure, you could order something from a fancy bakery, but the time, effort, and love poured into a homemade cake is a gift in itself. It is a labor of love that says, ‘You are worth every sift of flour and every whisk of buttercream.’
This particular recipe was born out of a desire to recreate that ‘wedding cake’ magic without the stress of actually planning a wedding. We wanted something that felt sophisticated and high-end but was approachable enough for a home kitchen. The flavor profile is a classic romantic duo: white chocolate and raspberry. The sweetness of the creamy white chocolate is perfectly cut by the bright, zesty tartness of the raspberries, creating a balance that dances on the palate. It is rich, it is indulgent, and it is absolutely stunning when sliced.
Visually, this cake is a showstopper. The stark white frosting against the vibrant red filling makes for a dramatic reveal when you cut that first slice. It is the kind of cake that makes you want to dim the lights, light a few candles, and just savor the moment. So, put on your favorite romantic playlist, tie on your apron, and let’s bake something unforgettable.
History & Origins
The tradition of celebrating anniversaries with cake actually has roots in the wedding cake tradition. Historically, in the 19th century, fruitcakes were the standard for weddings because they preserved well. Couples would save the top tier of their wedding cake to eat on their first anniversary (or often, the christening of their first child). This ritual symbolized good luck and longevity for the marriage. As cakes evolved from dense fruitcakes to lighter sponges and butter cakes, the tradition of saving the top tier became a bit trickier (freezer burn is real!), leading many couples to simply bake a fresh, smaller version of their wedding cake flavor for their anniversary.
The specific pairing of white chocolate and raspberry gained massive popularity in the late 20th century as ‘New American’ cuisine began exploring more contrast in dessert flavors. White chocolate, technically a derivative of cocoa butter without the cocoa solids, offers a creamy, milky sweetness that can sometimes be overwhelming. Pastry chefs discovered that the natural acidity of raspberries was the perfect foil for this richness. This combination became a staple in bridal magazines and high-end patisseries in the 90s and has remained a symbol of romantic elegance ever since.
Why This Recipe Works
This recipe works because it relies on the principle of flavor contrasting and textural balance. White chocolate is notoriously sweet because it is primarily sugar and cocoa butter. If you pair it with a sweet filling (like vanilla custard), the dessert becomes cloying and one-dimensional. By introducing a raspberry reduction (coulis), we introduce sharp acidity and fruitiness. This acid cuts through the fat of the butter and the sweetness of the chocolate, cleansing the palate and making you want another bite.
Structurally, the cake layers use a ‘reverse creaming’ method (or a modified version thereof) where we ensure the butter coats the flour particles before the liquid is added. This inhibits gluten formation, resulting in a crumb that is velvety and tender rather than chewy—perfect for a delicate layer cake. We also use egg whites rather than whole eggs in the batter to keep the color purely pale and the texture light, allowing the vanilla bean paste to shine through without the richness of yolks interfering.
Why You’ll Love This Recipe
- ✓Perfect balance of sweet white chocolate and tart raspberry
- ✓Tender, bakery-style vanilla crumb
- ✓Stable buttercream that pipes beautifully
- ✓Looks professional but uses standard equipment
- ✓Can be made ahead in stages for stress-free baking
Equipment You’ll Need
- ✓Three 8-inch round cake pans
- ✓Stand mixer with paddle attachment
- ✓Rubber spatula
- ✓Small saucepan
- ✓Fine mesh sieve
- ✓Offset spatula
- ✓Cake turntable (optional)
- ✓Piping bag and tips
Ingredients
- ✓For the Cake Layers:
- ✓3 cups cake flour, sifted
- ✓2 1/2 cups granulated sugar
- ✓1 tablespoon baking powder
- ✓1/2 teaspoon salt
- ✓1 cup unsalted butter, room temperature, cut into cubes
- ✓1 cup whole milk, room temperature
- ✓1/2 cup vegetable oil
- ✓1 tablespoon vanilla bean paste (or pure vanilla extract)
- ✓6 large egg whites, room temperature
- ✓For the Raspberry Filling:
- ✓3 cups frozen raspberries (or fresh)
- ✓1/2 cup granulated sugar
- ✓2 tablespoons lemon juice
- ✓2 tablespoons cornstarch dissolved in 2 tablespoons water
- ✓For the White Chocolate Buttercream:
- ✓1 1/2 cups unsalted butter, slightly softened
- ✓6 ounces high-quality white chocolate, melted and cooled
- ✓4 cups powdered sugar
- ✓1/4 cup heavy cream
- ✓1 teaspoon vanilla extract
- ✓Pinch of salt
Instructions
- Prepare the Raspberry Filling: In a medium saucepan, combine raspberries, sugar, and lemon juice. Cook over medium heat until the berries break down (about 10 minutes). Stir in the cornstarch slurry and cook for another 2 minutes until thickened. Strain through a mesh sieve to remove seeds if desired. Let cool completely in the fridge.
- Prep for Baking: Preheat your oven to 350°F (175°C). Grease three 8-inch round cake pans, line the bottoms with parchment paper, and grease the paper. Dust with flour and tap out excess.
- Mix Dry Ingredients: In the bowl of a stand mixer fitted with the paddle attachment, mix the sifted cake flour, sugar, baking powder, and salt on low speed just to combine.
- Add Fats: Add the cubed room temperature butter one piece at a time while the mixer is running on low. Mix until the mixture resembles coarse sand.
- Add Liquids: In a separate jug, whisk together the milk, oil, and vanilla bean paste. Pour this into the dry ingredients and beat on medium speed for 2 full minutes to build structure.
- Add Egg Whites: Reduce speed to low and slowly add the egg whites. Mix until just combined. Scrape down the sides and bottom of the bowl to ensure everything is incorporated.
- Bake: Divide the batter evenly between the three prepared pans. Bake for 30-35 minutes, or until a toothpick inserted into the center comes out clean or with just a few moist crumbs. Do not overbake!
- Cool: Let the cakes cool in the pans for 10 minutes, then turn them out onto a wire rack to cool completely before frosting.
- Make the Buttercream: Whip the butter in the stand mixer on medium-high speed for 5 minutes until pale and creamy. Reduce speed to low and gradually add the powdered sugar.
- Add Chocolate: Pour in the melted (but cooled!) white chocolate, heavy cream, vanilla, and salt. Whip on high speed for 3-4 minutes until light, fluffy, and silky.
- Assemble: Place one cake layer on your stand. Pipe a ‘dam’ of buttercream around the outer edge. Fill the center with half of the raspberry filling. Top with the second cake layer and repeat. Place the final layer on top (bottom side up for a flat top).
- Frost and Decorate: Apply a thin crumb coat of frosting all over the cake and chill for 20 minutes. Then, apply the final thick layer of buttercream. smooth with an offset spatula. Decorate with fresh raspberries or white chocolate curls.
Expert Cooking Tips
- ✓Room Temperature is Key: Ensure your butter, milk, and egg whites are truly at room temperature. This creates an emulsion that traps air, leading to a fluffy cake.
- ✓Cool the Chocolate: When making the frosting, if your melted white chocolate is hot, it will melt the butter and create a soupy mess. It should be fluid but cool to the touch.
- ✓The Dam Method: Don’t skip piping a ring of frosting around the edge of the cake layers before adding the raspberry filling. This prevents the filling from leaking out the sides.
- ✓Weigh Ingredients: For the most accurate results, use a kitchen scale. Too much flour is the number one cause of dry cakes.
Substitutions and Variations
If you don’t have cake flour, you can make a substitute by removing 2 tablespoons of all-purpose flour from every cup and replacing it with 2 tablespoons of cornstarch. Sift well! If you prefer a less sweet frosting, you can swap the buttercream for a Swiss Meringue Buttercream base, adding the white chocolate at the end. For the fruit, strawberries or blackberries work beautifully in place of raspberries if you prefer a different berry profile.
Common Mistakes to Avoid
The biggest mistake is overmixing the batter once the liquids are added. This develops too much gluten and makes the cake tough instead of tender. Stop mixing as soon as the ingredients are combined. Another common issue is frosting a warm cake. If the cake layers are even slightly warm, the butter in the frosting will slide right off. Patience is a virtue here—chill those layers!
Serving Suggestions
Serve this elegant cake with a glass of chilled Rosé Champagne or Prosecco to complement the berries. A side of fresh berries and perhaps a dollop of unsweetened whipped cream can help cut the richness for those who don’t have a huge sweet tooth. For an extra romantic touch, garnish the plate with edible rose petals.
Storage and Reheating Tips
Because of the fruit filling and dairy in the frosting, this cake is best stored in the refrigerator. However, cake tastes best at room temperature! Remove the cake (or slices) from the fridge about 1 to 2 hours before serving to let the buttercream soften and the flavor blossom. The cake will keep in the fridge for up to 4 days. You can also freeze individual slices wrapped tightly in plastic wrap for up to 2 months.
Nutrition Facts (Estimated)
| Serving Size | 1 slice |
| Calories | 680 |
| Fat | 38g |
| Saturated Fat | 22g |
| Unsaturated Fat | 14g |
| Trans Fat | 0.5g |
| Cholesterol | 95mg |
| Sodium | 240mg |
| Carbohydrates | 82g |
| Fiber | 2g |
| Sugar | 52g |
| Protein | 6g |
Frequently Asked Questions
Can I make this cake ahead of time?
Absolutely! You can bake the cake layers up to 2 days in advance, wrap them tightly in plastic, and store them in the fridge (or freeze for up to a month). The filling can be made 3 days in advance.
Can I use white chocolate chips?
It is not recommended. Chips contain stabilizers that prevent them from melting smoothly. Use high-quality white chocolate bars (like Ghirardelli or Lindt) for the frosting.
Why did my cake sink in the middle?
This usually happens if the oven door was opened too early during baking, or if the leavening agents (baking powder) were expired. It can also happen if the batter was over-beaten.
Is the raspberry filling necessary?
While the cake is delicious on its own, the raspberry filling provides the necessary acidity to balance the sweetness. If you skip it, the cake might feel too sweet.
How do I get smooth sides on my cake?
A crumb coat is essential! Apply a thin layer of frosting to trap crumbs, chill the cake until firm, and then apply your final layer. A metal bench scraper and a turntable make smoothing much easier.
Can I make this as cupcakes?
Yes! This recipe will make about 24-30 standard cupcakes. Bake them for 18-22 minutes. You can core the centers to add the raspberry filling.
What if I don’t have a stand mixer?
You can use a hand mixer! It might take a little longer to cream the butter and sugar, but it works perfectly fine. Just be careful not to overmix the flour stage.
How do I transport this cake?
Chill the cake thoroughly before moving it. A cold cake is stable; a room-temperature cake is wobbly. Use a sturdy cake box and place it on the floor of the car, not the seat.
Conclusion
There you have it, mamas—the ultimate Anniversary Cake to celebrate your love story. Whether it’s been one year or fifty, taking the time to create something this beautiful is a testament to the sweetness of your life together. Don’t be intimidated by the steps; take it one layer at a time, and remember that even if it isn’t ‘bakery perfect’ visually, the taste will be incredible. Here is to many more years of love, laughter, and cake! Happy baking!