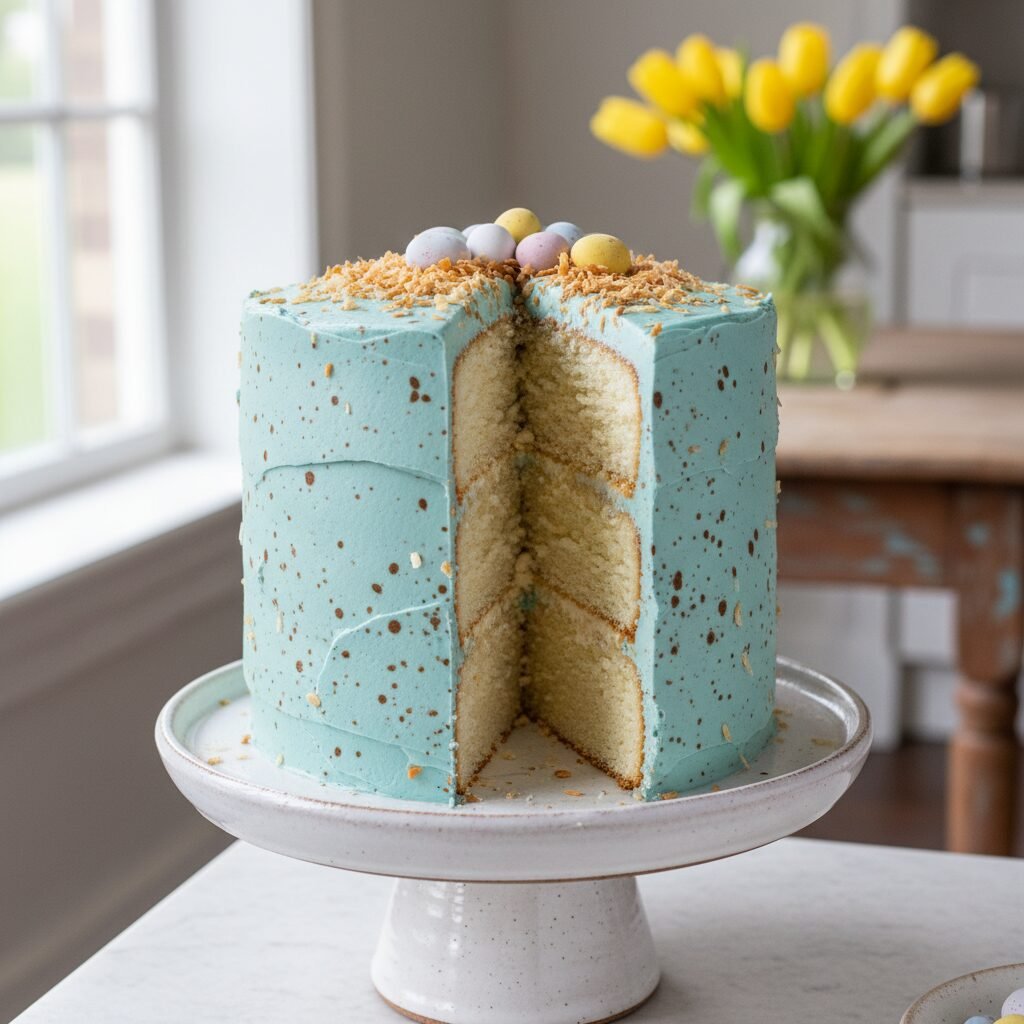
Speckled Egg Buttercream Cake
If you are looking for a show-stopping dessert for your Easter table that is actually forgiving to decorate, this is it. We are taking a classic moist vanilla cake and dressing it up with a robin’s egg blue buttercream and a fun cocoa splatter technique that hides all imperfections!
45 minutes
35 minutes
2 hours 30 minutes
12-14 Servings
Dessert
Baking & Decorating
American
Vegetarian
Spring is finally in the air, and for me, that means one thing: it is time to bake something pastel, pretty, and undeniably festive. Every year when Easter rolls around, I find myself scrolling through Pinterest looking for that one dessert that will make my family gasp in delight but won’t require a degree in pastry arts to pull off. Enter the Speckled Egg Buttercream Cake. This cake is the absolute darling of spring baking. It captures the essence of those crunchy, malted milk robin’s eggs we all secretly hoard in our pantry, but transforms that aesthetic into a fluffy, towering layer cake.
The beauty of this recipe isn’t just in the taste—though, believe me, the tender crumb of the vanilla bean cake paired with creamy, whipped buttercream is to die for—it is in the decoration. If you have ever struggled to get your frosting perfectly smooth (hands up, because I definitely have), this cake is your new best friend. The signature ‘speckled’ look is achieved by flicking a mixture of cocoa powder and vanilla extract onto the cake. This not only adds a lovely, artistic flair, but it also brilliantly camouflages any nicks, bumps, or air bubbles in your icing. It is the ultimate mom-hack for a bakery-quality look with zero stress.
Whether you are hosting a full-blown Easter brunch or just want a fun weekend project to do with the kids, this cake delivers on all fronts. It is whimsical, elegant, and nostalgic all at once. Plus, there is something incredibly satisfying about standing in your kitchen and intentionally making a little bit of a mess to create a masterpiece. So, grab your apron and a clean paintbrush, because we are about to make the most beautiful cake of the season!
History & Origins
The inspiration for the Speckled Egg Cake comes directly from nature, specifically the delicate, spotted shells of wild bird eggs, most notably the American Robin. The robin’s egg blue—a distinct, rich cyan—has long been associated with the arrival of spring and new beginnings. In the culinary world, this aesthetic became popularized by Easter confectioneries in the mid-20th century, particularly with the advent of candy-coated malted milk eggs and speckled jelly beans.
However, the transition from candy to cake is a more recent phenomenon, largely driven by the rise of food blogging and visual platforms like Pinterest in the early 2010s. Bakers began looking for ways to move beyond traditional piping and fondant flowers, seeking textures that felt more organic and rustic. The ‘splatter’ technique, borrowed from abstract art, found a perfect home in cake decorating. By mixing cocoa powder (to mimic the brown earth tones of natural speckles) with an extract, bakers realized they could replicate that organic eggshell look on a grand scale.
This style of cake marked a shift in home baking trends away from the rigid perfection of fondant-covered cakes toward American Buttercream finishes that celebrated texture and imperfection. It aligns perfectly with the ‘rustic chic’ movement that has dominated weddings and parties for the last decade. Today, the Speckled Egg Cake is a modern Easter classic, bridging the gap between nostalgic candy treats and sophisticated dessert presentation.
Why This Recipe Works
You might be wondering, does flicking brown liquid onto a blue cake actually taste good? The answer is yes, and here is the culinary science behind why this cake works so well. First, let’s talk about the flavor balance. The cake base is a rich, sweet vanilla, and the American buttercream is sugary and creamy. The ‘paint’ used for the speckles is made from unsweetened cocoa powder mixed with vanilla extract. This concentrated cocoa mixture is slightly bitter. When dispersed in tiny droplets over the sweet frosting, it provides minute bursts of deep chocolate flavor that cut through the sweetness of the sugar, adding complexity without overwhelming the vanilla profile.
Structurally, this recipe relies on the emulsification of butter and sugar to create a stable frosting canvas. We use American Buttercream because it forms a slight ‘crust’ when exposed to air. This is crucial for the speckling process. If the frosting were too soft or wet (like a Swiss Meringue or whipped cream), the cocoa droplets might bleed or run. A crusting buttercream holds the droplets in place, keeping them distinct and sharp, which preserves that realistic eggshell appearance.
Visually, this technique utilizes the principle of visual texture. In design, texture adds depth. A plain blue cake can look flat or cartoonish. By adding the random, organic pattern of the speckles, we trick the eye into seeing a natural object. This is why it works so well for home bakers: the eye is drawn to the pattern, not the smoothness of the frosting underneath. It is a forgiving technique that yields high-impact results with low-skill requirements.
Why You’ll Love This Recipe
- ✓Forgiving Decoration: The speckles hide any imperfections in your frosting smoothing skills.
- ✓Kid-Friendly Activity: Children love the ‘splatter’ step of the decorating process.
- ✓Make-Ahead Friendly: The cake layers can be frozen, and the buttercream made days in advance.
- ✓Customizable: You can swap the vanilla cake for coconut, lemon, or even chocolate.
- ✓Bakery Quality Visuals: Looks like it cost $80 at a boutique bakery, but costs a fraction to make.
Equipment You’ll Need
- ✓Three 8-inch round cake pans
- ✓Stand mixer with paddle attachment
- ✓Offset spatula
- ✓Bench scraper (for smoothing frosting)
- ✓Clean, stiff-bristled paintbrush or unused toothbrush
- ✓Turntable (optional but recommended)
- ✓Wire cooling racks
- ✓Parchment paper
Ingredients
- ✓For the Vanilla Cake:
- ✓3 cups cake flour (sifted)
- ✓2 1/2 teaspoons baking powder
- ✓1/2 teaspoon salt
- ✓1 cup unsalted butter, softened to room temperature
- ✓1 3/4 cups granulated sugar
- ✓4 large eggs, room temperature
- ✓1 tablespoon pure vanilla extract
- ✓1 cup whole milk, room temperature
- ✓For the Vanilla Buttercream:
- ✓2 cups unsalted butter, softened
- ✓7-8 cups powdered sugar
- ✓1/4 cup heavy cream
- ✓2 teaspoons pure vanilla extract
- ✓Pinch of salt
- ✓Teal or Royal Blue gel food coloring
- ✓For the Speckles:
- ✓1 tablespoon unsweetened cocoa powder
- ✓1 1/2 tablespoons vanilla extract (or vodka)
- ✓Optional Garnish:
- ✓Toasted coconut flakes
- ✓Candy-coated chocolate eggs (like Cadbury Mini Eggs)
Instructions
- Step 1: Prep the Oven and Pans. Preheat your oven to 350°F (175°C). Grease three 8-inch round cake pans generously with butter or cooking spray. Line the bottoms with parchment paper rounds and grease the paper. This ensures your cakes release perfectly without breaking.
- Step 2: Mix Dry Ingredients. In a medium bowl, whisk together the sifted cake flour, baking powder, and salt. Set this aside. Using cake flour is key here—it gives you that super tender, bakery-style crumb.
- Step 3: Cream Butter and Sugar. In the bowl of your stand mixer fitted with the paddle attachment, beat the 1 cup of softened butter and granulated sugar on medium-high speed for about 3-5 minutes. You want it pale, fluffy, and aerated. Scrape down the sides of the bowl as needed.
- Step 4: Add Eggs and Vanilla. Reduce the mixer speed to medium. Add the eggs one at a time, beating well after each addition. Stir in the vanilla extract. Don’t worry if the batter looks slightly curdled at this stage; it will come together.
- Step 5: Alternate Wet and Dry. Turn the mixer to low speed. Add the flour mixture in three parts, alternating with the milk in two parts (Flour, Milk, Flour, Milk, Flour). Mix only until just combined. Do not overmix or your cake will be dense!
- Step 6: Bake. Divide the batter evenly among the prepared pans. Bake for 30-35 minutes, or until a toothpick inserted into the center comes out clean. The tops should spring back when lightly touched.
- Step 7: Cool. Let the cakes cool in the pans for 10 minutes, then turn them out onto a wire rack to cool completely. They must be cool before frosting, or your buttercream will melt into a sad puddle.
- Step 8: Make the Buttercream. While cakes cool, wipe out your mixer bowl. Beat the 2 cups of butter on medium-high speed until creamy (about 5 minutes). Gradually add powdered sugar, one cup at a time, mixing on low. Once all sugar is added, increase speed to high and beat for 3 minutes. Add the heavy cream, vanilla, and salt. Beat for another minute until fluffy.
- Step 9: Color the Frosting. Add a tiny drop of teal or blue gel food coloring. Mix well. You want a soft, pastel robin’s egg blue, so start with a very small amount—you can always add more, but you can’t take it out!
- Step 10: Stack and Coat. Place one cake layer on your serving plate or turntable. Spread a generous layer of frosting on top. Repeat with the second and third layers. Cover the entire cake with a thin layer of frosting (crumb coat) and chill for 20 minutes. Then, apply the final thick layer of frosting and smooth it out with a bench scraper.
- Step 11: The Speckle Technique. In a small bowl, mix the cocoa powder and vanilla extract until smooth. It should be the consistency of thin paint. Cover your kitchen counter with parchment paper or newspaper (this gets messy!). Dip your clean paintbrush or toothbrush into the cocoa mixture. Hold the brush near the cake and use your finger to flick the bristles, sending a spray of droplets onto the cake. Go around the entire cake until you are happy with the coverage.
- Step 12: Garnish. Top the cake with a nest of toasted coconut and fill it with candy chocolate eggs. Slice and serve!
Expert Cooking Tips
- ✓Room Temperature is Rule #1: Ensure your butter, eggs, and milk are all at room temperature before you start. This creates an emulsion that traps air, resulting in a fluffy cake.
- ✓Gel over Liquid: Use gel food coloring instead of liquid drops. Gel is more concentrated, so you need less of it, and it won’t water down your frosting consistency.
- ✓Practice the Flick: Before you start splattering your beautiful cake, practice the flicking motion on a piece of paper towel or the inside of your sink to get a feel for the spray pattern.
- ✓Chill Before Splattering: Let the frosted cake chill in the fridge for at least 30 minutes before doing the speckles. A cold, firm surface is easier to work with if you make a mistake and need to scrape a section off.
Substitutions and Variations
If you need to make this gluten-free, simply swap the cake flour for a high-quality 1:1 Gluten-Free Baking Flour blend (one that contains xanthan gum). For a dairy-free version, use plant-based butter sticks and almond milk in the cake, and swap the heavy cream in the frosting for coconut cream or oat milk. If you aren’t a fan of vanilla, this design works beautifully with a coconut cake or even a lemon cake for extra spring vibes.
Common Mistakes to Avoid
The biggest mistake people make is overmixing the batter once the flour is added. This develops the gluten too much and results in a tough, rubbery cake rather than a tender one. Stop mixing as soon as the white streaks of flour disappear. Another common issue is adding too much liquid to the cocoa speckle mixture. If it is too runny, the droplets will drip down the side of the cake like tears rather than staying as round spots. Keep the mixture slightly thick!
Serving Suggestions
This cake is a centerpiece on its own, but it pairs wonderfully with fresh berries on the side to cut through the sweetness of the buttercream. Serve it alongside a hot cup of coffee or a floral tea, like Earl Grey or Jasmine, which complements the vanilla notes perfectly. For an adult Easter brunch, a glass of sparkling rosé or a mimosa is the perfect accompaniment.
Storage and Reheating Tips
Since this cake is covered in buttercream, it can sit out at room temperature for up to 2 days (as long as your kitchen isn’t hot). In fact, it tastes best at room temperature! If you need to store it longer, keep it in the fridge for up to 5 days, but be sure to let it come to room temperature for 2-3 hours before serving. Cold cake can taste dry and the butter in the frosting will be hard. You can also freeze individual slices wrapped in plastic wrap for up to 3 months.
Nutrition Facts (Estimated)
| Serving Size | 1 slice |
| Calories | 680 |
| Fat | 34g |
| Saturated Fat | 21g |
| Unsaturated Fat | 11g |
| Trans Fat | 1g |
| Cholesterol | 115mg |
| Sodium | 340mg |
| Carbohydrates | 88g |
| Fiber | 1g |
| Sugar | 58g |
| Protein | 6g |
Frequently Asked Questions
Can I make the cake layers ahead of time?
Absolutely! I actually prefer doing this. Bake the layers, let them cool completely, wrap them tightly in two layers of plastic wrap, and freeze them. You can frost them while they are still frozen; it actually makes them easier to handle and reduces crumbs!
I don’t have cake flour, what can I use?
No problem. You can make a DIY substitute. For every cup of all-purpose flour, remove 2 tablespoons of flour and replace them with 2 tablespoons of cornstarch. Sift them together twice to ensure they are fully aerated and combined.
Will the cocoa splatter taste bitter?
Not really. Because the droplets are so tiny and the frosting underneath is very sweet, you won’t notice the bitterness of the cocoa. It just adds a very subtle depth of flavor.
Can I use a different color for the cake?
Yes! While robin’s egg blue is traditional, this looks stunning in pale pink, lavender, or mint green. You can even do a white cake with colorful speckles for a confetti look.
My speckles are running down the cake, what did I do wrong?
Your cocoa mixture was likely too thin (too much extract/vodka) or you applied too much liquid in one spot. Try adding a pinch more cocoa powder to thicken the ‘paint’ and stand slightly further back when flicking.
Can I use water instead of vanilla extract for the speckles?
You can, but alcohol-based liquids (like extract or vodka) evaporate faster than water. This prevents the speckles from making the frosting soggy. If you use water, use very little and let the cake dry in a cool place.
What kind of brush works best?
A stiff-bristled craft brush (new and cleaned, obviously!) works best. A soft watercolor brush won’t have enough ‘snap’ to flick the paint. A clean, unused toothbrush is actually the secret weapon of many bakers for this exact technique.
How do I transport this cake without ruining it?
Because the buttercream crusts and the cake is chilled, it’s fairly sturdy. Use a cake box that is at least 10 inches wide and tall enough. Place a non-slip mat under the cake board inside the box to prevent sliding.
Conclusion
There you have it—the secret to winning Easter brunch! This Speckled Egg Buttercream Cake is truly one of those recipes that looks like a labor of love but is secretly a blast to make. The combination of the fluffy, aromatic vanilla cake and the creamy, sweet frosting is a timeless classic, but that speckled finish is what will have everyone reaching for their phones to take a picture. Remember, the key to this cake is embracing the imperfection. Nature’s eggs aren’t perfectly uniform, and your cake doesn’t need to be either. So have fun with the splatter, enjoy the process, and get ready for the compliments to roll in. Happy baking!