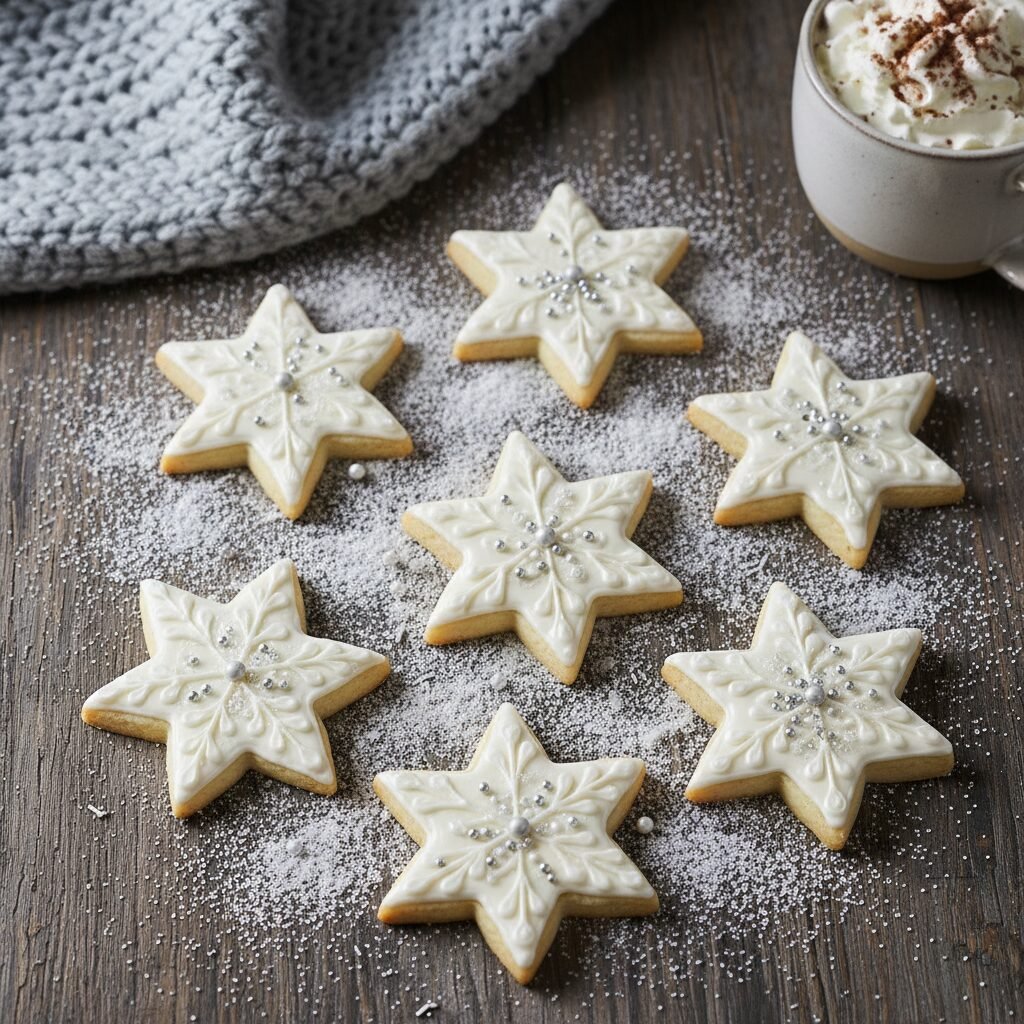
Snowflake Sugar Cookies
There is nothing quite like the magic of a fresh snowfall captured perfectly in a delicious cookie. These tender, buttery sugar cookies hold their intricate snowflake shapes without spreading and are just waiting for your creative touch!
20 minutes
10 minutes
1 hour 30 minutes (includes chilling)
24 cookies
Dessert
Baking
American
Vegetarian
Hello, wonderful bakers! Is there anything more enchanting than waking up to a world blanketed in white, fluffy snow? It brings out that inner child in all of us, wanting to bundle up and play, or better yet, stay cozy inside with a warm oven and the smell of vanilla wafting through the house. Today, we are channeling that winter magic into the kitchen with my absolute favorite recipe for Snowflake Sugar Cookies.
If you have ever been frustrated by cut-out cookies that turn into unrecognizable blobs in the oven, you can breathe a sigh of relief. This recipe is specifically designed to prevent spreading. We are talking crisp edges, intricate snowflake details, and a surface that stays flat for decorating. But don’t worry, they aren’t hard as rocks! The texture is delightfully soft and chewy with a buttery finish that melts in your mouth.
These cookies have become a yearly tradition in our home. I set up a decorating station with bowls of white royal icing, silver dragées, and sanding sugar that sparkles like real ice crystals. It is the perfect weekend activity to do with the kids, and these sturdy little beauties pack beautifully for holiday cookie exchange boxes. So, grab your rolling pin and let’s make it snow!
History & Origins
While we might think of the decorated sugar cookie as a modern holiday staple, its roots actually go back hundreds of years. The modern sugar cookie can trace its ancestry to the Nazareth Sugar Cookie, created by German Protestant settlers in Pennsylvania in the mid-1700s. Back then, they were simple, round, and crumbly.
However, the tradition of using cutters to create shapes became popular as tin smiths began crafting affordable cookie cutters in the 19th century. The snowflake shape specifically gained massive popularity in the 20th century as baking technology improved and intricate cutters became widely available. Today, the snowflake cookie is a universal symbol of winter baking, representing uniqueness and beauty—because just like real snowflakes, no two hand-decorated cookies are ever exactly alike!
Why This Recipe Works
The science behind this recipe is all about controlling the spread. Most cookie recipes rely on leavening agents like baking soda and a high ratio of sugar and butter, which causes the dough to expand and flatten. For these snowflakes, we use baking powder instead of soda to provide lift without excessive spread.
Furthermore, we keep the dough relatively cool and use a higher ratio of flour to fat. By rolling the dough between parchment paper before chilling it, we eliminate the need to add extra flour during the rolling process (which often makes cookies dry and tough). The result is a cookie that is tender on the inside but sturdy enough to hold the most delicate crystalline points of a snowflake cutter.
Why You’ll Love This Recipe
- ✓Holds intricate shapes perfectly with zero spreading
- ✓Soft and tender texture, not hard or crunchy
- ✓Dough is easy to handle and forgiving for kids
- ✓Royal icing dries hard enough for stacking and shipping
- ✓Can be frozen for up to 3 months
- ✓Uses simple pantry staples you already have
Equipment You’ll Need
- ✓Stand mixer or electric hand mixer
- ✓Rolling pin
- ✓Snowflake cookie cutters (various sizes)
- ✓Parchment paper
- ✓Baking sheets
- ✓Piping bags and #2 or #3 piping tips
- ✓Wire cooling rack
Ingredients
- ✓1 cup (2 sticks) unsalted butter, softened to room temperature
- ✓1 cup granulated white sugar
- ✓1 large egg, room temperature
- ✓1.5 teaspoons pure vanilla extract
- ✓0.5 teaspoon almond extract (optional but recommended)
- ✓3 cups all-purpose flour (spooned and leveled)
- ✓2 teaspoons baking powder
- ✓0.5 teaspoon salt
- ✓FOR THE ICING: 4 cups powdered sugar
- ✓3 tablespoons meringue powder
- ✓5-6 tablespoons warm water (plus more for thinning)
Instructions
- Cream the Butter and Sugar: In the bowl of a stand mixer fitted with the paddle attachment, beat the softened butter and granulated sugar together on medium-high speed for about 2-3 minutes until the mixture is smooth and creamy. Do not over-beat to the point of being fluffy, as too much air can cause bubbles in the baked cookies.
- Add Wet Ingredients: Add the egg, vanilla extract, and almond extract. Beat on medium speed until combined, scraping down the sides of the bowl as needed.
- Combine Dry Ingredients: In a separate medium bowl, whisk together the flour, baking powder, and salt. Turn the mixer to low speed and gradually add the flour mixture to the wet ingredients. Mix only until the dough pulls away from the sides of the bowl and clumps together. Do not overmix.
- Roll and Chill: Divide the dough into two balls. Place one ball between two large sheets of parchment paper. Use a rolling pin to roll the dough to a 1/4-inch thickness. Repeat with the second ball. Stack the rolled dough sheets (still in the paper) onto a baking sheet and refrigerate for at least 1 hour.
- Preheat and Cut: Preheat your oven to 350°F (175°C). Remove one sheet of dough from the fridge. Peel off the top layer of parchment. Use your snowflake cutters to cut out shapes. Transfer the cut cookies to a baking sheet lined with fresh parchment paper or a silicone mat. Re-roll scraps and repeat.
- Bake: Bake for 8-11 minutes, depending on the size of your cutter. You want them to look matte on top and just barely set. Do not let them brown on the edges. Remove from the oven and let them cool on the baking sheet for 5 minutes before transferring to a wire rack to cool completely.
- Make the Royal Icing: While cookies cool, whisk together powdered sugar and meringue powder in a mixer bowl. Add the water and beat on medium-high speed for 5-7 minutes until stiff, glossy peaks form.
- Decorate: Divide icing into bowls if coloring. Thin the icing with tiny amounts of water (1/2 tsp at a time) until it reaches ‘flood consistency’ (like honey). Pipe outlines on the cookies and fill them in. Add sprinkles or sanding sugar while wet. Let dry for at least 6-8 hours before stacking.
Expert Cooking Tips
- ✓Room Temperature Ingredients: Ensure your butter and egg are truly at room temperature. This ensures they emulsify properly creating a smooth dough.
- ✓Measure Flour Correctly: Use a kitchen scale or the spoon-and-level method. Scooping the measuring cup directly into the flour bag packs it down, leading to dry cookies.
- ✓The Rolling Trick: Rolling the dough before chilling is a total game-changer. Cold dough is hard to roll and cracks; rolling warm dough between paper is effortless and mess-free.
- ✓Almond Extract: Even if you don’t love almond flavor, just a half teaspoon adds a ‘bakery’ quality that elevates the vanilla without being overpowering.
Substitutions and Variations
If you need to make these allergy-friendly, here are some swaps that work wonders! For a Gluten-Free version, swap the all-purpose flour for a high-quality 1:1 gluten-free baking flour blend (look for one with xanthan gum). To make them Dairy-Free, use a high-quality vegan butter stick substitute; just make sure it is firm when cold, not a tub margarine. If you cannot find meringue powder for the icing, you can use a simple glaze made of powdered sugar, milk, and corn syrup, though it won’t dry quite as hard.
Common Mistakes to Avoid
The most common mistake is overbaking. Sugar cookies should not be golden brown! If the edges are brown, they will be crunchy rather than soft. Take them out when they look puffy and matte. Another issue is warm dough. If your cut-outs are getting floppy or sticking to the cutter, pop the dough sheet back in the fridge for 10 minutes. Cold dough equals sharp edges!
Serving Suggestions
These cookies are stunning on their own, but they are magical when served with a mug of rich, homemade hot cocoa or a peppermint mocha. For a holiday party, arrange them on a platter with dark chocolate truffles for a beautiful contrast. They are also the absolute best candidate for ‘Santa’s Plate’ on Christmas Eve!
Storage and Reheating Tips
Once the icing has completely set (hard to the touch), store the cookies in an airtight container at room temperature for up to 1 week. Use sheets of parchment paper between layers to keep the decorations pristine. To freeze, stack the baked (undecorated) cookies in a freezer-safe container for up to 3 months. Thaw on the counter before decorating.
Nutrition Facts (Estimated)
| Serving Size | 1 cookie |
| Calories | 185 |
| Fat | 8g |
| Saturated Fat | 5g |
| Unsaturated Fat | 2g |
| Trans Fat | 0g |
| Cholesterol | 25mg |
| Sodium | 85mg |
| Carbohydrates | 26g |
| Fiber | 0.5g |
| Sugar | 12g |
| Protein | 2g |
Frequently Asked Questions
Why did my cookies spread and lose their shape?
This usually happens if the butter was too warm, or the dough wasn’t chilled long enough. Ensure you chill the rolled dough for at least an hour. Also, check that your baking powder isn’t expired!
Can I make the dough ahead of time?
Absolutely! You can make the dough, roll it out between parchment, and keep it in the fridge for up to 2 days before cutting and baking. You can also freeze the rolled dough sheets for up to a month.
How do I get my icing white and bright?
Royal icing is naturally very white, but if you use butter in a buttercream frosting, it will be yellow. Stick to the royal icing recipe provided. If it looks slightly off-white, add the tiniest dot of purple gel food coloring to cancel out the yellow tones.
Do I have to use meringue powder?
For this specific icing recipe, yes. Meringue powder is safe (pasteurized) and provides the structure needed for the icing to harden. If you prefer not to use it, you can use a simple powdered sugar and milk glaze.
My icing is too runny/too thick, what do I do?
Royal icing consistency is key. If it’s too thick, add water a few drops at a time. If it’s too runny, whisk in more sifted powdered sugar. You want ’15-second consistency’ where a line drawn in the icing disappears in 15 seconds.
Can I skip the almond extract?
Yes, you can omit it if you have a nut allergy or dislike the taste. You can replace it with more vanilla extract or try lemon extract for a citrusy twist.
How thin should I roll the dough?
I recommend 1/4 inch thick. This is thick enough to keep the cookie soft and sturdy. If you roll them too thin (1/8 inch), they will be crispy and fragile.
Why is my dough crumbly?
You may have measured the flour by scooping the cup into the bag, which packs it down. This results in too much flour. Add a teaspoon of milk or water and knead gently to bring it back together.
Conclusion
I hope these Snowflake Sugar Cookies bring a little extra sparkle to your holiday season! Whether you are a seasoned pro with a piping bag or just looking for a fun afternoon activity with the little ones, this recipe is a keeper. The memories you make while decorating these are just as sweet as the cookies themselves. Happy baking, and stay warm!