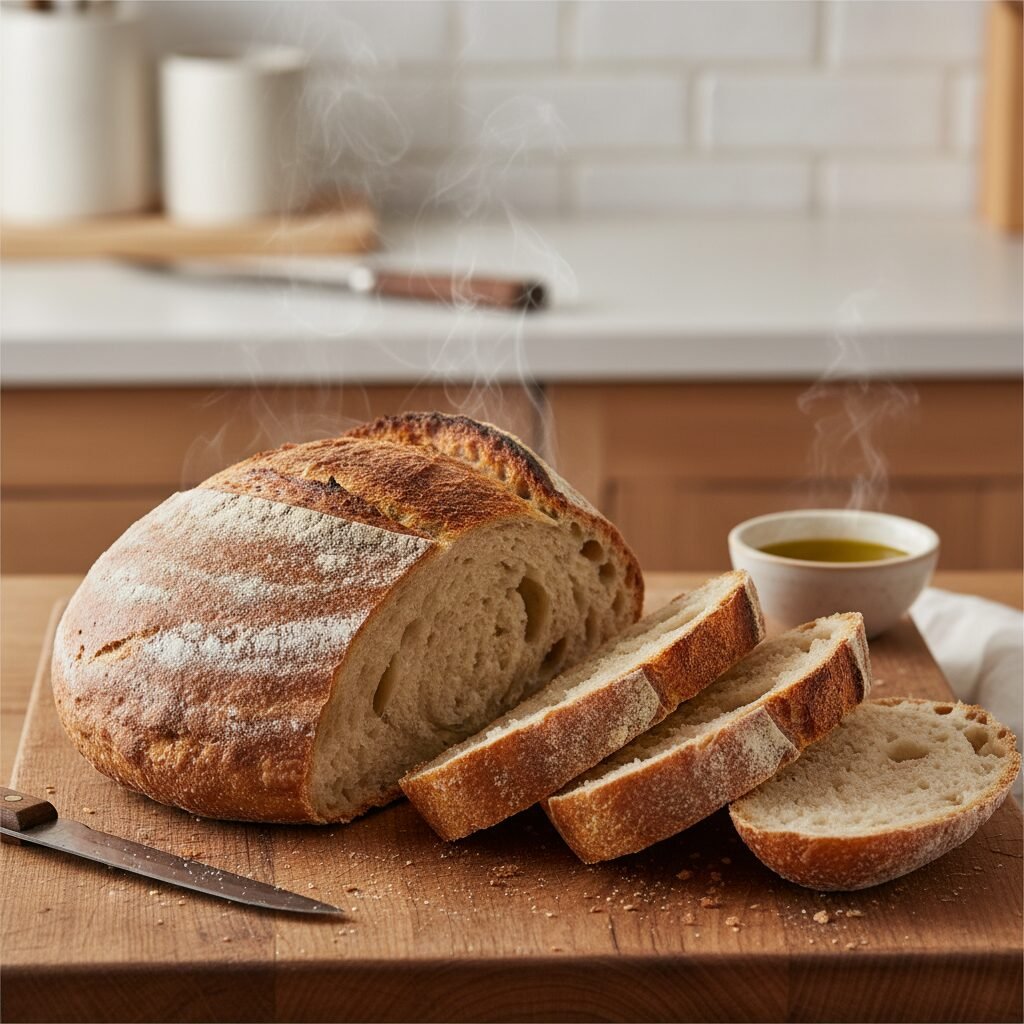
Artisan Italian Bread
Forget the bakery; your kitchen is about to become the most fragrant room in the house. This foolproof, no-knead Artisan Italian Bread delivers that coveted crackling crust and airy, soft interior with minimal effort and simple ingredients.
10 minutes
45 minutes
18 hours (includes resting time)
1 Large Loaf (approx. 12 slices)
Bread
Baking
Italian
Vegan
There is perhaps no culinary endeavor more intuitively rewarding than pulling a golden, crackling loaf of bread from one’s own oven. For many home cooks, the concept of baking artisan bread feels reserved for professional boulangeries equipped with steam-injected ovens and decades of sourdough starters. However, the truth is delightfully contrary. The secret to the rustic, high-quality Italian bread that graces the tables of Pinterest feeds lies not in complex machinery or tireless kneading, but in the simple alchemy of time and hydration.
This Artisan Italian Bread recipe is designed to strip away the intimidation factor of yeast baking. By utilizing a high-hydration dough and a long, slow fermentation process, we allow the gluten strands to develop naturally without the need for a stand mixer or elbow grease. The result is a loaf that rivals any local bakery: a thick, blistered crust that ‘sings’ as it cools, protecting a crumb that is light, airy, and distinctly chewy. It is a return to the fundamentals of food—flour, water, salt, and yeast—transformed into a centerpiece that brings families together.
For the busy mother or the professional woman managing a household, this recipe is a revelation. It requires approximately ten minutes of active preparation time. The rest of the work is done passively by the yeast while you sleep or work. Whether served alongside a hearty vegetable soup, toasted for morning bruschetta, or simply slathered with high-quality butter, this bread elevates the everyday meal into a gourmet experience.
History & Origins
The tradition of rustic Italian bread, often categorized generally as Pane di Casa or ‘household bread,’ is deeply rooted in the agrarian history of Italy. Historically, in rural Italian villages, families would prepare their own dough at home but lacked the large, wood-fired ovens required to bake it to perfection. Once a week, women would carry their shaped loaves to a communal village oven, or forno, where the village baker would bake them. These loaves were designed to be durable, with thick crusts that preserved the moisture inside, allowing the bread to last for several days.
The specific technique utilized in this recipe—often referred to as the ‘No-Knead’ method—gained massive popularity in the United States following the publication of Jim Lahey’s method in the mid-2000s, but its roots are ancient. It mimics the long fermentation processes used in traditional Italian breadmaking before the advent of commercial yeast and mechanical mixers. By slowing down the process, we recapture the depth of flavor and texture that defined the breads of the Old World, bringing a slice of Italian history into the modern American kitchen.
Why This Recipe Works
This recipe succeeds based on two primary scientific principles: autolysis via high hydration and steam entrapment.
First, the high ratio of water to flour creates a very wet, shaggy dough. In a drier dough, you must knead vigorously to align gluten proteins. However, in a wet dough left to sit for 12 to 18 hours, the gluten molecules align themselves naturally as the yeast slowly ferments. This long fermentation also allows enzymes to break down starches into simple sugars, creating a much more complex, nutty flavor than a quick-rise loaf could ever achieve.
Second, the baking vessel is crucial. By baking the dough inside a preheated Dutch oven with the lid on, we trap the moisture releasing from the dough. This creates a high-pressure steam environment similar to professional bakery ovens. The steam keeps the crust soft initially, allowing the bread to rise rapidly (oven spring) without tearing. Once the lid is removed for the final stage of baking, the direct heat caramelizes the sugars on the exterior, creating that signature deep-brown, shattering crust.
Why You’ll Love This Recipe
- ✓Requires only 4 simple pantry ingredients
- ✓No stand mixer or kneading required
- ✓Produces a professional-grade crispy crust
- ✓Passive preparation fits into busy schedules
- ✓Freezer-friendly for meal planning
- ✓Vegan and dairy-free
Equipment You’ll Need
- ✓Dutch Oven (5-7 quart) with oven-safe lid
- ✓Large Mixing Bowl
- ✓Plastic Wrap or Kitchen Towel
- ✓Parchment Paper
- ✓Wooden Spoon or Silicone Spatula
- ✓Wire Cooling Rack
Ingredients
- ✓3 cups Bread Flour (plus extra for dusting)
- ✓1 ½ cups Warm Water (approx. 100°F/38°C)
- ✓1 teaspoon Instant Yeast
- ✓1 ½ teaspoons Fine Sea Salt
Instructions
- Mix the Dough: In a large mixing bowl, whisk together the bread flour, instant yeast, and sea salt to ensure even distribution. Pour in the warm water. Using a wooden spoon or silicone spatula, stir until a shaggy, sticky dough forms. Do not overmix; you simply want to ensure there are no pockets of dry flour. The dough will look rough and unpolished; this is normal.
- First Rise (Fermentation): Cover the bowl tightly with plastic wrap or a damp kitchen towel. Place the bowl in a draft-free, room-temperature spot (ideally around 70°F). Let the dough rest for a minimum of 12 hours, but preferably up to 18 hours. The dough is ready when it has doubled in size, the surface is dotted with bubbles, and it has a jiggly, jelly-like consistency.
- Prepare for Baking: When you are ready to bake, place your empty Dutch oven (with the lid on) into the oven. Preheat the oven to 450°F (230°C). It is critical that the pot heats up with the oven for at least 30 minutes to create the necessary thermal shock.
- Shape the Dough: While the oven preheats, turn the sticky dough out onto a generously floured surface using a spatula or dough scraper. Lightly flour the top of the dough. Gently fold the edges of the dough toward the center to form a rough ball shape. Do not knead it. Flip the dough over (seam side down) onto a large piece of parchment paper.
- Second Rise (Proofing): Cover the shaped dough loosely with a towel or plastic wrap and let it rest on the parchment paper while the oven finishes preheating (about 30 minutes). This allows the gluten to relax again.
- The Bake (Covered): Carefully remove the hot Dutch oven from the oven. Lift the dough by holding the corners of the parchment paper and lower it directly into the hot pot. Place the lid back on immediately to trap the steam. Bake for 30 minutes.
- The Bake (Uncovered): Remove the lid. The bread should be pale but risen. Continue baking uncovered for another 12 to 15 minutes, or until the crust is a deep, golden brown and sounds hollow when tapped.
- Cool: Remove the bread from the pot and place it on a wire cooling rack. Allow it to cool for at least 30 minutes before slicing. Cutting into hot bread releases steam prematurely, which can make the crumb gummy.
Expert Cooking Tips
- ✓Flour Measurement: For the most accurate results, weigh your flour (approx. 390g-400g). If using cups, use the ‘spoon and level’ method to avoid packing the flour down, which leads to dense bread.
- ✓Water Temperature: The water should be warm to the touch but not hot. If it is too hot (over 120°F), it will kill the yeast. If it is too cold, the rise will take significantly longer.
- ✓Sticky Dough: Do not be alarmed by how sticky the dough is. Resist the urge to add excessive flour during the mixing stage. The hydration is what creates the beautiful air pockets (crumb) inside.
- ✓Parchment Paper: Using parchment paper acts as a sling, making it much safer to transfer the dough into the scorching hot Dutch oven without burning your hands.
Substitutions and Variations
While the classic recipe is a standard for a reason, slight modifications can be made based on pantry availability. Flour: Bread flour is superior due to its higher protein content (12-14%), which provides structure. However, All-Purpose flour can be used; the loaf may just be slightly less chewy and rise a bit less. Yeast: If you only have Active Dry Yeast, dissolve it in the warm water first and let it sit for 5 minutes until foamy before adding it to the flour. Salt: Kosher salt can be used, but you may need to increase the volume slightly to account for the larger grain size.
Common Mistakes to Avoid
The most frequent error is slicing the bread too soon. It is tempting to cut into a hot loaf, but the bread continues to cook internally as it cools. Slicing it immediately allows steam to escape, resulting in a gummy, doughy texture. Another common mistake is not preheating the Dutch oven. The pot must be screaming hot to create the steam needed for oven spring. Finally, ensure your yeast is alive. If your dough hasn’t risen or bubbled after 12 hours, your yeast may have expired.
Serving Suggestions
This Artisan Italian Bread is incredibly versatile. Serve it warm with a saucer of high-quality extra virgin olive oil, balsamic vinegar, and cracked black pepper for dipping. It is the ideal vessel for Bruschetta topped with diced tomatoes, fresh basil, and garlic. It also pairs beautifully with hearty soups like Minestrone or Zuppa Toscana, acting as a sponge for the savory broth. For breakfast, toast thick slices and top with smashed avocado and red pepper flakes.
Storage and Reheating Tips
Room Temperature: Store the bread cut-side down on a wooden cutting board, or keep it in a paper bag for up to 2 days. Avoid plastic bags, as they will trap moisture and soften the crispy crust. Freezing: Slice the entire loaf once cooled. Place slices between sheets of parchment paper and store in a freezer-safe bag for up to 3 months. Toast slices directly from frozen for a quick, fresh-tasting treat.
Nutrition Facts (Estimated)
| Serving Size | 1 Slice |
| Calories | 145 kcal |
| Fat | 0.5g |
| Saturated Fat | 0g |
| Unsaturated Fat | 0.3g |
| Trans Fat | 0g |
| Cholesterol | 0mg |
| Sodium | 290mg |
| Carbohydrates | 30g |
| Fiber | 1.2g |
| Sugar | 0.5g |
| Protein | 5g |
Frequently Asked Questions
Can I make this without a Dutch oven?
Yes, though the results will vary slightly. You can bake the loaf on a pizza stone or a heavy baking sheet. To mimic the steam effect, place a metal pan on the bottom rack of the oven and pour a cup of boiling water into it right as you put the bread in. This generates the necessary steam for the crust.
Why is my dough so wet and hard to handle?
This is intentional! High hydration is the key to the artisan texture. Use generous amounts of flour on your hands and the work surface when shaping, and work quickly. Using a dough scraper is very helpful.
Can I let the dough rise longer than 18 hours?
You can push it to about 24 hours, but beyond that, the yeast may exhaust its food supply, leading to a loaf that is flat or overly sour in flavor. If you need to hold it longer, place the dough in the refrigerator to slow down fermentation.
My bread came out dense. What went wrong?
This usually happens for one of two reasons: either the yeast was dead and the dough didn’t rise properly, or you added too much flour during the mixing or shaping process. Ensure you measure flour correctly.
Can I add mix-ins like cheese or herbs?
Absolutely. You can fold in ingredients like roasted garlic, fresh rosemary, chopped olives, or grated parmesan cheese during the shaping step (after the first long rise) to distribute them without inhibiting the initial gluten development.
Why is the bottom of my bread burnt?
Some ovens heat unevenly, especially from the bottom. To prevent this, place a baking sheet on the rack directly underneath the rack holding your Dutch oven to act as a heat shield.
Is this bread sourdough?
Technically, no, because it uses commercial instant yeast rather than a wild starter. However, the long fermentation process creates a depth of flavor and slight tang that mimics the profile of a mild sourdough.
Can I double the recipe?
Yes, but do not bake two loaves in the same Dutch oven at the same time unless it is massive. It is better to mix a double batch of dough, divide it after the first rise, and bake the loaves sequentially or in two separate Dutch ovens.
Conclusion
Embracing the art of making Artisan Italian Bread at home is less about precision baking and more about patience and simplicity. This recipe strips away the barriers that often keep home cooks from attempting bread, proving that with just four humble ingredients, you can create something truly magnificent. The shattering crunch of the crust and the tender, airy crumb are rewards that far outweigh the minimal effort required. Whether you are a busy mom looking for wholesome, preservative-free options for your family, or simply someone who loves the romance of baking, this loaf is sure to become a weekly staple in your home.