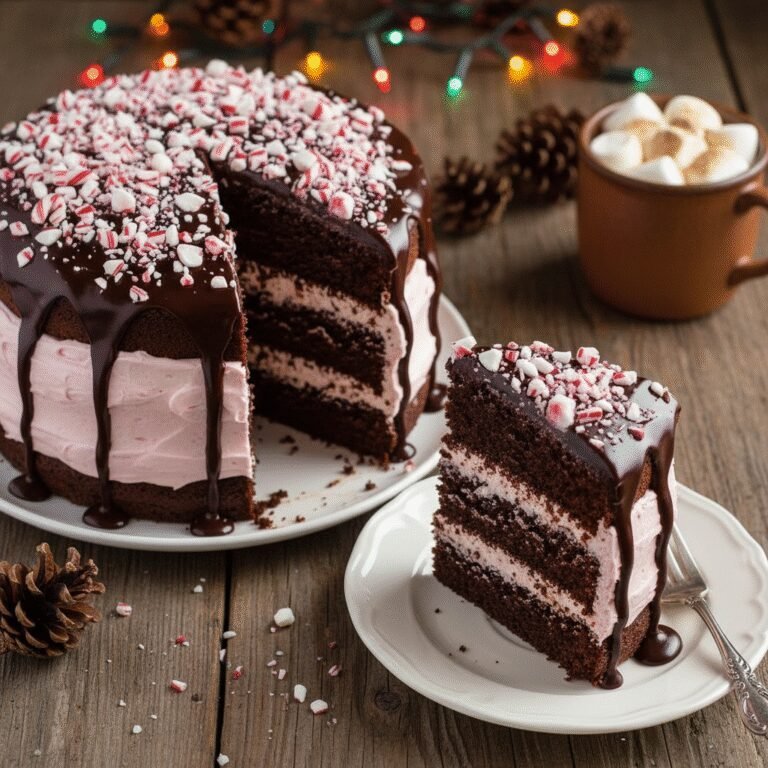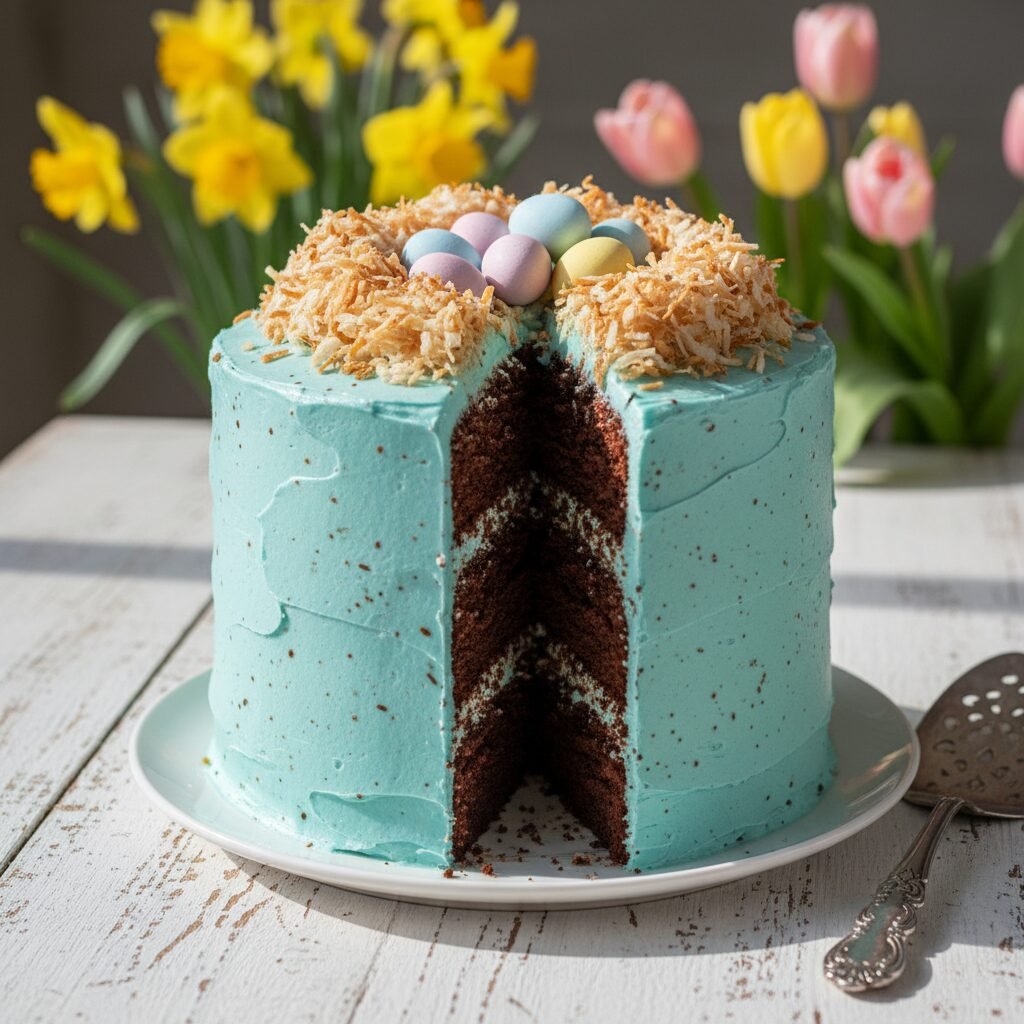
Robins Egg Chocolate Cake
Get ready to wow your guests with this spectacular Robins Egg Chocolate Cake! It looks like a masterpiece from a high-end bakery, but the secret speckled effect is shockingly easy to achieve at home. It is rich, chocolatey, and screams springtime joy.
45 minutes
35 minutes
2 hours 30 minutes
12-14 servings
Dessert
Baking
American
Vegetarian
If there is one dessert that captures the whimsical magic of spring, it is this Robins Egg Chocolate Cake. Imagine slicing into a gorgeous, pastel blue cake speckled to perfection, only to reveal deep, dark, fudgy chocolate layers hidden inside. It is the kind of contrast that makes people gasp at the dinner table!
I know what you are thinking: “That looks way too complicated for me.” But here is the best news ever—this cake is actually one of the most forgiving recipes you will ever make. Why? Because that adorable speckled pattern completely hides any imperfections in your frosting technique! If you can flick a paintbrush, you can decorate this cake like a pro.
We are using my absolute favorite chocolate cake base—it is moist, dense, and not overly sweet—paired with a creamy vanilla buttercream that we have tinted that signature robin’s egg blue. To top it all off, we create a little “nest” of toasted coconut and malted milk eggs. It is fun, it is festive, and it is practically begging to be pinned to your Easter board!
History & Origins
The tradition of decorating with eggs for spring festivals dates back centuries, symbolizing rebirth and new life. However, the specific inspiration for this cake comes from the beloved malted milk candy, the Robin Egg.
Malted milk balls were originally invented in the late 1930s, but the pastel-coated, speckled Easter versions became a seasonal staple in America during the mid-20th century. Bakers began mimicking this iconic look on cakes and cupcakes in the early 2000s as food photography blogs started to take off. The “speckling” technique, borrowed from crafting and painting, allows home bakers to replicate the organic, natural look of a wild bird’s egg using simple edible ingredients like cocoa powder and vanilla extract.
Why This Recipe Works
This recipe balances flavor and aesthetics perfectly. First, let’s talk about the chocolate cake base. We use boiling hot coffee in the batter. Don’t worry, it won’t taste like a latte! The heat blooms the cocoa powder, releasing a more intense chocolate flavor, while the acidity in the coffee and buttermilk tenderizes the gluten, resulting in a crumb that is moist for days.
Visually, the speckling technique works because it creates optical texture. A plain blue cake can look a bit flat or cartoonish, but the brown cocoa splatters add dimension and realism. The splatter is made with cocoa powder and vanilla extract (or vodka), which evaporates quickly, leaving behind just the pigment without making the frosting soggy.
Why You’ll Love This Recipe
- ✓Foolproof speckled decoration hides frosting mistakes
- ✓Deep, fudgy chocolate flavor enhanced with coffee
- ✓Perfect centerpiece for Easter or baby showers
- ✓Fun decorating step that kids love helping with
- ✓Moist texture that stays fresh for days
- ✓Customizable with malted milk powder for nostalgic flavor
Equipment You’ll Need
- ✓Three 8-inch round cake pans
- ✓Stand mixer or electric hand mixer
- ✓Offset spatula
- ✓Cake scraper (bench scraper)
- ✓Clean, stiff-bristled paintbrush (dedicated for food)
- ✓Wire cooling rack
- ✓Parchment paper
- ✓Small bowl for speckle mixture
Ingredients
- ✓For the Cake:
- ✓2 cups granulated sugar
- ✓1 3/4 cups all-purpose flour
- ✓3/4 cup dark unsweetened cocoa powder
- ✓1 1/2 teaspoons baking powder
- ✓1 1/2 teaspoons baking soda
- ✓1 teaspoon salt
- ✓2 large eggs, room temperature
- ✓1 cup whole milk or buttermilk
- ✓1/2 cup vegetable oil
- ✓2 teaspoons vanilla extract
- ✓1 cup boiling hot coffee (or boiling water)
- ✓For the Frosting:
- ✓1 1/2 cups unsalted butter, softened
- ✓5-6 cups powdered sugar, sifted
- ✓1/4 cup heavy cream
- ✓2 teaspoons vanilla extract
- ✓Pinch of salt
- ✓Gel food coloring (Royal Blue and a tiny dot of Teal)
- ✓For the Speckles & Decor:
- ✓1 tablespoon cocoa powder
- ✓1 1/2 tablespoons vanilla extract (or vodka)
- ✓1 cup toasted shredded coconut (optional for nest)
- ✓1 bag speckled malted milk eggs (Robin Eggs)
Instructions
- Step 1: Prep the Oven and Pans. Preheat your oven to 350°F (175°C). Grease three 8-inch round cake pans with butter or cooking spray and line the bottoms with parchment paper circles. This ensures your cakes pop out perfectly!
- Step 2: Mix Dry Ingredients. In the bowl of a stand mixer, whisk together the sugar, flour, cocoa, baking powder, baking soda, and salt until well combined.
- Step 3: Add Wet Ingredients. Add the eggs, buttermilk, oil, and vanilla. Beat on medium speed for about 2 minutes. The batter will look thick at this stage.
- Step 4: The Hot Coffee Trick. Stir in the boiling hot coffee by hand or on the lowest mixer speed. The batter will become very thin and liquidy—this is exactly what you want! It ensures a super moist cake.
- Step 5: Bake. Pour the batter evenly into the prepared pans. Bake for 30-35 minutes, or until a toothpick inserted into the center comes out clean. Cool in the pans for 10 minutes, then turn them out onto a wire rack to cool completely.
- Step 6: Make the Frosting. While the cakes cool, beat the softened butter until creamy (about 3 minutes). Gradually add powdered sugar, alternating with the heavy cream and vanilla. Beat on high for 4-5 minutes until fluffy. Add the blue gel food coloring one drop at a time until you reach a soft, robin’s egg blue.
- Step 7: Stack and Coat. Place one cake layer on your serving plate. Spread a layer of frosting. Repeat with the remaining layers. Cover the entire cake with a thin ‘crumb coat’ of frosting and chill for 20 minutes. Then, apply the final thick layer of blue frosting and smooth it out with a cake scraper.
- Step 8: The Speckle Technique. In a small bowl, mix the 1 tablespoon of cocoa powder with the vanilla extract until you have a thin, paint-like consistency. Dip your stiff paintbrush into the mixture. Hold the brush near the cake and use your finger to flick the bristles, splattering the chocolate mixture onto the cake. Go all the way around until you are happy with the speckled egg look.
- Step 9: The Nest. Arrange toasted coconut in a circle on top of the cake to create a bird’s nest. Fill the center with the malted milk egg candies.
- Step 10: Serve. Slice and enjoy the oohs and aahs from your guests!
Expert Cooking Tips
- ✓Room Temperature Matters: Ensure your eggs, buttermilk, and butter are at room temperature. This helps the batter emulsify properly for a fluffier cake.
- ✓Don’t Skip the Coffee: Even if you are baking for kids, use decaf coffee. It deepens the chocolate flavor significantly without making it taste like coffee.
- ✓Practice the Flick: Before you splatter your cake, practice flicking the cocoa mixture onto a piece of paper towel to get the feel for the distance and force needed.
- ✓Chill the Cake: Chilling the cake after the final coat of frosting but before speckling helps the frosting set so you don’t accidentally dent it while flicking paint.
Substitutions and Variations
If you need to make swaps, this recipe is quite flexible! Gluten-Free: Swap the all-purpose flour for a high-quality 1:1 Gluten-Free Baking Flour blend. Dairy-Free: Use almond milk mixed with a teaspoon of vinegar instead of buttermilk, and swap the butter for high-quality vegan butter sticks. No Coffee? You can use hot water, but I recommend adding a teaspoon of instant espresso powder to the water if you can.
Common Mistakes to Avoid
The biggest mistake people make is over-baking the cake. Start checking at the 30-minute mark. If the toothpick has a few moist crumbs clinging to it, that is actually perfect! If it comes out bone dry, the cake might be a bit dry. Another common issue is making the speckle mixture too thick. If it is too pasty, it won’t splatter; it will just clump. Add more vanilla extract until it is fluid like watercolor paint.
Serving Suggestions
This cake is rich, so serve it in thin slices. It pairs beautifully with a cold glass of milk or a hot cup of coffee. For an extra festive touch, serve it alongside some fresh berries to cut through the richness of the chocolate and buttercream.
Storage and Reheating Tips
Because of the buttercream, this cake can stay at room temperature for up to 2 days if covered with a cake dome. If you need to keep it longer, store it in the fridge for up to 5 days. Just be sure to let it come back to room temperature before serving—cold cake can taste dry and the frosting won’t be as creamy! You can also freeze the cake layers (unfrosted) for up to 3 months.
Nutrition Facts (Estimated)
| Serving Size | 1 slice |
| Calories | 650 |
| Fat | 32g |
| Saturated Fat | 18g |
| Unsaturated Fat | 12g |
| Trans Fat | 0.5g |
| Cholesterol | 85mg |
| Sodium | 340mg |
| Carbohydrates | 88g |
| Fiber | 4g |
| Sugar | 55g |
| Protein | 6g |
Frequently Asked Questions
Can I make this cake ahead of time?
Absolutely! You can bake the cake layers a day in advance, wrap them tightly in plastic wrap, and store them at room temperature. You can also make the buttercream a few days ahead and store it in the fridge; just re-whip it before using.
What if I don’t have a paintbrush for the speckles?
No problem! You can use a brand new, clean toothbrush. It actually creates a very fine, realistic mist of speckles.
Does the alcohol in the vanilla extract evaporate?
Mostly, yes. The small amount used for the speckles evaporates quickly. However, if you are strictly avoiding alcohol, you can mix the cocoa powder with water, but be careful not to use too much as it won’t evaporate as fast and could leave wet spots.
Why did my cake sink in the middle?
This usually happens if the oven door was opened too early during baking, or if there was too much leavening (baking soda/powder). Trust the timer and use an oven light to check!
Can I use this batter for cupcakes?
Yes! This recipe yields about 24-30 cupcakes. Bake them for 18-22 minutes.
How do I get that perfect robin’s egg blue color?
Use gel food coloring rather than liquid drops. Start with a tiny bit of Royal Blue and add a pinhead-sized amount of Teal or Leaf Green to get that natural, slightly turquoise hue.
My frosting is too soft, what do I do?
If your kitchen is warm, the butter might be melting. Pop the bowl in the fridge for 10-15 minutes, then re-whip. You can also add a bit more powdered sugar.
Can I use store-bought frosting?
You can, but homemade buttercream will hold the shape and the speckles much better. If you use store-bought, whip it with a mixer to fluff it up before tinting.
Conclusion
There is something so satisfying about creating a dessert that looks like art but tastes like home. This Robins Egg Chocolate Cake is more than just a sweet treat; it is a centerpiece that celebrates the joy of spring. Whether you are an experienced baker or just a mom trying to make Easter extra special, this recipe is your ticket to rockstar status. So grab your paintbrush, get messy, and enjoy every chocolatey bite!