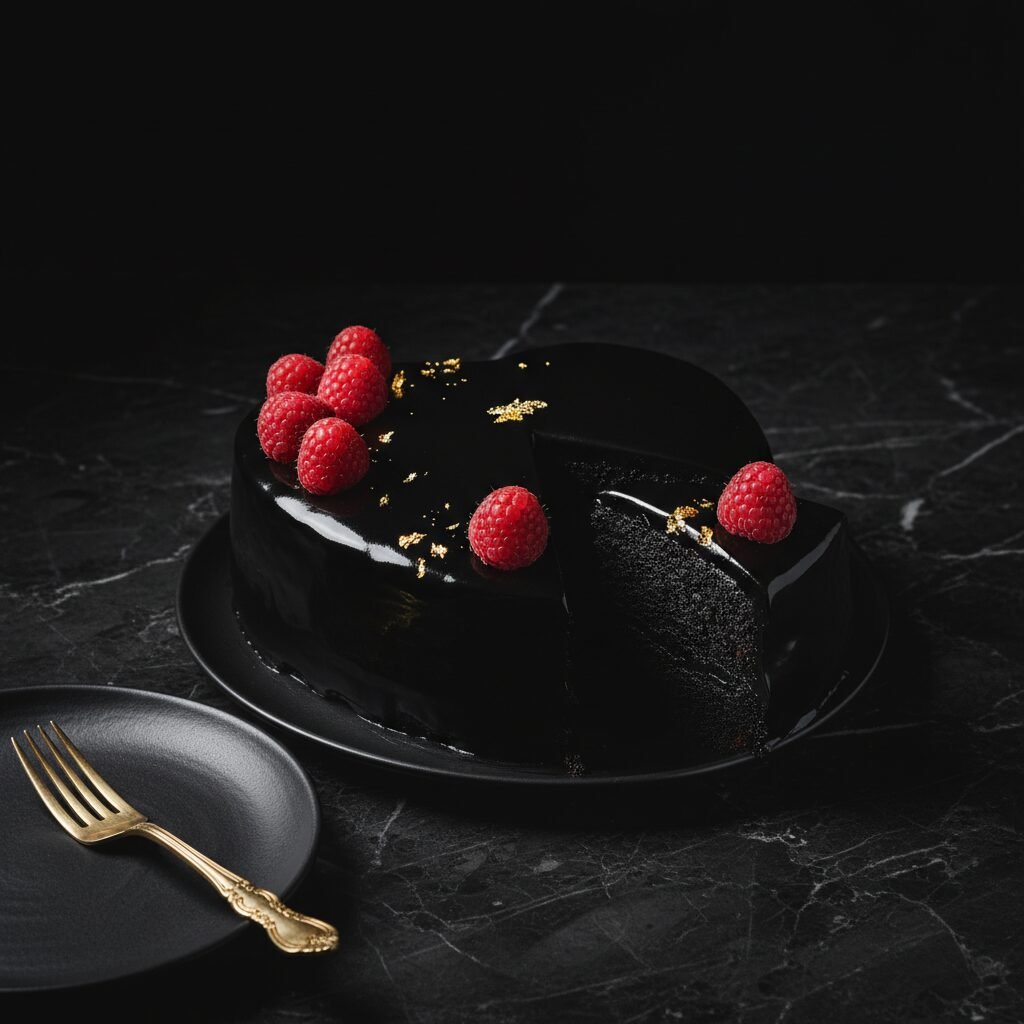
Black Heart Cake
If you are looking to channel your inner goth queen or just want a dessert that screams drama, this Black Heart Cake is it. It is incredibly moist, deeply chocolaty, and naturally black thanks to a secret ingredient—no teeth-staining food dye required!
30 mins
35 mins
2 hrs 15 mins
12 Slices
Dessert
Baking
American
Vegetarian
Okay, let’s be real for a second. We have all spent hours scrolling through Pinterest, admiring those moody, dark, and mysterious cakes that look like they belong in a vampire romance novel. They are stunning, elegant, and a total vibe. But for the longest time, I assumed achieving that pitch-black color meant dumping an entire bottle of artificial food coloring into the batter—and nobody wants that chemical aftertaste or the inevitable stained teeth situation.
Enter the game-changer: Black Cocoa Powder. This is the recipe that changed my baking life. We are making a Black Heart Cake that is technically a ‘Black Velvet’ cake. It is softer than a cloud, moist for days, and has that distinct Oreo-like flavor that we all secretly crave. Whether you are prepping for a spooky Halloween bash, a ‘Galentine’s’ party for the single ladies, or you just appreciate the darker side of aesthetics, this cake is going to be your new obsession.
What I love most about this recipe is that despite looking like it came from a high-end boutique bakery, it is actually a simple oil-based cake. That means no creaming butter for hours and no complicated techniques. It is a whisk-and-bake situation that delivers professional results. So, grab your heart-shaped pans, and let’s make some magic happen in the kitchen!
History & Origins
While the concept of a ‘Black Heart Cake’ feels very modern and trendy—largely popularized by social media aesthetics and the rise of goth-glam weddings—its roots are firmly planted in the history of the Velvet cake. Most of us know and love Red Velvet, which originated in the Victorian era and gained its signature texture from the reaction between acidic buttermilk and raw cocoa powder.
Black Velvet is the rebellious younger sister of Red Velvet. The culinary breakthrough here is the use of Black Cocoa, also known as ultra-Dutch processed cocoa. This ingredient was heavily popularized by commercial cookie manufacturers (think the outer cookie of an Oreo) to achieve a dark color and a mellow, non-bitter flavor. In recent years, home bakers and food bloggers have reclaimed this ingredient to create stunning noir desserts without artificial dyes. This specific heart-shaped iteration is a nod to modern internet culture, where food is as much about the visual statement as it is about the flavor.
Why This Recipe Works
This recipe creates a texture that is velvety smooth and incredibly moist, and there is some cool science behind it. First, we use oil instead of butter as the primary fat. While butter adds flavor, oil is 100% fat and liquid at room temperature, which coats the flour proteins better and keeps the cake moist far longer than butter-based cakes.
The star of the show, Black Cocoa Powder, is heavily alkalized. This means the acidity has been neutralized, resulting in that deep charcoal color and a milder chocolate flavor. Because the cocoa is neutral, we rely on buttermilk and a touch of vinegar to interact with the baking soda. This reaction creates carbon dioxide bubbles, giving the cake a tender, airy crumb despite its rich appearance. Finally, adding hot coffee at the end of the mixing process ‘blooms’ the cocoa powder, intensifying the chocolate notes and ensuring the batter is thin enough to rise evenly without becoming dense.
Why You’ll Love This Recipe
- ✓Naturally black color using black cocoa powder—no dye needed!
- ✓Incredibly moist texture that stays fresh for days.
- ✓Deep, rich chocolate flavor reminiscent of chocolate sandwich cookies.
- ✓Perfect for themed parties like Halloween or Gothic Romance.
- ✓Easy one-bowl mixing method suitable for beginners.
Equipment You’ll Need
- ✓Two 8-inch Heart-Shaped Cake Pans
- ✓Large Mixing Bowl
- ✓Whisk
- ✓Stand Mixer or Hand Mixer (for frosting)
- ✓Wire Cooling Rack
- ✓Offset Spatula
- ✓Parchment Paper
Ingredients
- ✓2 cups All-Purpose Flour
- ✓2 cups Granulated Sugar
- ✓3/4 cup Black Cocoa Powder (must be black cocoa, not regular)
- ✓2 tsp Baking Soda
- ✓1 tsp Baking Powder
- ✓1 tsp Salt
- ✓1 cup Buttermilk, room temperature
- ✓1/2 cup Vegetable Oil
- ✓2 large Eggs, room temperature
- ✓2 tsp Vanilla Extract
- ✓1 cup Hot Strong Coffee (or hot water)
- ✓1 cup Unsalted Butter, softened (for frosting)
- ✓1/2 cup Black Cocoa Powder (for frosting)
- ✓4 cups Powdered Sugar
- ✓1/4 cup Heavy Cream
- ✓1 tsp Vanilla Bean Paste
Instructions
- Prep the Oven and Pans: Preheat your oven to 350°F (175°C). Grease two 8-inch heart-shaped cake pans generously with butter or cooking spray. Line the bottoms with parchment paper cut to the shape of the heart to ensure a perfect release.
- Whisk Dry Ingredients: In a large bowl, sift together the flour, sugar, 3/4 cup black cocoa powder, baking soda, baking powder, and salt. Whisk vigorously to ensure the cocoa is evenly distributed and there are no lumps.
- Mix Wet Ingredients: In a separate medium bowl, whisk together the buttermilk, vegetable oil, eggs, and vanilla extract until fully combined.
- Combine: Pour the wet ingredients into the dry ingredients. Whisk gently until just combined. Do not overmix at this stage.
- Add the Coffee: Slowly pour in the hot coffee while whisking. The batter will be very thin and liquidy—don’t panic, this is exactly what we want! It ensures a super moist cake.
- Bake: Divide the batter evenly between the two prepared pans. Bake for 30-35 minutes, or until a toothpick inserted into the center comes out clean or with just a few moist crumbs attached.
- Cool: Let the cakes cool in the pans for about 10 minutes, then carefully turn them out onto a wire rack to cool completely. They must be 100% cool before frosting, or your buttercream will melt.
- Make the Black Buttercream: While the cakes cool, beat the softened butter in a stand mixer fitted with a paddle attachment until creamy (about 3 minutes). Sift in the 1/2 cup black cocoa powder and mix on low.
- Finish Frosting: Gradually add the powdered sugar alternating with the heavy cream. Add the vanilla bean paste. Whip on high speed for 3-5 minutes until fluffy. If it looks grey, let it sit for an hour; the color will deepen to black as the cocoa absorbs the moisture.
- Assemble: Level the tops of the cakes if they domed. Place one heart on your serving platter, spread a thick layer of frosting, and top with the second heart. Frost the outside of the cake. Use an offset spatula to create swoops or smooth it out for a sleek look.
Expert Cooking Tips
- ✓Finding Black Cocoa: You usually cannot find black cocoa at a standard grocery store. Look for ‘Black Cocoa’ or ‘Ultra Dutch Processed’ online or at specialty baking shops. Regular cocoa will result in a brown cake.
- ✓Room Temperature Matters: Ensure your buttermilk and eggs are at room temperature. This helps them emulsify with the oil properly, creating a uniform crumb structure.
- ✓Don’t Skip the Coffee: Even if you hate coffee, use it! You won’t taste coffee in the final product. It simply enhances the chocolate flavor. If you absolutely must avoid caffeine, use decaf or hot water.
- ✓Darkening the Frosting: Black buttercream often starts out dark grey. The secret is time. Make the frosting a day ahead and store it in the fridge (bring to room temp before using). The color will develop into a jet black overnight.
Substitutions and Variations
If you need to make adjustments, here is what works. For a Gluten-Free version, swap the all-purpose flour for a high-quality 1:1 Gluten-Free Baking Flour blend (one that contains xanthan gum). To make this Vegan, substitute the eggs with flax eggs (2 tbsp flax meal + 6 tbsp water), use a plant-based buttermilk (soy milk + 1 tbsp vinegar), and swap the butter/cream in the frosting for vegan butter sticks and coconut cream.
Common Mistakes to Avoid
The biggest mistake people make with this cake is overbaking. Because the cake is black, you cannot see it browning, so visual cues are tricky. Rely on the toothpick test. If you bake it too long, it will lose that signature velvet moisture. Another mistake is using regular cocoa powder and expecting it to look black. Natural cocoa (like Hershey’s standard) is acidic and light brown; it will not give you the dark aesthetic or the Oreo-like flavor profile.
Serving Suggestions
This cake is a drama queen, so style it accordingly! I love serving this on a white or gold cake stand for maximum contrast. For a pop of color, top it with fresh raspberries, strawberries, or even edible red roses for a romantic vibe. If you are feeling extra fancy, a dusting of edible gold luster dust or gold leaf against the black frosting looks incredibly luxurious. Serve with a glass of red wine or a cold glass of milk.
Storage and Reheating Tips
Because of the buttercream, this cake is best stored in an airtight cake container. It can sit at room temperature for up to 2 days (as long as your kitchen isn’t hot). For longer storage, keep it in the fridge for up to 5 days. Note that the fridge dries out cake, so let slices come to room temperature before eating for the best texture. You can also freeze the unfrosted cake layers wrapped in plastic wrap for up to 3 months.
Nutrition Facts (Estimated)
| Serving Size | 1 Slice |
| Calories | 580 |
| Fat | 28g |
| Saturated Fat | 12g |
| Unsaturated Fat | 14g |
| Trans Fat | 0g |
| Cholesterol | 65mg |
| Sodium | 320mg |
| Carbohydrates | 78g |
| Fiber | 4g |
| Sugar | 45g |
| Protein | 6g |
Frequently Asked Questions
Will black cocoa stain my teeth?
Yes, temporarily! Just like eating fresh blueberries or drinking red wine, black cocoa can leave a dark tint on your tongue and teeth. It washes away with water or a quick brush, but maybe don’t eat a huge slice right before a photo shoot!
Can I use food coloring instead of black cocoa?
Technically yes, but I strongly advise against it. To get this level of black with gel coloring, you have to use a massive amount, which can make the frosting taste bitter and chemical-like. Black cocoa is the natural, tastier path.
What does black cocoa taste like?
It tastes exactly like the wafer part of an Oreo cookie. It is less acidic and less fruity than regular dark chocolate, offering a smooth, earthy, bittersweet flavor.
My batter is super watery, did I mess up?
Not at all! This is a high-liquid batter (similar to many chocolate cake recipes). The thin consistency allows the flour to hydrate fully and results in a very moist, tender cake.
Can I make this as cupcakes?
Absolutely. This recipe will make about 24 standard cupcakes. Bake them for 18-22 minutes at the same temperature.
Why do I need vinegar/buttermilk if cocoa is alkalized?
Since black cocoa has no acid, we must add acid (buttermilk) back into the recipe to react with the baking soda. This reaction creates the lift so the cake isn’t a dense brick.
Where can I buy heart-shaped pans?
Amazon, Michaels, or Joann Fabrics usually carry them, especially around Valentine’s Day. If you don’t have one, you can bake round cakes and trim them, but the pans make it much easier.
Can I use melted butter instead of oil in the cake?
You can, but the cake will be slightly drier. Oil coats the flour better and stays liquid at room temperature, keeping the cake feeling moist longer than butter would.
Conclusion
There you have it, friends! The ultimate Black Heart Cake that is as delicious as it is dramatic. Whether you are baking for a goth soul, an anti-Valentine’s celebration, or just because you love chocolate, this cake is guaranteed to impress. It’s rich, dark, and surprisingly easy to pull off. Don’t be intimidated by the color; it’s just nature doing its thing with cocoa beans! If you make this, please snap a photo and tag me—I am dying to see your dark creations!