Top 39 Refreshing Summer Desserts
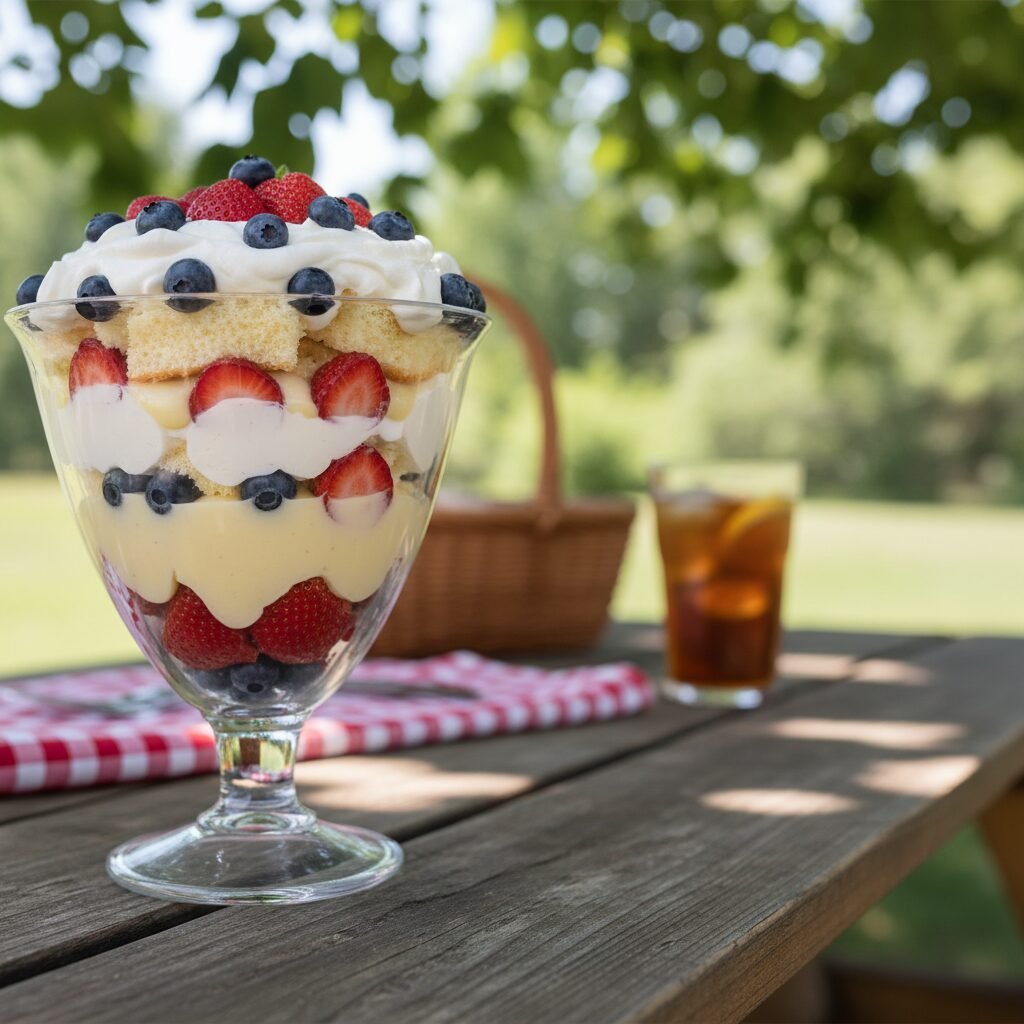
Looking for the perfect ending to a backyard BBQ? This stunning No-Bake Summer Berry Trifle leads our list of top summer treats—it is light, creamy, and absolutely bursting with fresh seasonal fruit.
25 minutes
0 minutes
4 hours (includes chilling)
12-14 Servings
Dessert
No-Bake / Assembly
American / British Fusion
Vegetarian
Is there anything better than a warm summer evening spent on the patio with family and friends? The fireflies are out, the grill is cooling down, and everyone is craving something sweet but light. As a mom, I know the struggle of wanting to serve a showstopper dessert without turning on the oven and heating up the entire house. That is exactly why I have put together this massive guide to the Top 39 Refreshing Summer Desserts! We are talking about everything from zesty lemon bars and frozen yogurt bark to classic icebox cakes and boozy popsicles for the adults.
Summer is the season of abundance when it comes to produce. Juicy strawberries, plump blueberries, sweet peaches, and tart raspberries are at their peak, begging to be turned into something delicious. In this article, while we celebrate 39 amazing ideas including Key Lime Pie, Strawberry Shortcake, and Peach Cobbler, we are going to deep dive into my absolute number one pick from the list: The Ultimate No-Bake Summer Berry Trifle. It is the queen of summer desserts because it feeds a crowd, looks like a million bucks in a glass bowl, and requires zero baking time. It is the perfect centerpiece for your Fourth of July bash or a simple Sunday dinner.
Whether you are a fan of creamy textures, icy treats, or fruit-forward tarts, this list has something for everyone. We will explore why cold desserts work so well in the heat, the history behind these layered delights, and give you the step-by-step method to master the Trifle. So, grab your iced tea, sit back, and let’s dive into the sweetest season of the year!
History & Origins
The concept of the summer dessert has evolved significantly over the centuries. Before the advent of modern refrigeration, summer sweets were often limited to fresh fruit or preserved jams. However, the specific recipe we are highlighting today—the Trifle—has deep roots in English cuisine, dating back to the 16th century. The word ‘trifle’ comes from the old French term trufle, meaning something of little consequence. But let me tell you, this dessert is anything but inconsequential!
Originally, trifles were simple mixtures of boiled cream and fruit. By the mid-18th century, they evolved into the layered masterpieces we recognize today: sponge cake soaked in sherry or fruit juice, rich custard, and whipped cream. It was the ultimate way to use up stale cake and showcase the summer’s harvest. In America, specifically in the South, this evolved into ‘icebox cakes’ during the 1920s and 30s as electric refrigerators became common household appliances. Moms discovered they could layer wafers and cream, let them sit in the ‘icebox’ overnight, and wake up to a cake-like texture without ever striking a match. This method of ‘setting’ rather than ‘baking’ is the foundation of many of the 39 desserts on our list, from cheesecakes to puddings.
Why This Recipe Works
Why does the Berry Trifle top our list of 39 summer favorites? It all comes down to the culinary balance of texture, temperature, and acidity. When the weather is hot, our palates crave acidity to cut through the heat. The fresh berries provide a natural tartness and juice that explodes in your mouth, acting as a refreshing counterpoint to the rich, velvety vanilla pudding and whipped cream.
Structurally, this dessert works because of the moisture migration. By using a porous sponge cake or angel food cake and layering it with creamy elements, the cake absorbs just enough moisture to become tender and flavorful without turning into mush—provided you don’t let it sit too long. The addition of lemon zest in the cream layer bridges the gap between the dairy and the fruit, lifting the heavy fats and making the whole dish taste lighter than it actually is. Furthermore, serving it chilled depresses the perception of sweetness slightly, making it feel more refreshing and less cloying than a hot fudge sundae or a warm brownie.
Why You’ll Love This Recipe
- ✓No-Bake Recipe: Keeps your kitchen cool.
- ✓Feeds a Crowd: Perfect for potlucks and parties.
- ✓Highly Customizable: Swap fruits based on what is in season.
- ✓Make-Ahead Friendly: Tastes better after sitting for a few hours.
- ✓Visual Stunner: The layers look beautiful in a glass bowl.
Equipment You’ll Need
- ✓Large Glass Trifle Bowl (or large salad bowl)
- ✓Electric Hand Mixer or Stand Mixer
- ✓Rubber Spatula
- ✓Sharp Knife
- ✓Cutting Board
- ✓Zester / Microplane
Ingredients
- ✓1 large Angel Food Cake or Pound Cake, cut into 1-inch cubes
- ✓2 packages (3.4 oz each) Instant Vanilla Pudding Mix
- ✓4 cups Cold Milk (whole milk works best for creaminess)
- ✓2 cups Heavy Whipping Cream, very cold
- ✓1/4 cup Powdered Sugar
- ✓1 teaspoon Vanilla Extract
- ✓1 tablespoon Fresh Lemon Zest
- ✓1.5 lbs Fresh Strawberries, hulled and sliced
- ✓1 pint Fresh Blueberries, washed and dried
- ✓1 pint Fresh Raspberries, washed and dried
- ✓1/4 cup Orange Juice or Limoncello (optional, for drizzling)
Instructions
- Start by prepping your fruit. Wash and dry all berries thoroughly. Slice the strawberries. If you want a juicier trifle, toss the strawberries with a tablespoon of sugar and let them sit for 10 minutes, but for a cleaner look, leave them fresh.
- Prepare the pudding layer. In a large bowl, whisk together the Instant Vanilla Pudding Mix and the Cold Milk for about 2 minutes until it begins to soft set. Place this in the fridge for 5 minutes to firm up completely.
- Make the whipped cream. In a separate chilled bowl, whip the Heavy Whipping Cream, Powdered Sugar, and Vanilla Extract with an electric mixer until stiff peaks form. Be careful not to over-whip into butter! Gently fold the Lemon Zest into the whipped cream.
- Fold about 1 cup of the whipped cream into the set vanilla pudding to lighten the texture. Keep the rest of the whipped cream separate for the layers and topping.
- Begin assembly. Place one-third of the cake cubes in the bottom of your trifle bowl. If using, lightly brush or drizzle the cake with a little Orange Juice or Limoncello.
- Spoon one-third of the pudding mixture over the cake, spreading it out to the edges of the glass so the layers are visible.
- Add a generous layer of mixed berries (strawberries, blueberries, raspberries).
- Repeat the layers: Cake, Pudding, Berries. Continue until you reach the top of the bowl.
- Finish by topping the final layer with the remaining sweetened whipped cream. Garnish artistically with the best-looking berries and a sprig of fresh mint if you have it.
- Cover with plastic wrap and refrigerate for at least 4 hours before serving. This allows the flavors to meld and the cake to soften slightly.
Expert Cooking Tips
- ✓Ensure your heavy cream is ice cold before whipping; it creates more volume.
- ✓If you are in a rush, you can use store-bought whipped topping, but homemade tastes significantly better.
- ✓Dry your berries well after washing. Excess water can make the trifle runny at the bottom.
- ✓Cut the cake with a serrated knife to keep the cubes fluffy and not compressed.
Substitutions and Variations
This recipe is incredibly forgiving! If you aren’t a fan of vanilla pudding, try using lemon curd folded into yogurt for a tart twist. You can swap the Angel Food Cake for brownies to make a chocolate version (one of our top 39 variations!). For a dairy-free option, use coconut milk pudding and coconut whipped cream. If berries aren’t your thing, try layers of caramelized peaches and pecans for a Southern flair.
Common Mistakes to Avoid
The biggest mistake people make with trifles is making them too far in advance. While it needs time to set (about 4 hours), if you leave it for more than 24 hours, the cake can dissolve into mush. Another common error is using warm pudding; make sure your pudding is fully set and cold before layering, or it will melt your whipped cream. Lastly, don’t pack the layers down! Let them sit lightly on top of each other to keep the dessert airy.
Serving Suggestions
Serve this trifle in a large, stemmed glass bowl to show off those beautiful red, white, and blue layers—perfect for patriotic holidays! If you are hosting a socially distanced gathering or a kids’ party, you can build individual mini-trifles in mason jars or clear plastic cups. This pairs beautifully with a glass of crisp Rosé or fresh iced tea.
Storage and Reheating Tips
Trifles are best eaten within 24 hours of assembly. Cover the bowl tightly with plastic wrap or a beeswax wrap and keep it in the coldest part of your fridge. Freezing is not recommended as the pudding will separate and the fruit will become mushy upon thawing.
Nutrition Facts (Estimated)
| Serving Size | 1 cup |
| Calories | 320 kcal |
| Fat | 14g |
| Saturated Fat | 8g |
| Unsaturated Fat | 5g |
| Trans Fat | 0g |
| Cholesterol | 45mg |
| Sodium | 180mg |
| Carbohydrates | 42g |
| Fiber | 3g |
| Sugar | 28g |
| Protein | 5g |
Frequently Asked Questions
Can I make this trifle the day before?
Yes, but it is best to assemble it the morning of your event. If you must make it the night before, use a sturdier cake like pound cake instead of angel food cake.
What other fruits work well in this?
Peaches, mangoes, and kiwis are fantastic summer options. Just avoid fruits that brown quickly, like bananas or apples, unless you treat them with lemon juice first.
Can I use frozen fruit?
I do not recommend frozen fruit for fresh trifles. As frozen fruit thaws, it releases a lot of water which will turn your beautiful dessert into a soup.
Is there a low-sugar option?
Absolutely! Use sugar-free pudding mix and a sugar substitute (like monk fruit) in the whipped cream. The fruit provides plenty of natural sweetness.
How do I transport this to a potluck?
Place the trifle bowl in a cardboard box lined with a towel to prevent it from sliding. Keep it in the coolest part of your car, away from direct sunlight.
Can I use store-bought cake?
100% yes! Store-bought angel food cake or pound cake from the bakery section is a huge time-saver and works perfectly.
My trifle looks messy, what did I do wrong?
You likely smeared the pudding on the glass. When layering, try to place the pudding in the center and gently push it to the edge, or pipe it in for clean lines.
What is the difference between a trifle and a fool?
A fool is usually just pureed fruit folded into custard or cream, whereas a trifle has distinct layers including sponge cake.
Conclusion
There you have it—the ultimate centerpiece for your summer table! While this Berry Trifle is my personal favorite, remember that the world of summer desserts is vast. Whether you try your hand at a frozen s’mores pie, a watermelon pizza, or this luscious trifle, the most important thing is enjoying the process and sharing the sweetness with the people you love. Don’t be afraid to get creative with the other 38 ideas on our list; mix and match flavors to find your family’s new tradition. Stay cool, happy baking (or non-baking!), and enjoy every bite of summer!