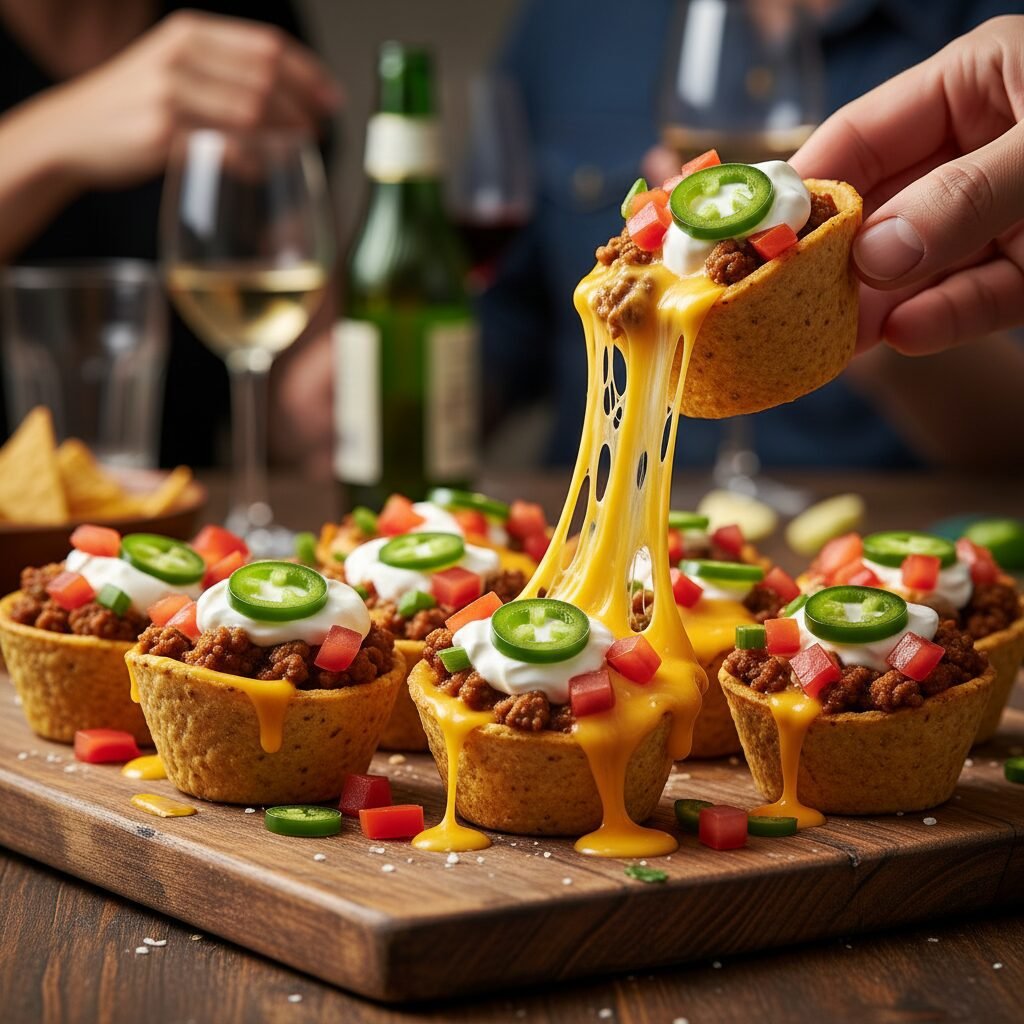
Loaded Nacho Cups
Imagine all the glorious, cheesy goodness of a loaded nacho platter, but neatly packed into individual, crunchy bites. These Loaded Nacho Cups are the ultimate solution to the ‘soggy chip’ dilemma, offering the perfect ratio of meat, cheese, and crunch in every single mouthful. They are effortless to make and vanish from the tray in seconds!
10 mins
10 mins
20 mins
30 cups
Appetizer
Baking
Tex-Mex
Gluten Free
Let’s be honest, ladies—is there anything more universally loved than nachos? They are the king of comfort food, the hero of game day, and the savior of Friday nights when you just don’t feel like cooking a full meal. But, we all know the struggle of the traditional nacho platter. You grab a chip, and it breaks under the weight of the toppings, or worse, you reach for that bottom layer only to find a sad, soggy mess that has absorbed way too much salsa. Enter the Loaded Nacho Cup.
This recipe is an absolute game-changer for busy moms and party hostesses. By using scoop-shaped tortilla chips, we create individual vessels of flavor. Each cup holds its own weight in seasoned beef, savory beans, and gooey melted cheese. The best part? They are virtually mess-free compared to their flat-chip cousins. No more fighting over the one chip that has all the toppings; with these cups, every single bite is the ‘perfect bite’.
I started making these for my kids’ sleepovers, and they became an instant legend in our neighborhood. Now, whether it’s the Super Bowl, a casual potluck, or just a fun ‘appetizer dinner’ on a Tuesday, these nacho cups are the first thing on my list. They are customizable, quick to assemble, and look adorable arranged on a platter. Get ready to be asked for the recipe a dozen times before the night is over!
History & Origins
While our little nacho cups are a modern twist, the history of nachos is actually quite charming and dates back to 1943. The story goes that a group of wives of U.S. soldiers stationed at Fort Duncan in Eagle Pass, Texas, crossed the border into Piedras Negras, Mexico, for a shopping trip. They arrived at a restaurant called the Victory Club after closing time. The maître d’, Ignacio ‘Nacho’ Anaya, didn’t want to turn them away, so he improvised.
Ignacio went into the kitchen, cut tortillas into triangles, fried them, topped them with cheddar cheese and sliced jalapeños, and heated them until the cheese melted. He presented the dish as ‘Nacho’s Especiales’. The dish traveled across the border and eventually became a staple of Tex-Mex cuisine. Our version today honors that spirit of improvisation and hospitality but utilizes the modern invention of the ‘scoop’ chip to perfect the delivery system!
Why This Recipe Works
Culinary engineering is real, and it is the secret behind why these Loaded Nacho Cups work so much better than a standard pile of nachos. The primary reason is structural integrity. A flat chip relies on surface tension to hold heavy toppings like ground beef and beans, which often leads to breakage. The cup shape acts like a tiny bowl, physically containing the ingredients so they can’t slide off.
Secondly, we address the moisture barrier. By mixing the taco-seasoned meat with a little bit of refried beans (my secret weapon!), we create a cohesive filling that binds together. This prevents grease from seeping straight into the chip and making it soggy before it even hits the table. The cheese acts as a ‘lid’ during the baking process, sealing in the heat and moisture of the meat while the exposed edges of the chip toast to a perfect golden crunch.
Why You’ll Love This Recipe
- ✓Ready in under 20 minutes from start to finish.
- ✓Perfect meat-to-cheese-to-chip ratio in every bite.
- ✓No soggy chips thanks to individual portioning.
- ✓Kid-friendly and easy for little hands to hold.
- ✓Highly customizable with your favorite toppings.
- ✓Great for crowds and easy to double or triple.
Equipment You’ll Need
- ✓Large skillet
- ✓Baking sheet
- ✓Parchment paper
- ✓Spatula
- ✓Measuring spoons
- ✓Cheese grater
Ingredients
- ✓1 bag (10 oz) scoop-shaped tortilla chips (like Tostitos Scoops)
- ✓1 lb lean ground beef (90/10 recommended)
- ✓1 packet (1 oz) taco seasoning (or homemade blend)
- ✓1/2 cup refried beans (canned or homemade)
- ✓2 cups Colby Jack or Cheddar cheese, freshly shredded
- ✓1/4 cup water
- ✓Optional Toppings:
- ✓1/2 cup sour cream
- ✓1/4 cup green onions, sliced
- ✓1 jalapeño, thinly sliced (fresh or pickled)
- ✓1/2 cup diced tomatoes or pico de gallo
- ✓Guacamole or diced avocado
Instructions
- Preheat and Prep: Preheat your oven to 375°F (190°C). Line a large baking sheet with parchment paper for easy cleanup. Arrange the scoop chips in a single layer on the baking sheet. Discard any broken chips (or eat them as a snack while you cook!).
- Cook the Beef: Heat a large skillet over medium-high heat. Add the ground beef and cook, breaking it up with a spatula, until fully browned and no pink remains. Drain any excess grease very well.
- Season the Mixture: Return the skillet to the heat. Add the taco seasoning packet and 1/4 cup of water. Stir to combine and let simmer for 2 minutes until the liquid thickens.
- The Secret Binder: Stir in the 1/2 cup of refried beans into the meat mixture. Mix until well combined. Note: This helps the meat stick together inside the cup so it doesn’t crumble out when you take a bite!
- Assemble the Cups: Using a small spoon, scoop about 1 teaspoon of the meat and bean mixture into each tortilla cup. Do not overfill, or you won’t have room for the cheese!
- Add the Cheese: Top each beef-filled cup with a generous pinch of shredded cheese. Try to keep the cheese inside the cup to prevent it from melting onto the pan.
- Bake: Place the baking sheet in the oven and bake for 7-10 minutes, or until the cheese is completely melted and bubbly, and the edges of the chips are slightly golden.
- Garnish and Serve: Remove from the oven. While warm, top with a dollop of sour cream, a slice of jalapeño, diced tomatoes, and a sprinkle of green onions. Serve immediately while the cheese is gooey!
Expert Cooking Tips
- ✓Grate Your Own Cheese: Pre-shredded cheese contains anti-caking agents (cellulose) that prevent it from melting smoothly. For that restaurant-style cheese pull, buy a block and grate it yourself.
- ✓Drain the Meat Well: Since the chips are cups, any grease left in the meat will pool at the bottom of the chip and make it soggy. Drain the beef thoroughly before adding seasoning.
- ✓Don’t Assemble Too Early: You can cook the meat mixture ahead of time, but don’t fill the chips until you are ready to bake. If they sit filled for hours, the moisture will eventually soften the crunch.
- ✓Watch the Oven: Chips can go from toasted to burnt very quickly. Keep an eye on them around the 7-minute mark.
Substitutions and Variations
This recipe is incredibly versatile! If you are looking to lighten things up, you can easily swap the ground beef for ground turkey or chicken; just add a little extra pinch of cumin to boost the flavor. For a vegetarian version, skip the meat entirely and use a mix of black beans, corn, and the refried beans as the base.
If you don’t have refried beans, you can use a tablespoon of cream cheese mixed into the meat to create that binding effect. For those with dairy allergies, use a high-quality vegan cheese shred and omit the sour cream or use a dairy-free alternative. If you can’t find ‘scoop’ chips, you can use standard round chips, but you will need to layer them carefully on the pan.
Common Mistakes to Avoid
The biggest mistake people make is overfilling the cups. It is tempting to pile it high, but remember: it’s a finger food. If it’s too heavy, it becomes difficult to eat gracefully. Stick to a teaspoon of meat filling.
Another common error is using cold toppings on cold chips. Make sure you serve these immediately after baking. If you let them sit out for an hour, the cheese hardens and the magic is lost. Also, avoid putting wet toppings like salsa or guacamole inside the cup before baking; these should always be added fresh after they come out of the oven to maintain texture contrast.
Serving Suggestions
These Loaded Nacho Cups are the star of the show, but they love company! Serve them on a large wooden board or a white ceramic platter to make the colors pop. Place small bowls of extra salsa, guacamole, and sour cream in the center of the platter for dipping.
If you are serving these as a main course for a fun family dinner (which I highly recommend!), pair them with a fresh Southwestern salad featuring corn, black beans, and a cilantro-lime vinaigrette to cut through the richness of the cheese. They also pair wonderfully with a cold margarita or a sparkling limeade for the kids!
Storage and Reheating Tips
To be perfectly honest, these are best eaten immediately. However, if you have leftovers, store them in an airtight container in the refrigerator for up to 2 days. To reheat, do not microwave them—they will become rubbery and soft. Instead, place them back on a baking sheet and reheat in the oven or a toaster oven at 350°F for about 5 minutes until crisp again. Note that fresh toppings like sour cream and lettuce will not reheat well, so try to scrape those off before reheating.
Nutrition Facts (Estimated)
| Serving Size | 3 cups |
| Calories | 320 |
| Fat | 18g |
| Saturated Fat | 8g |
| Unsaturated Fat | 9g |
| Trans Fat | 0g |
| Cholesterol | 45mg |
| Sodium | 450mg |
| Carbohydrates | 24g |
| Fiber | 3g |
| Sugar | 2g |
| Protein | 14g |
Frequently Asked Questions
Can I make these ahead of time for a party?
You can prep the components ahead! Cook the meat mixture and shred the cheese up to 2 days in advance. Store them in the fridge. When guests arrive, just fill the chips and bake.
Are these gluten-free?
Most corn tortilla chips are naturally gluten-free, but always check the package to be sure they were processed in a gluten-free facility. Ensure your taco seasoning is also GF.
My chips keep breaking when I fill them, what am I doing wrong?
You might be pressing too hard or using a spoon that is too large. Use a small teaspoon or even a melon baller to gently place the filling inside.
Can I freeze these?
No, I do not recommend freezing the assembled nachos. The chips will absorb moisture and become mushy upon thawing. You can, however, freeze the cooked meat mixture.
What is the best cheese to use?
Colby Jack is my favorite because it melts beautifully and has a mild flavor. Sharp Cheddar adds a nice kick, and Monterey Jack is super creamy. A ‘Mexican Blend’ works great too!
How do I make them spicy?
Add a pinch of cayenne pepper to the meat mixture, use ‘Hot’ taco seasoning, or top with fresh serrano peppers instead of jalapeños.
Can I use chicken instead of beef?
Absolutely! Shredded rotisserie chicken mixed with taco seasoning and a little cream cheese makes a fantastic filling.
How many cups should I plan per person?
For an appetizer, plan on 3-4 cups per person. If this is the main meal, plan on 8-10 cups per person.
Conclusion
There you have it, friends! The secret to winning your next potluck or simply surviving a chaotic weeknight with a smile. These Loaded Nacho Cups are crunchy, cheesy, savory little bites of heaven that bring everyone together. They are proof that you don’t need hours in the kitchen to create something delicious and memorable.
I can’t wait to see your creations! If you make these, please snap a photo and tag me on Instagram or leave a comment below letting me know what toppings you chose. Don’t forget to pin this recipe to your ‘Appetizers’ or ‘Game Day Food’ boards on Pinterest so you can find it easily next time. Happy snacking!