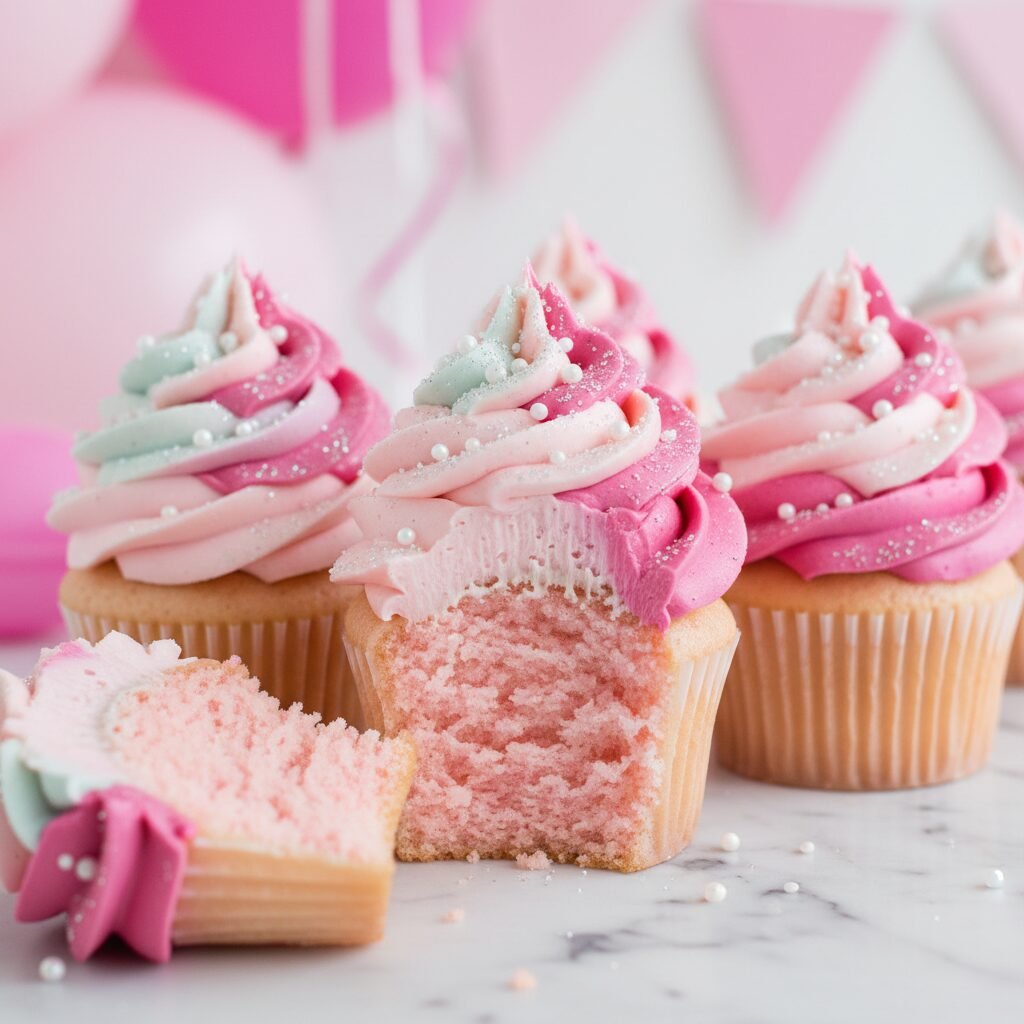
Barbie Cupcakes
Calling all Barbie girls! These cupcakes are pure pink perfection, featuring a tender vanilla crumb and the dreamiest, most swirl-able buttercream frosting you’ve ever tasted.
20 mins
20 mins
1 hour
12-14 Cupcakes
Dessert
Baking
American
Vegetarian
Hi mamas! If there is one thing that never goes out of style, it is the joy of pink, sparkles, and a little bit of nostalgia. Whether you are planning the ultimate birthday bash for your little princess, hosting a girls’ movie night, or just riding the wave of the massive Barbiecore trend, these Barbie Cupcakes are exactly what you need in your life right now.
We are talking about a dessert that screams fun. But let’s be real—pretty food needs to taste good, too. I have tested this recipe specifically to ensure that adding food coloring doesn’t dry out the cake. The result? A super moist, tender crumb that tastes like high-end bakery vanilla cake, topped with a mountain of fluffy buttercream that is just begging for edible glitter. It is whimsical, it is fabulous, and it is surprisingly easy to pull off right in your own kitchen.
Get your aprons on, queue up your favorite pop playlist, and let’s bake something that would make Barbie herself proud!
History & Origins
While cupcakes have been around since the 19th century, the cultural phenomenon of Barbie dates back to March 9, 1959, when Ruth Handler debuted the fashion doll at the American International Toy Fair in New York. Barbie changed the game for toys, allowing girls to imagine themselves as anything from astronauts to doctors.
Over the decades, Barbie became synonymous with a specific aesthetic: bold, unapologetic, vibrant pink. This signature “Barbie Pink” (Pantone 219 C) has transcended the toy aisle to influence fashion, interior design, and, of course, baking! With the recent resurgence of Barbie mania thanks to pop culture and movies, “Barbiecore” baking has taken Pinterest by storm. These cupcakes are a tribute to over 60 years of fashion and fun, translating that iconic style into a delicious, edible form.
Why This Recipe Works
You might be thinking, “Can’t I just put pink dye in a box mix?” You certainly can, but here is why this homemade recipe is superior. Box mixes often rely on oil, which can sometimes result in a greasy texture. This recipe uses the creaming method, beating butter and sugar to create air pockets that expand in the oven, giving you that classic, fluffy cupcake dome.
The secret weapon here is sour cream. The acidity in the sour cream tenderizes the gluten strands in the flour, resulting in a melt-in-your-mouth texture, while the extra fat content ensures the cupcakes stay moist for days. Furthermore, we use gel food coloring rather than liquid drops. Liquid drops can throw off your liquid-to-dry ratio, potentially making the batter too runny. Gel allows us to achieve that electric, vibrant Barbie pink without altering the chemistry of the batter.
Why You’ll Love This Recipe
- ✓Vibrant, photo-ready pink color without a chemical aftertaste
- ✓Super moist texture thanks to the addition of sour cream
- ✓Sturdy buttercream perfect for high swirls and piping
- ✓Kid-friendly recipe that is easy to mix and decorate
- ✓Customizable with your favorite sprinkles and edible glitter
Equipment You’ll Need
- ✓Standard 12-cup muffin tin
- ✓Pink or metallic cupcake liners
- ✓Stand mixer or electric hand mixer
- ✓Large mixing bowl
- ✓Rubber spatula
- ✓Piping bag
- ✓Wilton 1M or 2D piping tip (for the swirls)
- ✓Cooling rack
Ingredients
- ✓1 1/2 cups all-purpose flour, sifted
- ✓1 1/2 tsp baking powder
- ✓1/4 tsp salt
- ✓1/2 cup unsalted butter, softened to room temperature
- ✓1 cup granulated sugar
- ✓2 large eggs, room temperature
- ✓2 tsp pure vanilla extract
- ✓1/2 cup sour cream, room temperature
- ✓1/4 cup whole milk, room temperature
- ✓Pink gel food coloring (I recommend Americolor ‘Electric Pink’ or Wilton ‘Rose’)
- ✓For the Frosting:
- ✓1 cup (2 sticks) unsalted butter, softened
- ✓4 cups powdered sugar
- ✓2-3 tbsp heavy cream
- ✓1 tsp vanilla extract
- ✓Pinch of salt
- ✓Pink gel food coloring
- ✓Edible glitter or disco dust
- ✓Assorted pink and white sprinkles
Instructions
- Preheat and Prep: Preheat your oven to 350°F (175°C). Line your muffin tin with your fabulous pink liners. Set aside.
- Whisk Dry Ingredients: In a medium bowl, whisk together the flour, baking powder, and salt until well combined. This ensures an even rise.
- Cream Butter and Sugar: In the bowl of your stand mixer fitted with the paddle attachment (or a large bowl with a hand mixer), beat the softened butter and granulated sugar on medium-high speed for about 3-4 minutes. You want it pale, light, and fluffy.
- Add Eggs and Vanilla: Scrape down the sides of the bowl. Add the eggs one at a time, beating well after each addition. Mix in the vanilla extract.
- Make it Pink: Add a small drop of pink gel food coloring to the wet mixture. Mix until the color is uniform. Remember, the color will darken slightly as it bakes, but you want a nice vibrant base now.
- Combine Wet and Dry: Reduce mixer speed to low. Add half of the flour mixture, followed by the sour cream and milk, and then the remaining flour mixture. Mix just until the flour streaks disappear. Do not overmix!
- Fill the Liners: Use a cookie scoop or spoon to fill the cupcake liners about 2/3 full. Do not overfill, or they will spill over and lose that cute shape.
- Bake: Bake for 18-20 minutes, or until a toothpick inserted into the center comes out clean or with just a few moist crumbs.
- Cool: Let the cupcakes cool in the pan for 5 minutes, then transfer them to a wire rack to cool completely before frosting.
- Make the Frosting: While cupcakes cool, beat the 1 cup of butter for the frosting on high speed for 5 minutes until it is almost white and super creamy. Gradually add powdered sugar, 1 cup at a time, mixing on low.
- Whip and Tint: Add the vanilla, salt, and 1 tablespoon of heavy cream. Turn the mixer to high and whip for 3 minutes. Add more cream if needed for consistency. Add a tiny drop of pink gel coloring and mix until you achieve your desired Barbie shade.
- Decorate: Fit a piping bag with a 1M star tip and fill with frosting. Pipe generous swirls onto the cooled cupcakes. Immediately top with sprinkles and a dusting of edible glitter.
Expert Cooking Tips
- ✓Room Temperature is Key: Ensure your butter, eggs, sour cream, and milk are all at room temperature. This creates an emulsion that traps air, resulting in a lighter cupcake.
- ✓Gel vs. Liquid: Always use gel paste coloring. Liquid food coloring adds water to the batter which can affect the rise and texture.
- ✓Don’t Overmix: Once the flour hits the bowl, mix gently. Overmixing develops gluten which leads to tough, dense cupcakes.
- ✓Cool Completely: If you try to frost a cupcake that is even slightly warm, your beautiful butter swirls will melt into a sad puddle. Patience is a virtue here!
- ✓The Two-Tone Swirl: For a fun effect, put a stripe of dark pink gel coloring inside your piping bag before filling it with light pink frosting. This creates a stunning two-tone effect when piped.
Substitutions and Variations
If you need to tweak this recipe for dietary needs or pantry shortages, here is how to do it safely:
- Gluten-Free: Swap the all-purpose flour for a high-quality 1:1 Gluten-Free Baking Flour blend (like King Arthur or Bob’s Red Mill).
- Dairy-Free: Use plant-based butter sticks (not tub margarine) and swap the sour cream for a dairy-free plain yogurt or coconut cream. Use almond or oat milk instead of whole milk.
- Flavor Twist: Want something fruity? Add 1/2 teaspoon of strawberry or raspberry extract to the batter alongside the vanilla.
- No Sour Cream? Plain, full-fat Greek yogurt is a perfect 1:1 substitute for sour cream.
Common Mistakes to Avoid
The biggest mistake people make is overbaking. Pink cake tends to look brownish if it browns too much on the edges, ruining the aesthetic. Keep a close eye on them at the 18-minute mark. Another common issue is using melted butter instead of softened butter; this will make your cupcakes greasy and flat. Lastly, avoid using granulated sugar in the frosting—it will be gritty. Stick to powdered (confectioners’) sugar for that silky smooth finish.
Serving Suggestions
These Barbie Cupcakes are the star of the show, but they love company! Serve them alongside a pitcher of sparkling pink lemonade or strawberry milk for the kids. For a mom’s night in, they pair surprisingly well with a crisp Rosé or a pink champagne. Arrange them on a white tiered cake stand to really let the pink color pop. If it is a birthday party, add little plastic disco ball toppers or printable Barbie silhouettes for extra flair.
Storage and Reheating Tips
Room Temperature: Frosted cupcakes can stay at cool room temperature in an airtight container for up to 2 days.
Refrigerator: If your kitchen is warm, store them in the fridge for up to 4 days. Let them come to room temperature for 30 minutes before eating so the buttercream softens up.
Freezing: You can freeze the unfrosted cupcakes for up to 3 months. Wrap them individually in plastic wrap. Thaw on the counter before frosting.
Nutrition Facts (Estimated)
| Serving Size | 1 Cupcake |
| Calories | 380 kcal |
| Fat | 18g |
| Saturated Fat | 11g |
| Unsaturated Fat | 6g |
| Trans Fat | 0g |
| Cholesterol | 65mg |
| Sodium | 180mg |
| Carbohydrates | 52g |
| Fiber | 0.5g |
| Sugar | 32g |
| Protein | 3g |
Frequently Asked Questions
Can I make these cupcakes ahead of time?
Absolutely! You can bake the cupcakes 1 day in advance and store them in an airtight container. Make the frosting the day of serving for the freshest taste, or make the frosting ahead and refrigerate it (just rewhip it before using).
How do I get that super bright ‘Barbie’ pink?
The trick is using ‘Electric Pink’ or ‘Deep Pink’ gel coloring. Start with a small amount, as the color develops and darkens as it sits. If you want a neon look, look for neon gel colors specifically.
My buttercream is too soft to pipe. What do I do?
If your kitchen is warm, the butter might be melting. Pop the bowl of frosting in the fridge for 10-15 minutes to firm up, then whip it again briefly before piping.
Can I use this recipe for a layer cake?
Yes! This batter yields enough for two 6-inch round cake pans or one 8-inch round pan. You will need to adjust the baking time to approximately 25-30 minutes.
Do I have to use a piping bag?
Not strictly, but for that professional ‘bakery’ look, a piping bag with a 1M tip is essential. If you don’t have one, you can use a Ziploc bag with the corner snipped off, or just use a spatula for a rustic swirl.
Why did my cupcakes sink in the middle?
This usually happens if the oven door was opened too early (letting heat escape) or if the batter was overmixed. It can also happen if your baking powder is expired.
Can I add sprinkles inside the batter?
Yes! This creates ‘Funfetti’ style cupcakes. Just make sure to fold them in gently at the very end so the colors don’t bleed into the batter.
How do I transport these without ruining the frosting?
A dedicated cupcake carrier with deep wells is the best investment. If you don’t have one, place them in a shallow box and use a little dab of frosting on the bottom of each liner to ‘glue’ the cupcake to the box so they don’t slide.
Conclusion
There you have it, mamas—the ultimate guide to making Barbie Cupcakes that are as delicious as they are dazzling. Whether you are reliving your childhood or making magic for your little ones, these pink treats are guaranteed to bring a smile to everyone’s face. They are proof that you don’t need to be a professional pastry chef to create something spectacular. So grab that glitter, embrace the pink, and happy baking!
Don’t forget to snap a pic of your creations and tag me on Pinterest or Instagram—I love seeing your beautiful bakes!