Pillsbury Apple Pie Recipe
Craving that classic, old-fashioned apple pie flavor but short on time? This Pillsbury Apple Pie recipe combines the convenience of refrigerated crusts with a luscious, homemade spiced apple filling for a dessert that tastes just like Grandma’s—minus the flour mess!
20 mins
45 mins
1 hr 5 mins
8 servings
Dessert
Baking
American
Vegetarian
There is something undeniably magical about the aroma of an apple pie baking in the oven. It’s the scent of comfort, of crisp autumn afternoons, and of family gatherings where the dessert table is the star of the show. But let’s be real, busy moms: making pie crust from scratch can be intimidating! The chilling, the rolling, the fear of a soggy bottom—it’s enough to make you reach for a store-bought frozen pie. But wait! There is a glorious middle ground that changes everything.
Enter the Pillsbury Apple Pie. By using high-quality refrigerated pie crusts, we skip the most stressful part of pie-making while still pouring all our love into peeling fresh apples and tossing them in that perfect blend of cinnamon, sugar, and nutmeg. This recipe is my go-to secret weapon for Thanksgiving, Fourth of July, or just a random Tuesday when the kids need a treat.
I remember the first time I made this for a potluck. I was terrified someone would ask, "Is this crust homemade?" Instead, everyone just closed their eyes, hummed in delight, and asked for seconds. That is the beauty of this recipe: it gives you all the credit for a scratch-made taste with a fraction of the effort. So, grab your apron and let’s bake some memories!
History & Origins
While the phrase "as American as apple pie" is iconic, the concept of baking apples in pastry shells actually dates back to medieval Europe. Early recipes from England often didn’t include sugar (which was a luxury) and the crust was practically inedible—just a vessel to hold the filling! Thankfully, culinary evolution brought us the sweet, buttery, flaky masterpiece we know today.
The game-changer for modern home bakers came with the convenience revolution of the mid-20th century. Pillsbury, a brand synonymous with American baking since 1869, introduced refrigerated dough products that transformed kitchens. Their refrigerated pie crusts allowed home cooks to bypass the technical difficulty of cutting butter into flour, making pie accessible to everyone, regardless of skill level. This recipe honors that tradition of innovation by marrying convenience with fresh ingredients.
Why This Recipe Works
This recipe works beautifully because it balances convenience with freshness. The Pillsbury refrigerated crusts are scientifically formulated to yield consistent flakiness. They contain lard or shortening distributed evenly, which creates those distinct layers when baked—something that can be hit-or-miss with homemade dough if the butter melts too fast.
On the inside, we use a mix of apples—usually tart Granny Smiths and sweet Honeycrisps. This ensures the filling has a complex flavor profile and texture; the Granny Smiths hold their shape, while the softer apples break down slightly to create a thick, saucy consistency. By tossing the apples with a little flour and sugar before filling the pie, we draw out the juices and create a self-thickening syrup that prevents the dreaded soggy bottom.
Why You’ll Love This Recipe
- ✓Ready in under 90 minutes from start to finish.
- ✓Uses store-bought crust for guaranteed flaky results.
- ✓Perfect balance of tart and sweet apple filling.
- ✓Classic cinnamon-nutmeg spice blend.
- ✓Ideal for beginner bakers.
- ✓Great for holidays and potlucks.
Equipment You’ll Need
- ✓9-inch glass or ceramic pie plate
- ✓Large mixing bowl
- ✓Apple peeler and corer
- ✓Sharp knife
- ✓Measuring cups and spoons
- ✓Pastry brush
- ✓Aluminum foil or pie shield
Ingredients
- ✓1 box (14.1 oz) Pillsbury™ Refrigerated Pie Crusts (contains 2 crusts), softened as directed on box
- ✓6 cups Granny Smith apples, peeled, cored, and thinly sliced (about 6 medium apples)
- ✓3/4 cup granulated white sugar
- ✓2 tablespoons all-purpose flour
- ✓3/4 teaspoon ground cinnamon
- ✓1/8 teaspoon ground nutmeg
- ✓1/8 teaspoon salt
- ✓1 tablespoon lemon juice (freshly squeezed is best)
- ✓1 tablespoon unsalted butter, cut into small cubes
- ✓1 large egg white (beaten, for egg wash)
- ✓1 tablespoon coarse sugar or sparkling sugar (optional, for topping)
Instructions
- Preheat and Prep: Preheat your oven to 425°F (220°C). Remove the Pillsbury pie crusts from the refrigerator and let them sit on the counter for about 15 minutes to soften. This prevents them from cracking when you unroll them.
- Prepare the Apples: While the crusts are softening, peel, core, and slice your apples. Aim for slices about 1/4 inch thick. Place them in a large bowl and toss with the lemon juice immediately to prevent browning.
- Mix the Filling: In a small bowl, whisk together the sugar, flour, cinnamon, nutmeg, and salt. Sprinkle this mixture over the apples and toss gently until every slice is evenly coated.
- Bottom Crust: Unroll one pie crust and gently press it into the bottom and up the sides of an ungreased 9-inch glass pie plate. Be careful not to stretch the dough.
- Fill the Pie: Spoon the apple mixture into the crust-lined plate. Try to mound the apples slightly higher in the center. Dot the top of the apples with the small cubes of butter.
- Top Crust: Unroll the second crust. You can place it whole over the apples for a traditional look, or cut it into strips to create a lattice top. If using a whole top crust, cut several slits in the center to allow steam to escape.
- Seal and Flute: Trim the overhanging dough to about 1 inch from the rim. Fold the top crust edge under the bottom crust edge, pressing firmly to seal. Flute the edges with your fingers or crimp with a fork for a decorative finish.
- Egg Wash: Brush the top crust lightly with the beaten egg white. Sprinkle with coarse sugar if desired. This gives the pie a professional, shiny finish.
- Bake: Place the pie on the center rack of the oven. Bake for 40 to 45 minutes. The crust should be golden brown and the filling should be bubbly. Tip: After the first 15-20 minutes, cover the edge of the crust with a strip of foil or a pie shield to prevent it from burning.
- Cool: Remove from the oven and let the pie cool on a wire rack for at least 2 hours before serving. This is crucial as it allows the filling to set and thicken.
Expert Cooking Tips
- ✓Don’t skip cooling: Cutting into a hot apple pie will result in a runny mess. Let it set so you get that perfect slice.
- ✓Mix your apples: For the best flavor depth, use half Granny Smith (tart) and half Honeycrisp or Fuji (sweet).
- ✓Keep dough cool: If your kitchen is hot, put the pie in the fridge for 10 minutes before baking. Cold dough hits hot oven equals flaky layers.
- ✓Glass vs. Metal: Glass pie plates are best for beginners because you can lift the pie up and check if the bottom crust is browned.
- ✓Spill protection: Place a baking sheet on the rack below your pie to catch any bubbling juices that might spill over.
Substitutions and Variations
If you are out of certain ingredients, don’t panic! Here are some easy swaps:
- Apples: No Granny Smiths? Braeburn, Jonagold, or Pink Lady apples hold their shape well. Avoid Red Delicious as they get mushy.
- Thickener: If you don’t have flour, you can use 1 tablespoon of cornstarch or tapioca starch instead.
- Spice: If you don’t have nutmeg, you can use allspice or just increase the cinnamon slightly. Pumpkin pie spice also works in a pinch!
- Sugar: You can swap half the white sugar for brown sugar if you want a deeper, caramel-like flavor.
Common Mistakes to Avoid
Even with an easy recipe, things can go sideways. Avoid these common pitfalls:
- Soggy Bottom Crust: This usually happens if the oven isn’t hot enough or the apples are too wet. Make sure to bake at 425°F initially and consider brushing the bottom crust with a little egg white before adding apples to create a seal.
- Burnt Edges: The edges of the pie cook faster than the center. Always use a pie shield or aluminum foil ring halfway through baking.
- Under-baking: If the crust is brown but the apples are crunchy, it’s not done. Test the apples by inserting a knife through the vent; it should slide in easily.
Serving Suggestions
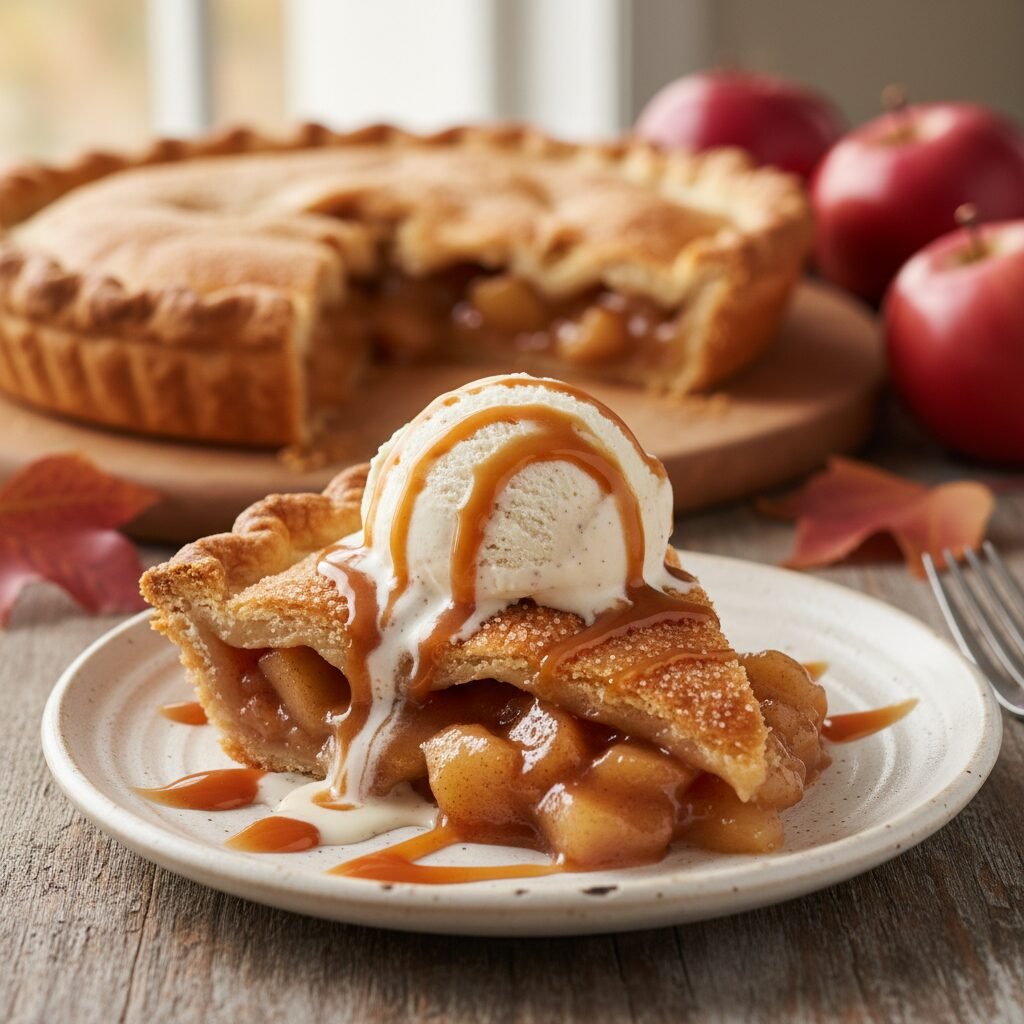
This pie is a superstar on its own, but the right toppings take it to the next level. Serve it slightly warm with:
- A big scoop of vanilla bean ice cream (à la mode is classic for a reason!).
- A dollop of freshly whipped cream with a dash of cinnamon.
- A drizzle of warm salted caramel sauce.
- A slice of sharp cheddar cheese (a controversial but beloved tradition in some regions!).
Storage and Reheating Tips
If you somehow have leftovers (which is rare!), here is how to keep them fresh:
- Room Temperature: You can store the pie covered loosely with foil or plastic wrap at room temperature for up to 2 days.
- Refrigerator: For longer storage, keep it in the fridge for up to 4 days. The crust may lose a little crispness.
- Freezing: You can freeze the baked pie. Wrap it tightly in plastic wrap and then foil. Thaw in the fridge overnight and reheat in a 350°F oven for 15-20 minutes to crisp up the crust.
Nutrition Facts (Estimated)
| Serving Size | 1 slice |
| Calories | 380 kcal |
| Fat | 16g |
| Saturated Fat | 6g |
| Unsaturated Fat | 8g |
| Trans Fat | 0g |
| Cholesterol | 10mg |
| Sodium | 240mg |
| Carbohydrates | 58g |
| Fiber | 3g |
| Sugar | 26g |
| Protein | 2g |
Frequently Asked Questions
Can I use salted butter instead of unsalted?
Yes, absolutely! The amount of butter used is small, so salted butter won’t ruin the flavor. Just omit the pinch of salt in the filling.
Why is my filling runny?
This usually happens if the pie wasn’t cooled long enough. The pectin in the apples needs time to gel as it cools. Wait at least 2 hours before slicing.
Do I have to peel the apples?
It is highly recommended. Apple skins can become tough and chewy when baked, which disrupts the smooth texture of the pie.
Can I make this ahead of time?
Yes! Apple pie is actually better the next day as the juices have time to settle. Just reheat it slightly before serving.
How do I prevent the gap between the top crust and the apples?
Apples shrink when they cook. To minimize the gap, slice apples thinly and mound them high in the center before adding the top crust.
Can I use a lattice cutter for the top?
Definitely. A lattice cutter or simply cutting strips with a knife creates a beautiful presentation and allows steam to escape perfectly.
What if my crust is cracking when I unroll it?
It’s too cold! Let it sit at room temperature for another 5-10 minutes. If it cracks, just wet your fingers slightly and press the dough back together.
Can I add other fruits?
Sure! You can swap 1 cup of apples for cranberries or pears for a fun twist on the classic recipe.
Conclusion
There you have it—the easiest path to apple pie nirvana! This Pillsbury Apple Pie recipe proves that you don’t need to spend hours in the kitchen to create something heartwarming and delicious. It’s all about working smarter, not harder.
Whether you are baking for a holiday crowd or just want to surprise your family on a Sunday afternoon, this pie delivers every single time. So go ahead, embrace the convenience, enjoy the smell of cinnamon filling your home, and get ready to accept all the compliments. Happy baking!