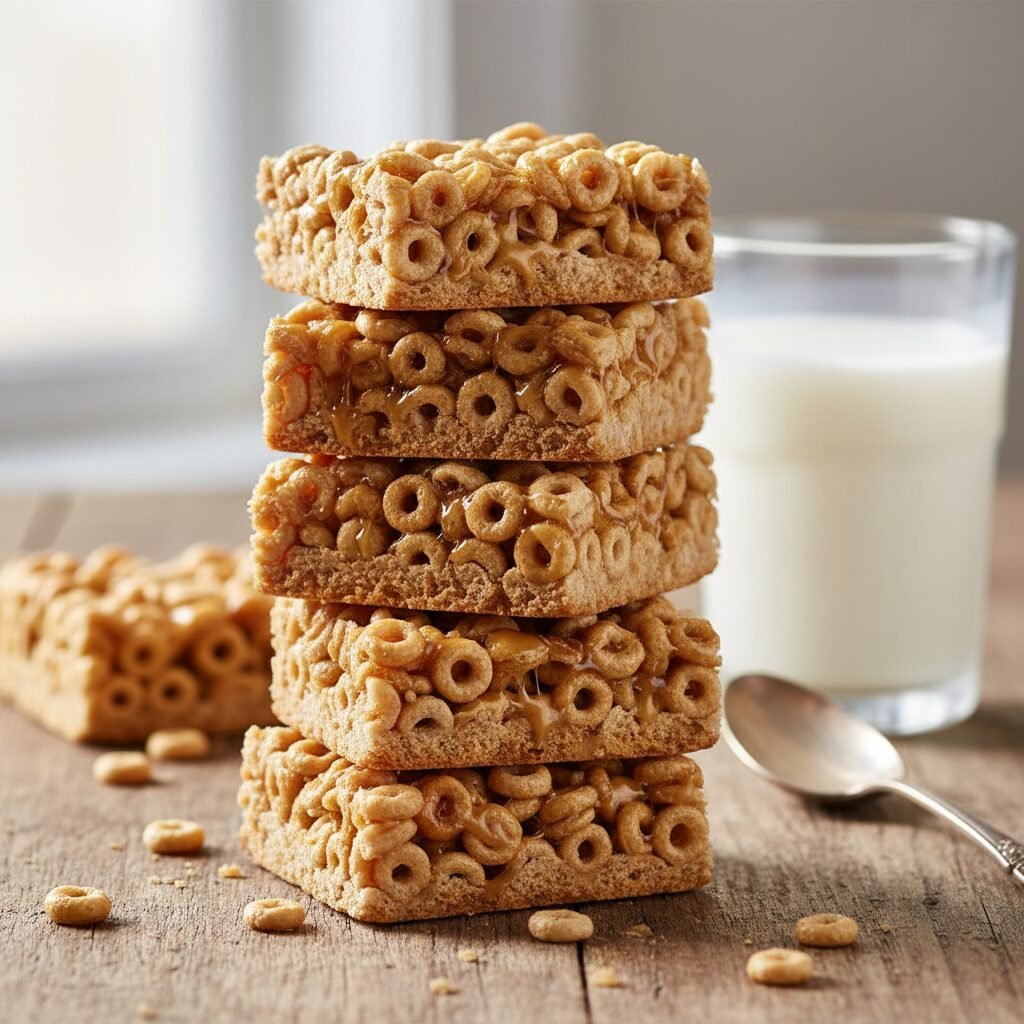
3 Ingredient Peanut Butter Cheerio Bars
Need a wholesome snack that’s ready in minutes? These 3 Ingredient Peanut Butter Cheerio Bars are the holy grail of easy, no-bake treats that kids devour and moms love.
5 minutes
2 minutes
35 minutes
16 bars
Snack
No-Bake
American
Vegetarian
Let’s be real for a second. The after-school hunger monster is real, and it usually strikes right when you have zero energy left to bake a complicated masterpiece. As a mom, I am constantly on the hunt for snacks that bridge the gap between ‘healthy enough to feel good about’ and ‘tasty enough that they won’t get traded at the lunch table.’ Enter the absolute lifesaver of my kitchen: 3 Ingredient Peanut Butter Cheerio Bars.
These bars are not just a recipe; they are a survival strategy. We are talking about three humble pantry staples—Cheerios, peanut butter, and honey—coming together to create something chewy, crunchy, and satisfyingly sweet. There is no flour to sift, no eggs to crack, and best of all, you don’t even have to turn on the oven. This is the kind of recipe you can make while helping with math homework or folding a load of laundry.
What I love most about these bars is the nostalgia factor. They remind me of the sticky, sweet treats my grandma used to make, but with a slightly more wholesome twist. The oats in the cereal provide a nice crunch, while the peanut butter offers that protein punch to keep little bellies full until dinner. Plus, they are incredibly versatile. Whether you are packing them for a road trip, tossing them into a bento box, or sneaking one for yourself with your morning coffee (no judgment here!), these bars always hit the spot.
History & Origins
The concept of the cereal bar is a quintessential piece of Americana. While the exact origin of this specific 3-ingredient variation is hard to pin down to a single inventor, its roots are deeply planted in the mid-20th century ‘back of the box’ recipe culture. We all know the legendary Rice Krispies Treats, which popularized the idea of binding cereal with a sticky sweetener in the late 1930s. However, as home cooks began looking for alternatives to marshmallows and butter, the peanut butter and honey combination emerged as a natural successor.
In the 1970s and 80s, the health food movement saw a rise in ‘energy bites’ and granola bars, moving away from purely sugary confections toward snacks that incorporated oats and nuts. This specific iteration—using Cheerios (or toasted oat cereal)—likely evolved as a parent-hack. It combines the ubiquity of the toddler-favorite cereal with the binding power of honey, stripping away the preservatives found in store-bought granola bars. It is a modern classic born out of necessity and a love for simple, honest ingredients.
Why This Recipe Works
You might be wondering, how do just three ingredients hold together without baking? The science behind these bars is actually quite fascinating. It all comes down to the relationship between the sugar in the honey and the fat in the peanut butter. When you gently heat the honey and peanut butter together, you are essentially creating a simplified caramel or candy syrup.
As the mixture heats, the honey becomes more fluid, allowing it to emulsify perfectly with the oils in the peanut butter. This creates a thick, sticky ‘glue’ that coats every single piece of cereal. The real magic happens during the cooling process. As the temperature drops, the honey returns to a semi-solid state, and the peanut butter firms up. This dual-action binding ensures the bars hold their shape at room temperature but remain soft enough to bite into. If you were to use just peanut butter, they would be a greasy mess; use just honey, and they would be rock hard and sticky. Together, they create the perfect chewy texture.
Why You’ll Love This Recipe
- ✓Only 3 common pantry ingredients required
- ✓Completely no-bake recipe keeps the kitchen cool
- ✓Ready to eat in under 30 minutes
- ✓Packed with protein and fiber
- ✓Kid-friendly and perfect for lunchboxes
- ✓Easily adaptable for gluten-free diets
Equipment You’ll Need
- ✓8×8 inch square baking dish
- ✓Large microwave-safe bowl or saucepan
- ✓Rubber spatula
- ✓Parchment paper
Ingredients
- ✓3 cups Plain Cheerios (or any toasted oat cereal)
- ✓3/4 cup Creamy Peanut Butter (classic commercial brands work best)
- ✓1/2 cup Honey (good quality clover honey)
Instructions
- Prepare the pan: Line an 8×8 inch square baking pan with parchment paper, leaving a little overhang on the sides to act as handles for easy removal later.
- Measure cereal: Pour the 3 cups of Cheerios into a large mixing bowl and set aside.
- Melt the binder: In a microwave-safe bowl (or a small saucepan on the stove), combine the peanut butter and honey. Microwave in 30-second intervals, stirring in between, until the mixture is completely smooth and fluid. This usually takes about 1 minute total. If using the stove, heat over low heat, stirring constantly until combined.
- Combine: Immediately pour the hot peanut butter and honey mixture over the Cheerios.
- Mix thoroughly: Using a rubber spatula, gently fold the mixture until every single piece of cereal is evenly coated. Be gentle so you don’t crush the Cheerios, but be thorough!
- Press into pan: Dump the sticky mixture into your prepared pan. This is the crucial step: grease your hands slightly or use a piece of wax paper to press the mixture firmly and evenly into the pan. You want to compact it well so the bars hold together.
- Chill: Place the pan in the refrigerator for at least 30 minutes to allow the binder to set.
- Slice and serve: Once firm, lift the block out of the pan using the parchment paper handles. Slice into 16 squares (or bars) and enjoy!
Expert Cooking Tips
- ✓Press Firmly: The number one reason these bars fall apart is that they weren’t pressed down hard enough. Really put some weight into it when compacting them into the pan.
- ✓Don’t Overheat: You only want to warm the peanut butter and honey enough to mix them. If you boil the honey, the bars will turn out rock-hard instead of chewy.
- ✓Grease Your Spatula: Spray your rubber spatula with a little non-stick cooking spray before mixing to prevent the honey mixture from sticking to your tools.
- ✓Let Them Set: It is tempting to cut them early, but give them the full 30 minutes in the fridge to ensure they slice cleanly.
Substitutions and Variations
One of the best things about this recipe is how adaptable it is to your pantry or dietary needs. If you have a peanut allergy in the house, you can easily swap the peanut butter for almond butter, cashew butter, or even sunflower seed butter for a nut-free school option. Just keep in mind that natural nut butters (the oily kind that needs stirring) might result in a softer bar that needs to stay refrigerated.
For the sweetener, while honey offers that classic sticky texture, you can use brown rice syrup or agave nectar. Maple syrup is delicious but thinner, so if you use it, you might need to store the bars in the freezer so they don’t get too gooey. And of course, the cereal! While plain Cheerios are the standard, you can use Honey Nut Cheerios for extra sweetness, or even Rice Krispies if that’s what you have on hand.
Common Mistakes to Avoid
The most common mishap with these bars is a texture that is either too crumbly or too hard. If your bars are falling apart, it usually means the ratio of dry to wet ingredients was off (too much cereal), or you didn’t press them into the pan firmly enough. Think of it like packing a snowball—you need pressure to make it stick! On the flip side, if the bars are hard enough to break a tooth, you likely overheated the honey mixture. Sugar goes through stages when cooked, and if it gets to the ‘hard crack’ stage, your bars will be brittle. Gentle warming is all you need!
Serving Suggestions
These bars are fantastic on their own, but you can dress them up for special occasions! Try drizzling melted dark chocolate over the top for a ‘Reese’s’ vibe. They pair beautifully with a cold glass of milk for an after-school snack or a hot latte for a mid-morning mom break. For a fun party treat, you can press the mixture into mini muffin tins to make bite-sized ‘Cheerio cups’!
Storage and Reheating Tips
Store these bars in an airtight container. They will last at room temperature for about 3-4 days, making them great for the counter. However, if your kitchen is warm or you prefer a chewier, firmer texture, keep them in the refrigerator where they will last for up to 2 weeks. You can also freeze them! Wrap individual bars in plastic wrap and freeze for up to 3 months—just let them thaw on the counter for 10 minutes before eating.
Nutrition Facts (Estimated)
| Serving Size | 1 Bar |
| Calories | 145 |
| Fat | 7g |
| Saturated Fat | 1.5g |
| Unsaturated Fat | 4g |
| Trans Fat | 0g |
| Cholesterol | 0mg |
| Sodium | 95mg |
| Carbohydrates | 18g |
| Fiber | 2g |
| Sugar | 9g |
| Protein | 4g |
Frequently Asked Questions
Can I make these vegan?
Yes! Simply swap the honey for brown rice syrup or agave nectar. Ensure your cereal is certified vegan as well (some fortified cereals use lanolin-derived Vitamin D).
Why are my bars falling apart?
This usually happens if the mixture wasn’t pressed firmly enough into the pan or if there was too much cereal relative to the peanut butter/honey mixture. Next time, really compact them down!
Are Cheerios gluten-free?
Most Cheerios varieties are labeled gluten-free because they are made from oats, but always check the specific box label if you have severe celiac disease to ensure there is no cross-contamination.
Can I use natural peanut butter?
You can, but the results may be softer and oilier. Commercial peanut butters (like Jif or Skippy) act as a better binder due to their consistency. If using natural, store the bars in the fridge.
Can I add mix-ins?
Absolutely! Mini chocolate chips, dried cranberries, or chia seeds make great additions. Just stir them in after the mixture has cooled slightly so the chocolate doesn’t melt.
Do I have to keep them in the fridge?
No, they are shelf-stable, but they hold their shape better in the fridge, especially in warmer months. I personally prefer the cold, chewy texture.
Can I double the recipe?
Yes, easily! Just use a 9×13 inch pan instead of an 8×8 square pan and double all the ingredients.
Is this recipe safe for toddlers?
Generally yes, as long as the child has been introduced to peanuts and honey (honey should not be given to infants under 1 year old due to botulism risk). Always cut into small, manageable pieces.
Conclusion
There you have it, mamas! The 3 Ingredient Peanut Butter Cheerio Bars that are about to become your new best friend. They are the perfect example of how simple food is often the best food. No preservatives, no complicated steps, just pure, sweet, crunchy goodness that brings a smile to everyone’s face. Whether you are meal-prepping for a busy week or just need a quick sweet fix on a Tuesday afternoon, this recipe delivers every single time. Give it a try, and I promise, your pantry will never be without Cheerios and honey again!