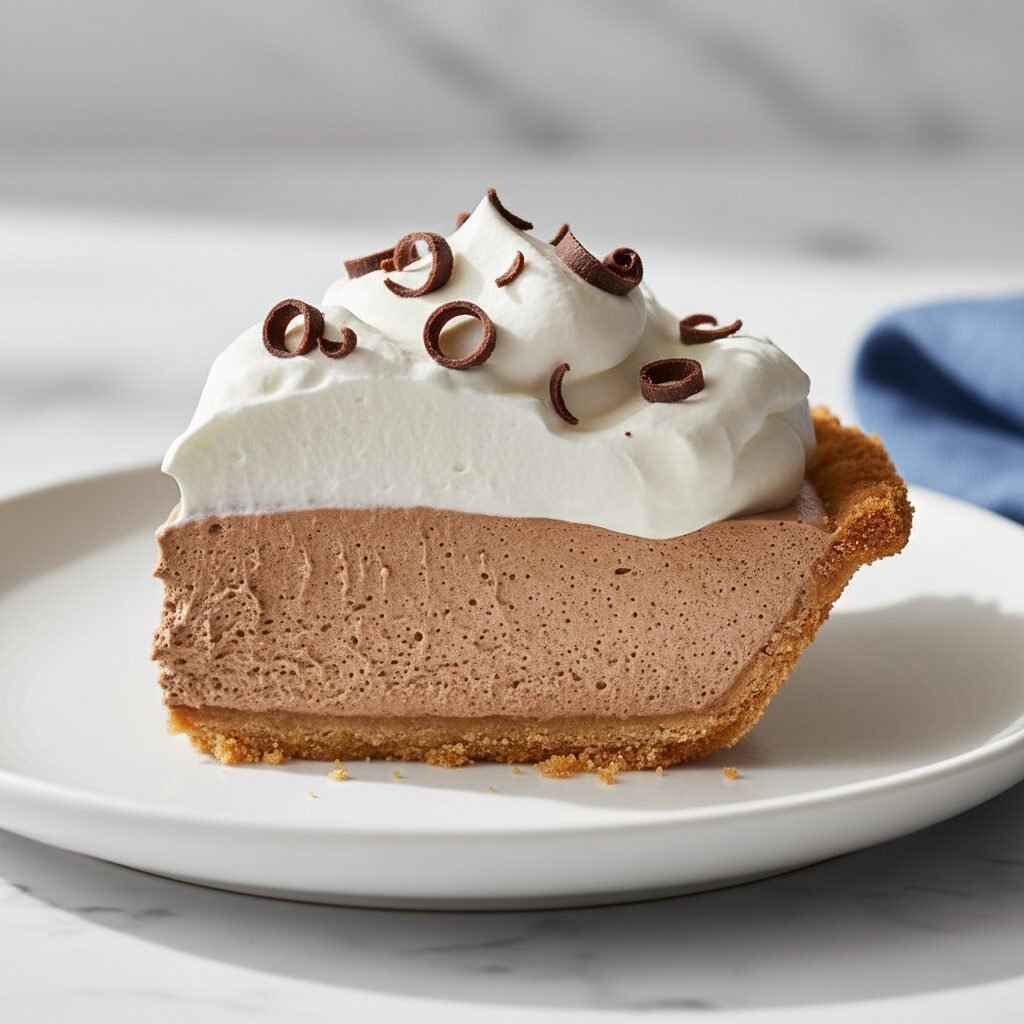
3 Ingredient No Bake Hersheys Pie
If you have five minutes and a serious chocolate craving, this pie is your new best friend. It is creamy, decadent, and ridiculously easy to make with just three simple ingredients.
10 minutes
0 minutes
2 hours 10 minutes (includes chilling)
8 slices
Dessert
No-Bake
American
Vegetarian
Hey there, busy mamas and dessert lovers! Let’s be real for a second. We all have those days where the laundry is piling up, the kids are running circles around the kitchen island, and the thought of baking a complex dessert from scratch feels like climbing Mount Everest. But then, that craving hits. You know the one. It screams for something rich, creamy, and unapologetically chocolatey. Enter the 3-Ingredient No-Bake Hershey’s Pie.
This recipe is absolute magic. It is the kind of dessert that makes you look like a domestic goddess without requiring you to turn on the oven or dirty a dozen mixing bowls. I remember the first time I made this; I was skeptical. How could three humble ingredients transform into something that tastes like a high-end French silk pie? But one bite silenced all my doubts. The texture is light as air yet deeply rich, melting on your tongue in a way that feels like a warm hug.
It is the perfect solution for potlucks, holiday dessert tables, or just a Tuesday night when you need a little treat. Plus, it is completely foolproof. Whether you are a seasoned pro in the kitchen or someone who burns toast, this pie has your back. So, grab your mixing bowl, and let’s whip up some happiness!
History & Origins
While this specific 3-ingredient wonder feels like a modern parenting hack, its roots go back to the mid-20th century era of "Icebox Pies." Before air conditioning was standard in every home, turning on the oven in the heat of summer was a no-go. Homemakers relied on their refrigerators (or iceboxes) to set desserts. The invention of convenient, stabilized whipped toppings in the 1960s—specifically Cool Whip in 1966—revolutionized home desserts.
Suddenly, mousses and cream pies didn’t require raw eggs or tedious double-boiling methods. The Hershey’s bar, an American icon since 1900, was the natural partner for these creamy toppings. Combining melted chocolate with whipped topping created a stable, mousse-like filling that could be poured into the increasingly popular pre-made graham cracker crusts. This recipe is a beautiful evolution of American convenience cooking, stripping away the fuss to leave just the pure, nostalgic flavor of milk chocolate.
Why This Recipe Works
The science behind this pie is surprisingly simple yet effective. It relies on the properties of cocoa butter found in the Hershey’s chocolate and the stabilizers in the whipped topping. When you melt the chocolate, you are liquefying the cocoa butter fats. As you fold this warm liquid into the cold whipped topping, two things happen.
First, the temperature shock begins to re-solidify the chocolate fats, but because they are suspended in the airy foam of the whipped topping, they don’t turn into a hard block. Instead, they create a structure that holds the air bubbles in place. Second, the stabilizers in the Cool Whip (like vegetable oil and gums) emulsify with the chocolate, ensuring the mixture remains smooth and creamy rather than grainy. The result is a filling that sets firm enough to slice cleanly but remains soft and airy, mimicking a traditional mousse that would typically take hours and raw eggs to achieve.
Why You’ll Love This Recipe
- ✓Only 3 ingredients required
- ✓No oven needed
- ✓Ready in under 10 minutes of prep
- ✓Rich, mousse-like texture
- ✓Perfect for holidays and parties
- ✓Easily customizable
Equipment You’ll Need
- ✓Large microwave-safe bowl
- ✓Rubber spatula
- ✓Measuring cups
- ✓Microwave
Ingredients
- ✓1 (6 oz) pre-made Graham Cracker Pie Crust
- ✓7 oz Hershey’s Milk Chocolate Bars (approx. 4.5 regular bars or 1 giant bar broken up)
- ✓8 oz tub Cool Whip (thawed)
Instructions
- Prep the Chocolate: Break your Hershey’s chocolate bars into small, even pieces and place them in a large microwave-safe bowl. This ensures they melt evenly without burning.
- Melt the Chocolate: Microwave the chocolate in 30-second intervals. After each interval, take the bowl out and give it a stir. Repeat this until the chocolate is completely smooth and glossy. Be careful not to overheat it!
- Cool Down: Let the melted chocolate sit on the counter for about 2-3 minutes. You want it to be warm and fluid, but not hot enough to deflate the whipped topping.
- The Folding Technique: Add about one-third of the thawed Cool Whip into the bowl of melted chocolate. Stir this vigorously to lighten the chocolate mixture. Then, gently fold in the remaining Cool Whip using a rubber spatula. Use a sweeping motion—cut down the middle, scrape the bottom, and fold over. Do this until no white streaks remain.
- Fill the Crust: Pour the fluffy chocolate mixture into your pre-made graham cracker crust. Use the back of a spoon or an offset spatula to smooth the top into a nice dome or swirl pattern.
- Chill: Place the pie in the refrigerator for at least 2 hours, or the freezer for 1 hour if you are in a rush. This allows the filling to set perfectly.
- Serve: Slice and serve cold. Top with extra whipped cream or chocolate shavings if desired!
Expert Cooking Tips
- ✓Thaw the Cool Whip: Ensure your whipped topping is completely thawed in the fridge before using. If it is frozen, it will seize the chocolate and create a lumpy texture.
- ✓Don’t Overheat Chocolate: Chocolate burns easily. If you see it getting thick and grainy, it might be burnt. Stick to short bursts in the microwave.
- ✓Room Temp Matters: If your kitchen is very cold, the chocolate might harden too fast. Work quickly once you start folding.
- ✓Garnish Game: Use a vegetable peeler on a chocolate bar to create beautiful curls for a professional bakery look.
Substitutions and Variations
If you aren’t a fan of milk chocolate, this recipe works wonderfully with dark chocolate for a richer, less sweet flavor. You can also swap the graham cracker crust for an Oreo crust if you want a double-chocolate experience. For a lighter version, you can try using Lite Cool Whip, though the texture might be slightly softer. If you are gluten-free, simply use a certified gluten-free pie crust.
Common Mistakes to Avoid
The biggest mistake people make is mixing the hot chocolate with the cold Cool Whip too quickly. If the chocolate is piping hot, it will deflate the air in the whipped topping, resulting in a dense, runny pie. Another common error is over-mixing. Once the white streaks are gone, stop mixing! Overworking the mixture can cause the stabilizers to break down, making the filling lose its volume.
Serving Suggestions
This pie is a showstopper on its own, but you can dress it up! Serve each slice with a fresh strawberry or a few raspberries to cut through the richness. A dollop of extra whipped cream is always a winner. For a salty-sweet combo, try drizzling a little salted caramel sauce over the top right before serving. It pairs perfectly with a hot cup of coffee or a cold glass of milk.
Storage and Reheating Tips
Keep this pie refrigerated. It covers well with the plastic lid that usually comes with the store-bought crust. It will stay fresh in the fridge for up to 3-4 days. If you want to store it longer, you can freeze it! Wrap it tightly in plastic wrap and foil, and it will keep in the freezer for up to 1 month. You can even serve it frozen for an ice-cream cake style treat.
Nutrition Facts (Estimated)
| Serving Size | 1 slice |
| Calories | 380 |
| Fat | 22g |
| Saturated Fat | 14g |
| Unsaturated Fat | 6g |
| Trans Fat | 0g |
| Cholesterol | 10mg |
| Sodium | 140mg |
| Carbohydrates | 42g |
| Fiber | 1g |
| Sugar | 28g |
| Protein | 4g |
Frequently Asked Questions
Can I use homemade whipped cream instead of Cool Whip?
Technically yes, but you need to stabilize it with gelatin or it might weep and not hold its shape as well as Cool Whip, which contains stabilizers.
Can I use chocolate chips instead of Hershey’s bars?
Yes, you can! However, chocolate chips contain stabilizers that keep them shaped, so they melt a bit thicker. Hershey’s bars have a higher cocoa butter content which yields a smoother melt for this specific recipe.
Why is my filling lumpy?
This usually happens if the chocolate cooled down too much before mixing, or if the Cool Whip was still frozen. The temperature difference causes the chocolate to harden instantly into tiny bits.
Can I make this ahead of time?
Absolutely! In fact, it tastes better after sitting for a few hours or overnight, making it the perfect make-ahead dessert for parties.
Is this pie gluten-free?
The filling is generally gluten-free (check labels to be safe), but the graham cracker crust is not. Swap it for a GF crust to make the whole dish safe.
Can I add mix-ins?
Sure! You can fold in crushed nuts, peanut butter chips, or crushed Oreos, but do so gently at the very end to avoid deflating the filling.
How do I get clean slices?
Run your knife under hot water and wipe it dry before each cut. The heat helps glide through the cold chocolate mousse for a bakery-perfect slice.
Can I use almond bark?
You can, but almond bark is a confectionary coating, not real chocolate. The flavor won’t be as rich or authentic as using real Hershey’s bars.
Conclusion
And there you have it—the easiest, most delicious chocolate pie you will ever make. It is amazing how three simple ingredients can come together to create something that brings so much joy. Whether you are making this for a birthday, a potluck, or just because you survived a chaotic Monday, this 3-Ingredient No-Bake Hershey’s Pie is guaranteed to bring smiles to the table. Give it a try, and do not be surprised when your family asks for seconds (and thirds)! Happy no-baking!