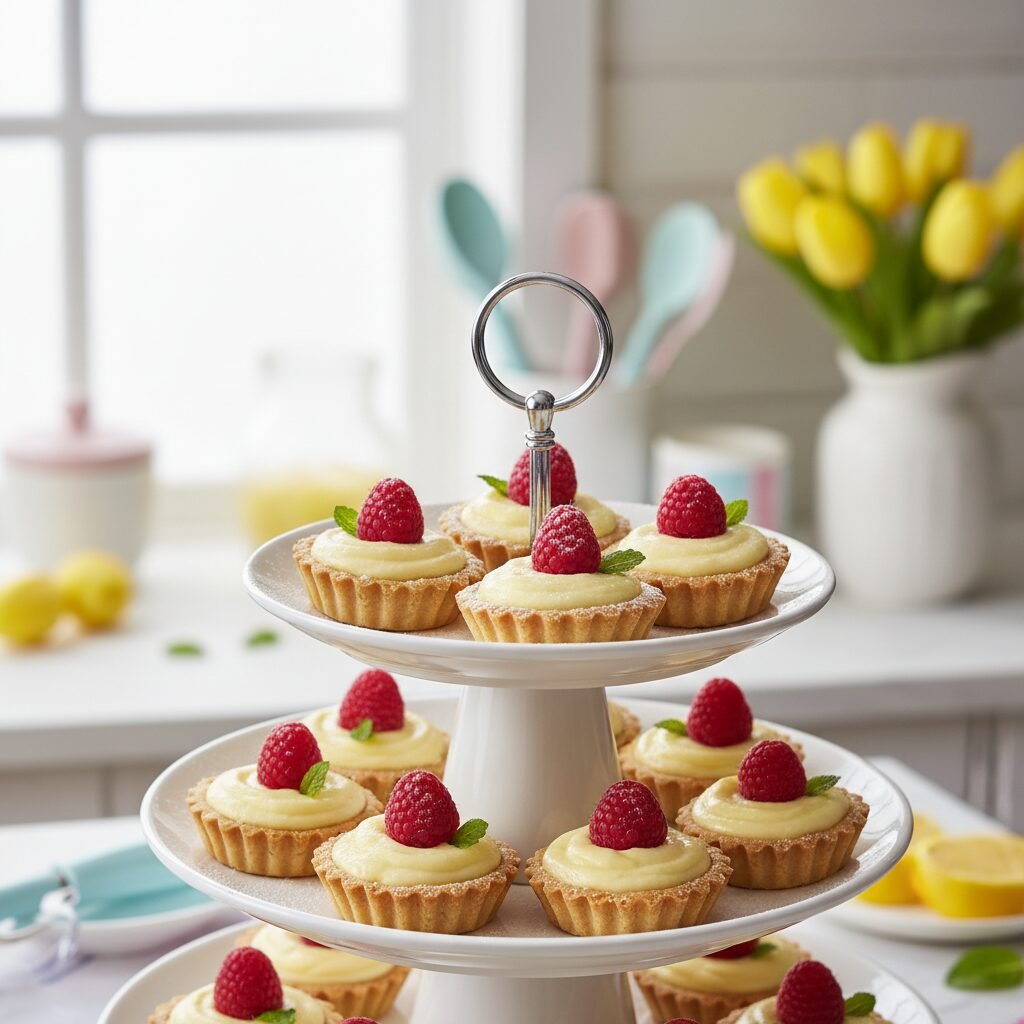
Mini Lemon Cream Tarts
If you are looking for a dessert that screams ‘springtime happiness,’ you have found it! These adorable Mini Lemon Cream Tarts combine a melt-in-your-mouth buttery crust with a zesty, creamy filling that comes together in minutes. They are bite-sized, beautiful, and guaranteed to be the first thing to disappear from the dessert table.
20 minutes
15 minutes
35 minutes (+ chilling time)
24 mini tarts
Dessert
Baking
American
Vegetarian
There is something undeniably cheerful about lemon desserts. They manage to be bright, uplifting, and comforting all at the same time. These Mini Lemon Cream Tarts are my absolute go-to recipe when I need to bring a dessert that looks incredibly impressive but actually requires very little effort. We are talking about a simple press-in shortbread crust—no rolling pin required!—and a filling that is essentially a foolproof, zesty cheesecake mousse.
As a mom, I am always on the hunt for recipes that are ‘grab-and-go’ friendly for parties. Nobody wants to be stuck cutting messy slices of pie while trying to wrangle toddlers. These little tarts are the perfect solution. They are self-contained, mess-free, and offer just the right amount of sweetness to satisfy a craving without being heavy. Plus, the combination of the crisp, buttery shell with the smooth, cool filling is texture perfection.
Whether you are hosting a baby shower, planning an Easter brunch, or just want a sweet treat to enjoy with your afternoon coffee, these tarts are a winner. I honestly cannot tell you how many times I have been asked for the recipe after a party. There is just something about the pop of fresh lemon zest and the creamy texture that hooks people instantly. Let’s get baking!
History & Origins
The concept of the tart dates back to medieval times, originating as a variation of the pie. While pies were often enclosed in a tough pastry designed to preserve the filling (and often discarded), tarts were open-faced and meant to show off high-quality ingredients like fruits and custards. The word ‘tart’ itself comes from the Old French word tarte, which likely referred to the flat pastry.
Lemon curd and lemon cream fillings became particularly popular in the 19th century in Britain and North America, evolving from simple lemon puddings. The specific style of this recipe—using a ‘press-in’ shortbread crust rather than a rolled pastry—is a more modern American convenience, popularized in community cookbooks and magazines in the mid-20th century. It reflects the post-war shift towards easier, faster home baking without sacrificing flavor. The ‘mini’ trend has exploded in recent decades, driven by the desire for portion control and the aesthetic appeal of bite-sized foods on social media platforms like Pinterest!
Why This Recipe Works
This recipe works so well because it balances the flavor spectrum and textural contrast perfectly. First, let’s talk about the crust. By using a high ratio of butter to flour and omitting eggs in the dough, we create a shortbread texture that is ‘short’ (crumbly and tender) rather than chewy. This provides a sturdy vessel that literally melts in your mouth.
For the filling, we are relying on the chemical reaction between the acid in the lemon juice and the proteins in the sweetened condensed milk and cream cheese. When the acid hits the dairy, it thickens the mixture naturally without needing heat or gelatin. This results in a silky, smooth consistency that holds its shape once chilled. The acidity of the lemon also cuts through the richness of the cream cheese and the sweetness of the condensed milk, ensuring the dessert isn’t cloying. It is a culinary balancing act that results in a fresh, clean finish on the palate.
Why You’ll Love This Recipe
- ✓No rolling pin needed – just press and bake!
- ✓Perfect balance of tart lemon and sweet cream.
- ✓Make-ahead friendly for stress-free hosting.
- ✓Bite-sized portions perfect for parties.
- ✓Uses simple pantry staples.
- ✓Easily customizable with different fruit toppings.
Equipment You’ll Need
- ✓Mini muffin tin (24 cup)
- ✓Electric hand mixer or stand mixer
- ✓Tart tamper or a shot glass
- ✓Microplane or zester
- ✓Mixing bowls
- ✓Non-stick cooking spray
Ingredients
- ✓For the Crust:
- ✓1 cup (2 sticks) unsalted butter, softened
- ✓1/2 cup powdered sugar
- ✓2 cups all-purpose flour
- ✓1/2 teaspoon salt
- ✓For the Filling:
- ✓8 oz cream cheese, softened to room temperature
- ✓1 can (14 oz) sweetened condensed milk
- ✓1/3 cup fresh lemon juice (about 2 large lemons)
- ✓1 tablespoon lemon zest
- ✓1 teaspoon vanilla extract
- ✓For Garnish:
- ✓Fresh berries (blueberries, raspberries, or blackberry halves)
- ✓Small mint leaves
- ✓Dusting of powdered sugar
Instructions
- Preheat and Prep: Preheat your oven to 350°F (175°C). Lightly grease a 24-cup mini muffin tin with non-stick cooking spray. Set aside.
- Make the Crust Dough: In a large mixing bowl, cream together the softened butter and powdered sugar until smooth and creamy (about 1-2 minutes). Add the salt and the flour. Mix on low speed just until a dough forms. It might look crumbly at first, but keep mixing until it comes together.
- Form the Tart Shells: Scoop about 1 tablespoon of dough into each muffin cup. Using a tart tamper or the bottom of a shot glass dipped in flour, press the dough down and up the sides of the cup to create a little ‘well’ or cup shape. Try to keep the thickness even.
- Bake the Crusts: Bake for 12-15 minutes, or until the edges are lightly golden brown. Remove from the oven. If the centers have puffed up, gently press them down again with your tamper while they are still warm. Let them cool completely in the pan before removing. This is crucial—if you try to remove them warm, they will crumble!
- Make the Filling: While the crusts are cooling, make the filling. In a medium bowl, beat the softened cream cheese until it is completely smooth and free of lumps.
- Combine Ingredients: Add the sweetened condensed milk, fresh lemon juice, lemon zest, and vanilla extract to the cream cheese. Beat on medium speed until the mixture is thick, creamy, and well combined.
- Fill the Tarts: Once the crusts are cool, carefully remove them from the tin (you can use a small knife to help pop them out). Spoon or pipe the lemon cream mixture into each tart shell.
- Chill: Place the filled tarts in the refrigerator for at least 1 hour to allow the filling to set and firm up.
- Garnish and Serve: Right before serving, top each tart with a fresh berry and a tiny mint leaf. Dust with a little powdered sugar for that bakery-style finish. Enjoy!
Expert Cooking Tips
- ✓Room Temperature is Key: Ensure your cream cheese is truly room temperature before mixing. If it is cold, you will end up with lumpy filling that no amount of beating can fix.
- ✓Don’t Over-Bake: The crusts should be pale golden, not dark brown. They will continue to firm up as they cool.
- ✓The Tamper Trick: If you don’t have a tart tamper, a small spice jar or the back of a rounded teaspoon works well to shape the crusts.
- ✓Zest First: Always zest your lemons before you juice them. It is nearly impossible to zest a squeezed lemon!
- ✓Piping for Pretty Points: Use a ziplock bag with the corner snipped off to pipe the filling into the cups instead of spooning it. It looks neater and is much faster.
Substitutions and Variations
If you need to switch things up, here are some easy swaps! For a Gluten-Free version, swap the all-purpose flour for a 1:1 gluten-free baking flour blend; the shortbread texture holds up well. If you aren’t a fan of lemon, you can use Key Limes for a mini key lime pie vibe—just swap the juice and zest equally. For a lighter filling, you can substitute half of the cream cheese with Mascarpone cheese, though the flavor will be milder. If you don’t have powdered sugar for the crust, granulated sugar works, but the texture will be slightly crunchier rather than meltingly soft.
Common Mistakes to Avoid
The biggest mistake people make is removing the crusts too early. Shortbread is very fragile when warm. You must let them cool in the pan for at least 15-20 minutes, or fully cool, before popping them out. Another common error is using bottled lemon juice. Please, I beg you, use fresh lemons! Bottled juice lacks the floral aroma and zest that gives these tarts their signature ‘sunshine’ flavor. Finally, avoid over-beating the crust dough; once the flour is incorporated, stop mixing, or your crust will be tough instead of tender.
Serving Suggestions
These mini tarts are incredibly versatile. They look stunning arranged on a tiered cake stand for a high tea or bridal shower. For an Easter brunch, garnish them with pastel-colored chocolate eggs instead of fruit. If you are serving them at an evening dinner party, a dollop of whipped cream and a candied lemon peel strip makes them look extra sophisticated. Serve them alongside a crisp white wine or a hot Earl Grey tea.
Storage and Reheating Tips
Refrigerator: These tarts must be stored in the fridge because of the dairy filling. They will keep well in an airtight container for up to 3-4 days. The crust may soften slightly after day 2, but they are still delicious.
Freezer: You can freeze the baked, unfilled crusts for up to a month. Thaw them at room temperature before filling. You can also freeze the finished tarts! Flash freeze them on a baking sheet for an hour, then transfer to a container. Thaw in the fridge for 2-3 hours before serving.
Nutrition Facts (Estimated)
| Serving Size | 1 tart |
| Calories | 145 |
| Fat | 9g |
| Saturated Fat | 5g |
| Unsaturated Fat | 3g |
| Trans Fat | 0g |
| Cholesterol | 25mg |
| Sodium | 60mg |
| Carbohydrates | 14g |
| Fiber | 0.2g |
| Sugar | 10g |
| Protein | 2g |
Frequently Asked Questions
Can I make these ahead of time?
Yes! These are actually better if made a few hours in advance so the filling can set. You can make them fully up to 24 hours before serving.
My filling is too runny, what happened?
This usually happens if you didn’t use enough lemon juice (the acid thickens the milk) or if you used low-fat cream cheese. Always use full-fat brick cream cheese for the best texture.
How do I get the tarts out of the pan without breaking them?
Greasing the pan is essential. Also, running a thin, sharp knife around the edge of the cooled tart helps release the suction before you try to lift them out.
Can I use a store-bought crust?
You can buy mini phyllo shells or mini graham cracker crusts if you want to skip the baking step entirely. Just make the filling and pipe it in!
Do I need to blind bake with weights?
No, because the cups are so small, the dough usually stays in place. If they puff up, just press them down gently immediately after taking them out of the oven.
Can I make this dairy-free?
It is tricky. You would need dairy-free butter, dairy-free cream cheese, and sweetened condensed coconut milk. The texture might be slightly softer, but the flavor should still be good.
What other fruits can I top this with?
Sliced strawberries, kiwi, mandarin orange segments, or even pomegranate arils look beautiful.
Why is my crust tough?
You likely overmixed the dough or added too much flour. Measure your flour by spooning it into the cup and leveling it off, rather than scooping directly from the bag.
Conclusion
I hope these Mini Lemon Cream Tarts bring a little bit of sunshine into your kitchen! They are truly one of those ‘low effort, high reward’ recipes that make you look like a professional pastry chef. Whether you are baking for a crowd or just treating your family, the bright, tangy flavor is sure to be a hit. Don’t forget to pin this recipe for your next gathering, and let me know in the comments how they turned out for you. Happy Baking!