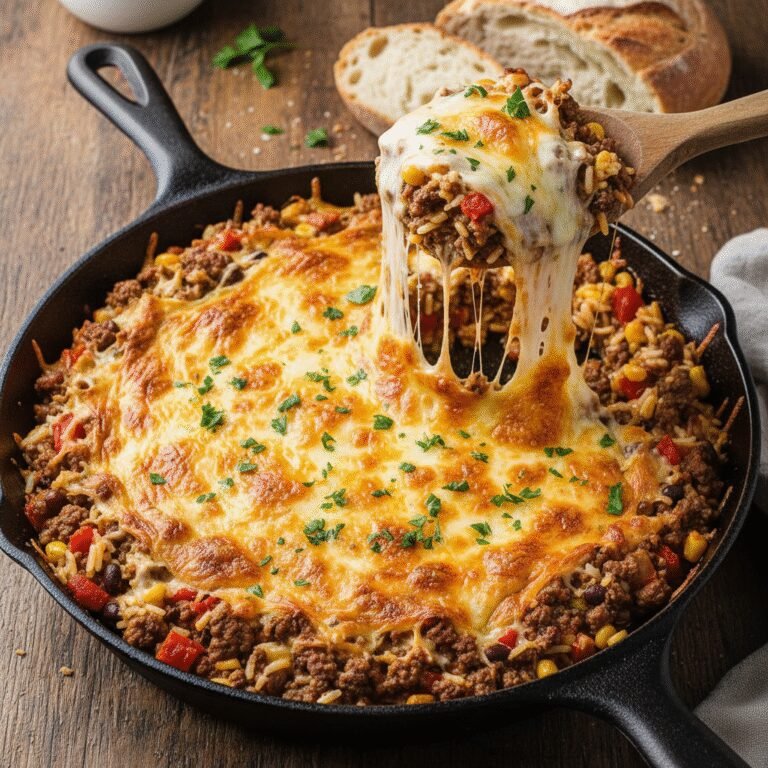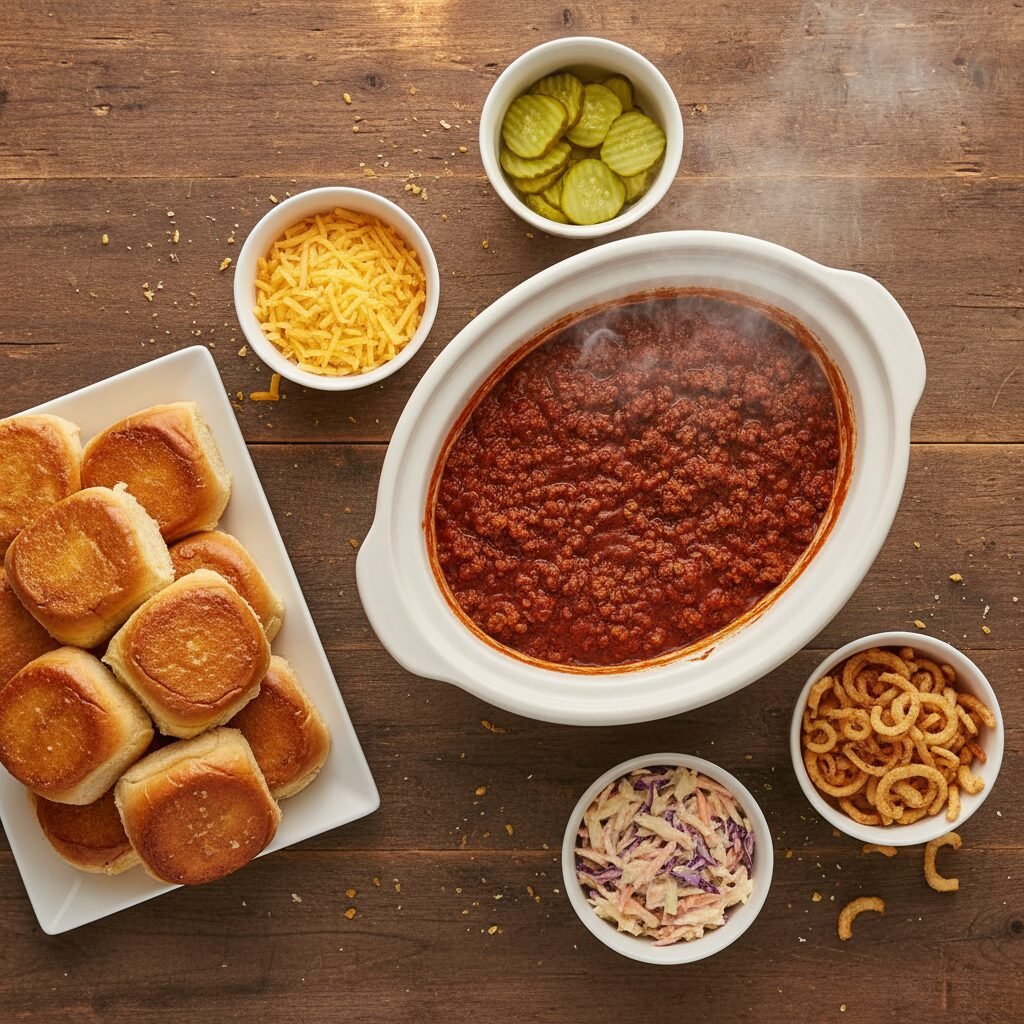
Diy Sloppy Joe Sliders Station
Say goodbye to plating stress and hello to the ultimate interactive dinner! This DIY Sloppy Joe Sliders Station lets your guests—and picky kids—build their dream messy sandwiches exactly how they like them.
20 minutes
30 minutes
50 minutes
12-15 Sliders
Main Course
Stovetop
American
Omnivore
Let’s be real for a second, friends. Feeding a crowd, whether it is for a chaotic kids’ birthday party, a Super Bowl gathering, or just a Tuesday night where the cousins decide to drop by, can be incredibly stressful. You want to serve something delicious and comforting, but you also do not want to be stuck in the kitchen plating food while everyone else is having fun. Enter the DIY Sloppy Joe Sliders Station. It is my absolute secret weapon for entertaining.
There is something undeniably nostalgic about a Sloppy Joe. It takes us right back to school cafeterias and summer camps, but let me tell you—this homemade version is lightyears ahead of the canned stuff we grew up with. By turning it into a "slider station," you are doing two brilliant things: portion control (sliders are cute and manageable!) and customization. We all know that one kid who screams if a pickle touches their bun, or the uncle who thinks everything needs hot sauce. With a DIY bar, everyone builds their own masterpiece, and you get to sit back with a glass of wine and enjoy the compliments.
This recipe focuses on a rich, tangy, and slightly sweet beef mixture that clings perfectly to soft slider buns. But the real magic happens with the toppings. We are moving beyond just plain meat and bread. We are talking crispy onions, sharp cheddar, spicy jalapeños, and creamy coleslaw. It is messy, it is fun, and it is guaranteed to be the hit of your party.
History & Origins
While the Sloppy Joe feels like an American staple that has been around forever, its exact origins are a bit of a culinary debate. Some food historians trace it back to the "loose meat sandwiches" popularized in Sioux City, Iowa, in the 1930s. These were essentially uncured ground beef sandwiches without the tomato sauce. Legend has it that a cook named Joe added tomato sauce to the mix at a cafe in Sioux City, creating the "Sloppy Joe."
Another theory suggests it originated at a bar in Havana, Cuba, also owned by a "Joe," which was a hotspot for Americans during Prohibition. Regardless of where it started, by the mid-20th century, it became a household name in the United States, largely because it was an economical way to stretch ground beef to feed a large family. Today, we are elevating this humble classic from a budget stretcher to a trendy, interactive party centerpiece.
Why This Recipe Works
The success of this recipe relies on the perfect balance of the five basic tastes. The ground beef provides the savory base and fat. We add brown sugar for sweetness, which balances the acidity of the tomato sauce and apple cider vinegar. The Worcestershire sauce adds that critical umami depth that makes the meat taste "meatier."
Technically, the magic happens during the simmer. By allowing the sauce to reduce, the flavors meld together, and the mixture thickens. This is crucial for sliders; if the mixture is too wet, the small buns will disintegrate instantly. We also rely on texture contrast. The soft, sweet Hawaiian rolls (my preferred slider bun) need to be toasted to create a barrier against the sauce, while toppings like crispy fried onions or raw slaw add a necessary crunch to break up the softness of the meat and bread.
Why You’ll Love This Recipe
- ✓Totally customizable for picky eaters
- ✓Feeds a large crowd on a budget
- ✓Sauce is made from scratch (no cans!)
- ✓Perfect for meal prepping ahead of time
- ✓Interactive and fun for kids
- ✓Scales up easily for big parties
Equipment You’ll Need
- ✓Large Skillet or Dutch Oven
- ✓Wooden Spoon
- ✓Chef’s Knife
- ✓Cutting Board
- ✓Slow Cooker (optional, for serving)
- ✓Small bowls for toppings
Ingredients
- ✓The Meat Mixture:
- ✓2 lbs Lean Ground Beef (85/15 recommended)
- ✓1 large Yellow Onion, finely diced
- ✓1 Green Bell Pepper, finely diced
- ✓3 cloves Garlic, minced
- ✓1 cup Ketchup
- ✓2 tbsp Yellow Mustard
- ✓2 tbsp Brown Sugar
- ✓1 tbsp Worcestershire Sauce
- ✓1 tbsp Apple Cider Vinegar
- ✓1 tsp Chili Powder
- ✓1/2 tsp Smoked Paprika
- ✓Salt and Black Pepper to taste
- ✓1/2 cup Water (or beef broth)
- ✓The Base:
- ✓2 packages (24 count total) Slider Buns or Hawaiian Rolls
- ✓Butter (for toasting buns)
- ✓The Toppings Station (Pick 5-6):
- ✓Shredded Sharp Cheddar Cheese
- ✓Pepper Jack Cheese slices
- ✓Dill Pickle slices
- ✓Crispy Fried Onions
- ✓Coleslaw (creamy style)
- ✓Sliced Jalapeños (fresh or pickled)
- ✓Cooked Bacon bits
- ✓Potato Chips (for crunch)
Instructions
- Step 1: Prep the Veggies. Start by finely dicing your onion and green bell pepper. If you have kids who are texture-sensitive, chop these super fine so they melt into the sauce later!
- Step 2: Brown the Beef. Heat your large skillet over medium-high heat. Add the ground beef, diced onion, and bell pepper. Cook until the beef is fully browned and the veggies are soft, about 8-10 minutes. Drain the excess grease leaving just a little bit for flavor.
- Step 3: Add Aromatics. Lower the heat to medium. Add the minced garlic, chili powder, and smoked paprika. Stir constantly for about 1 minute until fragrant. This blooms the spices and prevents the garlic from burning.
- Step 4: Make the Sauce. Stir in the ketchup, yellow mustard, brown sugar, Worcestershire sauce, apple cider vinegar, and water (or broth). Mix well until everything is combined.
- Step 5: Simmer. Reduce the heat to low. Let the mixture simmer uncovered for 15-20 minutes. You want the sauce to thicken up significantly so it isn’t runny on the buns. Stir occasionally. Season with salt and pepper to taste.
- Step 6: Toast the Buns. While the meat simmers, split your slider buns open. Butter the cut sides and toast them in a separate pan or under the broiler until golden brown. This is a crucial step to prevent sogginess!
- Step 7: Set Up the Station. Transfer the meat mixture to a slow cooker set on ‘Warm’ to keep it hot. Arrange your toasted buns on a platter. Place all your toppings—cheese, pickles, onions, slaw—in individual bowls with small spoons or tongs.
- Step 8: Serve. Invite your guests to grab a bun, scoop the meat, and pile on their favorite toppings!
Expert Cooking Tips
- ✓Don’t skip the toast: Toasting the buns creates a seal that keeps the bread from turning into mush the second the meat hits it.
- ✓Finely chop veggies: The smaller the onions and peppers, the better they integrate into the meat, making it easier to scoop onto small slider buns.
- ✓Prep ahead: You can make the meat mixture up to 2 days in advance. The flavors actually get better as they sit in the fridge! Just reheat before the party.
- ✓Keep it warm: If the party is going to last a while, a slow cooker is essential for the meat. Nobody likes a cold Sloppy Joe.
Substitutions and Variations
If you are looking to lighten things up, you can easily swap the ground beef for ground turkey or chicken. Just make sure to add a splash of olive oil when browning since poultry is leaner. For a vegetarian version, brown lentils or a plant-based ground meat alternative work wonderfully; lentils absorb the sauce beautifully and have a great texture. If you do not have apple cider vinegar, white vinegar or lemon juice can provide that necessary acid kick. No brown sugar? Honey or maple syrup are great natural alternatives.
Common Mistakes to Avoid
The biggest crime against Sloppy Joes is not simmering the sauce long enough. If you rush this step, the sauce will be watery, and your sliders will be a mess—and not the good kind! Another mistake is overcrowding the pan when browning the meat; this steams the beef instead of searing it. Make sure your skillet is large enough. Finally, do not forget to drain the grease. While fat is flavor, too much of it will make the sauce oily and separate the ketchup base.
Serving Suggestions
Since these sliders are rich and savory, you want sides that offer a fresh or crunchy contrast. A big bowl of classic potato chips is a must. I also love serving these with a vinegar-based potato salad, corn on the cob, or a crisp green salad with ranch dressing. For a fun party vibe, serve with tater tots or sweet potato fries.
Storage and Reheating Tips
Store any leftover meat mixture in an airtight container in the refrigerator for up to 4 days. It freezes beautifully too! Put the cooled meat in a freezer-safe bag, lay it flat, and freeze for up to 3 months. To reheat, thaw in the fridge overnight and warm it up on the stove or in the microwave. Store leftover buns separately at room temperature to keep them from getting stale.
Nutrition Facts (Estimated)
| Serving Size | 2 Sliders |
| Calories | 480 |
| Fat | 22g |
| Saturated Fat | 8g |
| Unsaturated Fat | 11g |
| Trans Fat | 0.5g |
| Cholesterol | 75mg |
| Sodium | 650mg |
| Carbohydrates | 42g |
| Fiber | 3g |
| Sugar | 12g |
| Protein | 26g |
Frequently Asked Questions
Can I make this in a slow cooker from the start?
Yes! Brown the meat and veggies in a skillet first (this is essential for flavor), then dump everything into the slow cooker. Cook on Low for 3-4 hours.
How much meat do I need per person?
For sliders, plan on about 1/4 cup of meat mixture per slider. Most adults will eat 2-3 sliders, while kids will eat 1-2. Two pounds of beef usually yields 12-15 generous sliders.
Is this spicy?
Not at all! The chili powder adds warmth, not heat. If you want it spicy, add cayenne pepper or diced jalapeños to the meat mixture.
Can I use Manwich or canned sauce?
You can, but I promise homemade is 100 times better and barely takes more effort. You control the sodium and sugar this way!
What is the best cheese for Sloppy Joes?
Sharp cheddar is classic because it cuts through the sweetness of the sauce. Pepper Jack is great for a kick, and American cheese melts the best.
My sauce is too runny, what do I do?
Just keep simmering! Let it cook uncovered for another 5-10 minutes. If you are in a huge rush, a cornstarch slurry (1 tsp cornstarch mixed with 1 tsp water) will thicken it instantly.
Can I use regular burger buns?
Absolutely. If you use full-sized buns, this recipe will yield about 6-8 large sandwiches instead of sliders.
How do I keep the buns warm?
After toasting, wrap them in aluminum foil and place them in a warm oven (lowest setting) or a bread warmer basket with a cloth napkin.
Conclusion
There you have it—the ultimate guide to hosting a stress-free, delicious DIY Sloppy Joe Sliders Station! Whether you are celebrating a touchdown or just celebrating making it through another week of parenting, this meal is sure to bring smiles to the table. It is messy, it is hearty, and it brings people together. So grab those napkins (you will need them!) and enjoy the fun.