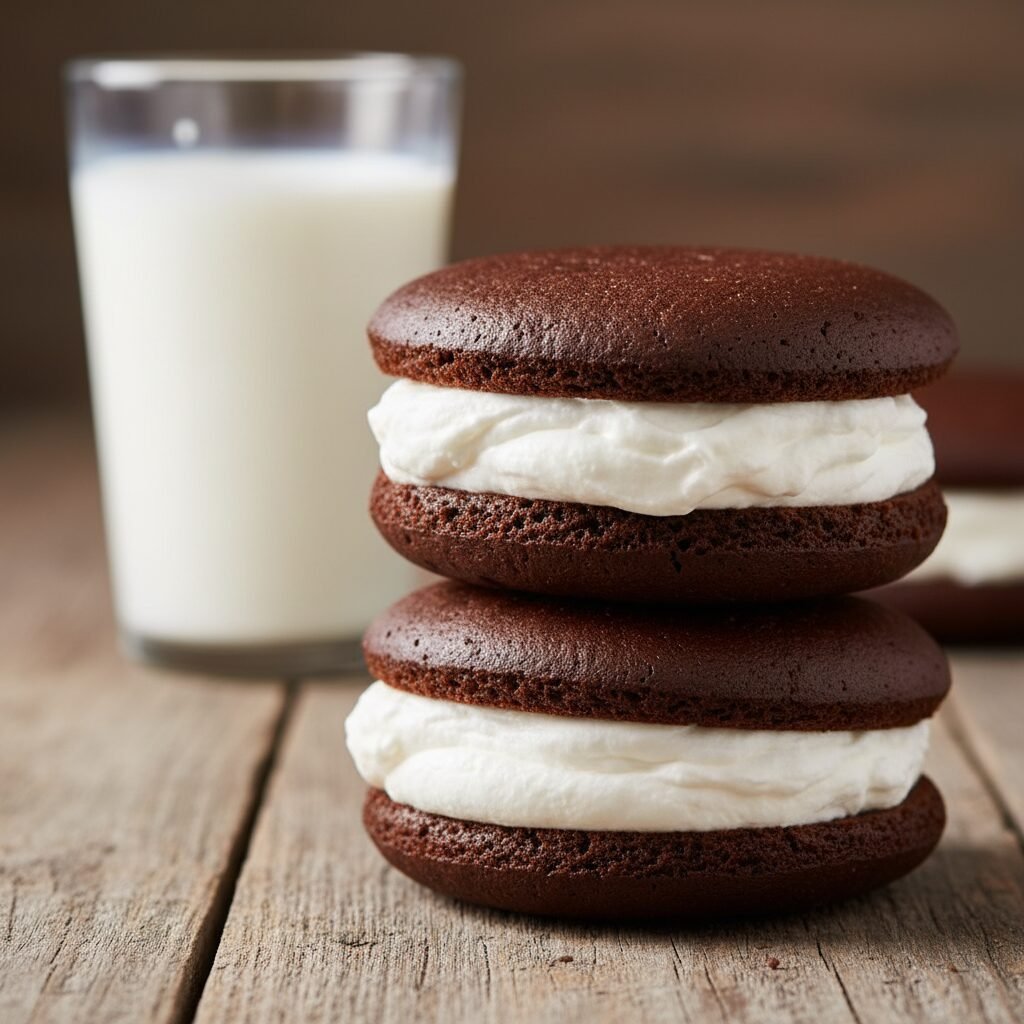
Maine Whoopie Pies Recipe
Imagine if a rich chocolate cake and a soft cookie had a delicious baby—that is the Maine Whoopie Pie! This classic New England treat features two tender chocolate rounds hugging a cloud of sweet marshmallow filling, making it the ultimate comfort food for families.
20 minutes
12 minutes
45 minutes
12 Large Pies
Dessert
Baking
American (New England)
Vegetarian
If you have ever visited New England, specifically the beautiful state of Maine, you have likely encountered the glorious creation known as the Whoopie Pie. It is not quite a cookie, and it is not quite a slice of cake; it is a handheld miracle that sits perfectly in between. For moms looking to bake a treat that will instantly become a core childhood memory for their kids, this is the one. There is something incredibly nostalgic about unwrapping a whoopie pie—the sticky, soft chocolate exterior and that burst of sugary, creamy filling.
I remember the first time I tried a real Maine Whoopie Pie. It was wrapped tightly in plastic wrap (which is actually the secret to keeping them soft!) at a roadside farm stand. One bite, and I was hooked. Unlike a macaron which is delicate and fussy, the Whoopie Pie is robust, humble, and deeply satisfying. It is the kind of dessert that begs for a tall glass of cold milk.
This recipe is dear to my heart because it recreates that authentic bakery texture right in your own kitchen. We are talking about cakes that are moist and tender, not dry or crumbly, and a filling that is light as air but sweet enough to satisfy any craving. Whether you are baking for a bake sale, a birthday party, or just a Tuesday afternoon pick-me-up, these treats are guaranteed to bring smiles to everyone’s faces. Let’s get baking!
History & Origins
The history of the Whoopie Pie is actually the subject of a sweet, sticky debate! While Maine declared the Whoopie Pie its official state treat in 2011, our friends in Pennsylvania (specifically the Amish community) also claim to have invented it. The legend goes that Amish women would bake these treats and put them in farmers’ lunchboxes. When the farmers opened their lunch and saw the dessert, they would shout, “Whoopie!” hence the name.
However, Maine has a very strong claim to the throne. Labadie’s Bakery in Lewiston, Maine, began selling them commercially as early as 1925. In Maine, these aren’t just an occasional treat; they are a food group. You can find them in every gas station, grocery store, and gourmet bakery from Kittery to Fort Kent. While the Pennsylvania version often uses a heavy buttercream filling, the authentic Maine version almost always relies on a filling made with Marshmallow Fluff (or crème), giving it that distinctively gooey, New England texture. Regardless of who invented it first, we are just glad they exist!
Why This Recipe Works
This recipe works because it balances the chemistry of a cake with the structure of a cookie. The key to the chocolate “shells” is the reaction between the acidic buttermilk and the baking soda. This creates a powerful lift, resulting in a dome shape that stays soft rather than flattening out like a standard cookie. Using Dutch-process cocoa powder provides a deep, mellow chocolate flavor and a darker color that contrasts beautifully with the white filling.
For the filling, the magic ingredient is Marshmallow Fluff. Unlike a standard buttercream which can be dense and greasy, the addition of marshmallow crème stabilizes the butter and sugar, creating a filling that is airy, glossy, and holds its shape without being too heavy. The ratio of cake-to-filling is also crucial; you want enough cake to hold it together, but enough filling to ensure every bite is creamy. Wrapping them individually in plastic wrap after assembly traps the moisture, essentially steaming the cakes slightly to keep them permanently soft.
Why You’ll Love This Recipe
- ✓Perfectly soft and cake-like texture
- ✓Classic marshmallow fluff filling
- ✓Freezes beautifully for later
- ✓Kid-friendly and fun to eat
- ✓Authentic New England flavor
- ✓No fancy decorating skills required
Equipment You’ll Need
- ✓Stand mixer or hand mixer
- ✓Baking sheets
- ✓Parchment paper or silicone mats
- ✓Medium cookie scoop (approx 2 tbsp)
- ✓Wire cooling rack
- ✓Spatula
Ingredients
- ✓2 cups All-purpose flour
- ✓1/2 cup Dutch-process cocoa powder
- ✓1 1/4 tsp Baking soda
- ✓1 tsp Salt
- ✓1/2 cup Unsalted butter, softened (for cake)
- ✓1 cup Granulated sugar
- ✓1 Large egg, room temperature
- ✓1 tsp Vanilla extract
- ✓1 cup Buttermilk, room temperature
- ✓1/2 cup Unsalted butter, softened (for filling)
- ✓1 1/2 cups Powdered sugar (Confectioners’ sugar)
- ✓1 jar (7 oz) Marshmallow Fluff or Crème
- ✓1 tsp Vanilla extract (for filling)
Instructions
- Preheat your oven to 350°F (175°C). Line two large baking sheets with parchment paper or silicone baking mats. This ensures the cakes don’t stick and cook evenly.
- In a medium bowl, whisk together the flour, cocoa powder, baking soda, and salt until well combined and no lumps of cocoa remain. Set this dry mixture aside.
- In the bowl of a stand mixer fitted with the paddle attachment (or using a hand mixer), cream the softened butter and granulated sugar together on medium-high speed for about 3-4 minutes. You want the mixture to be pale and fluffy.
- Add the egg and vanilla extract to the butter-sugar mixture. Beat until fully incorporated, scraping down the sides of the bowl as needed.
- Reduce the mixer speed to low. Add about one-third of the dry flour mixture to the bowl, mixing just until combined. Follow this with half of the buttermilk. Repeat with another third of the flour, the rest of the buttermilk, and end with the remaining flour. Do not overmix; stop as soon as the flour streaks disappear.
- Using a medium cookie scoop (or a spoon), drop mounds of batter onto the prepared baking sheets. Space them about 2 inches apart as they will spread slightly. You should get about 24 mounds (to make 12 pies).
- Bake for 10-12 minutes. The cakes are done when they spring back when lightly touched on the top. Be careful not to overbake, or they will dry out. Remove from the oven and let them cool on the baking sheet for 5 minutes before transferring to a wire rack to cool completely.
- While the cakes cool, make the filling. In a clean mixing bowl, beat the softened butter for the filling until creamy. Add the powdered sugar and vanilla. Beat on low until incorporated, then increase speed to medium and beat until fluffy.
- Add the jar of Marshmallow Fluff to the buttercream. Beat on medium speed until the mixture is smooth, glossy, and slightly stiff. If it feels too soft, you can add a little more powdered sugar.
- Once the cakes are completely cool, match them up in pairs of similar size. Pipe or spoon a generous amount of filling onto the flat side of one cake. Top with the second cake, flat side down, and gently press to push the filling to the edges.
- For the best texture, wrap each Whoopie Pie individually in plastic wrap and let them sit for at least an hour before eating. This softens the cake and melds the flavors.
Expert Cooking Tips
- ✓Room Temperature Ingredients: Ensure your egg, butter, and buttermilk are at room temperature. This creates a smoother emulsion and a fluffier cake.
- ✓Use a Scoop: Using a trigger-release cookie scoop ensures all your cake halves are exactly the same size, making assembly much easier.
- ✓Don’t Overbake: The difference between a soft whoopie pie and a dry cookie is about 1-2 minutes in the oven. Pull them out when they just spring back.
- ✓Cool Completely: If you try to fill the cakes while they are even slightly warm, the marshmallow filling will melt and slide right off.
Substitutions and Variations
If you don’t have buttermilk, you can make a quick substitute by adding 1 tablespoon of lemon juice or white vinegar to a cup of regular milk and letting it sit for 5 minutes. For a dairy-free version, use plant-based butter and almond milk with vinegar. If you cannot find Marshmallow Fluff, you can make a standard vanilla buttercream, but the texture will be heavier and less authentic to the Maine tradition. You can also swap the cocoa powder for a Red Velvet version by reducing cocoa and adding red food coloring!
Common Mistakes to Avoid
The most common mistake is overmixing the batter after adding the flour. This develops gluten and turns your soft cakes into tough, rubbery pucks. Another mistake is inconsistent sizing; if your mounds vary in size, the small ones will burn before the large ones are cooked. Finally, avoid skimping on the filling! A true Whoopie Pie should have a filling layer almost as thick as one of the cake layers.
Serving Suggestions
Whoopie pies are best served at room temperature or slightly chilled. They are the ultimate companion to a glass of cold milk or a hot cup of coffee. For a fun party twist, you can roll the exposed edges of the filling in sprinkles, crushed peppermint candies, or mini chocolate chips to match a holiday theme. They are perfect for picnics because they are handheld and generally hold up well if kept out of direct sun.
Storage and Reheating Tips
Counter: Store leftovers individually wrapped in plastic wrap or in an airtight container at room temperature for up to 3 days. The plastic wrap helps keep the exterior sticky and soft.
Fridge: You can refrigerate them for up to a week, but let them come to room temperature before eating for the best texture.
Freezer: These freeze amazingly well! Wrap them individually in plastic wrap, then place them in a zip-top freezer bag. Freeze for up to 3 months. Thaw on the counter for an hour before enjoying.
Nutrition Facts (Estimated)
| Serving Size | 1 Whoopie Pie |
| Calories | 480 |
| Fat | 24g |
| Saturated Fat | 14g |
| Unsaturated Fat | 8g |
| Trans Fat | 0g |
| Cholesterol | 65mg |
| Sodium | 210mg |
| Carbohydrates | 64g |
| Fiber | 2g |
| Sugar | 45g |
| Protein | 4g |
Frequently Asked Questions
Is a Whoopie Pie a cake or a cookie?
Technically, it is classified as a ‘drop cake’ or a cake-cookie hybrid. The batter is more like a cake batter, but it is baked on a sheet like a cookie. It’s the best of both worlds!
Why are my Whoopie Pies flat?
Flat pies usually mean the butter was too warm when you started, or the batter sat out too long before baking. It can also happen if your baking soda is expired. Make sure to get them in the oven quickly once mixed.
Can I use marshmallow crème instead of Fluff?
Yes! Marshmallow crème and Marshmallow Fluff are essentially the same product and can be used interchangeably in this recipe.
Do I have to use Dutch-process cocoa?
You don’t have to, but it is highly recommended. Dutch-process cocoa is less acidic and has a darker color and fudgier flavor. If you use natural cocoa, the cakes might be lighter in color and have a slightly tangier taste.
Can I make these mini-sized?
Absolutely! Use a smaller cookie scoop (1 tablespoon size) and reduce the baking time to roughly 8-9 minutes. This is great for kids’ parties.
Why is the filling squishing out when I bite it?
This happens if the filling is too soft. Try adding a bit more powdered sugar to stiffen it up, or refrigerate the assembled pies for 20 minutes to firm up the butter in the filling before serving.
Can I use shortening instead of butter in the cake?
Traditional recipes often use shortening (like Crisco) for a lighter texture and higher melting point. However, butter provides much better flavor. You can use a 50/50 mix if you want the stability of shortening with the taste of butter.
How do I get the cakes to be perfectly round?
Using a mechanical cookie scoop is the best way. Also, if they come out of the oven slightly misshapen, you can use a round cookie cutter to gently nudge them into perfect circles while they are still hot and soft on the baking sheet.
Conclusion
There you have it—the secret to making bakery-quality Maine Whoopie Pies right in your own kitchen! There is something so satisfying about peeling back the plastic wrap on a homemade treat that you made with love. These pies are more than just sugar and flour; they are a little edible hug. Whether you are reliving a childhood vacation or introducing your kids to a new favorite dessert, I hope this recipe brings a little bit of New England charm to your home. Don’t forget to pin this recipe for later and tag me in your photos when you bake them!