Chocolate Mousse Layer Cake
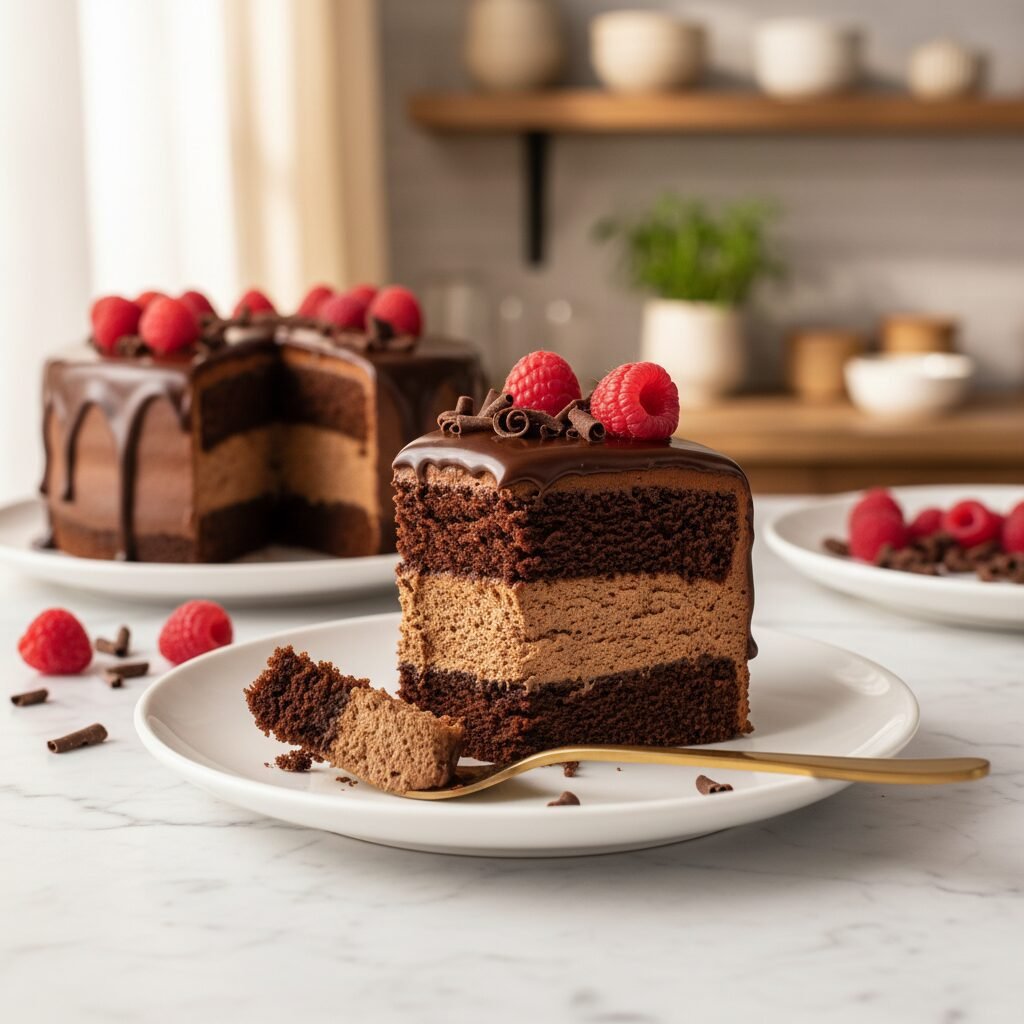
If you are looking for the dessert to end all desserts, you have found it. This Chocolate Mousse Layer Cake combines a dense, brownie-like bottom, a cloud-like mousse center, and a silky ganache finish for a texture combination that is absolutely to die for.
45 minutes
35 minutes
5 hours 20 minutes (includes chilling)
12-14 Servings
Dessert
Baking & Chilling
French-American Fusion
Vegetarian
Hey friends! Let’s be real for a second: is there anything that screams “I love you” (or “I love me”) quite like chocolate? I’m not talking about a quick candy bar from the checkout line. I’m talking about a dessert so rich, so decadent, and so beautifully layered that it makes the whole room go silent after the first bite. That is exactly what this Chocolate Mousse Layer Cake is all about.
I created this recipe because I wanted something that bridged the gap between a classic birthday cake and a fancy French patisserie creation. You know, something that looks like you spent $80 at a bakery but was actually made right in your kitchen while wearing pajama pants. This cake is a texture lover’s dream. You start with a base that is somewhere between a moist cake and a fudge brownie. Then, you pile on a massive layer of stabilized chocolate mousse—light, airy, yet rich enough to stand tall. Finally, a pour-over ganache seals the deal, dripping down the sides in that effortless, rustic-chic way we all love.
Now, don’t let the layers scare you! I know it looks intimidating, but if you break it down, it is just three simple steps. Plus, this is a “make-ahead” miracle. In fact, it tastes even better after sitting in the fridge for a day, making it the ultimate stress-free dessert for hosting dinner parties or celebrating special milestones. Grab your springform pan, and let’s make some magic!
History & Origins
While this specific layered creation is a modern favorite, its components have a deep-rooted history in culinary arts. The star of the show, chocolate mousse, traces its origins back to 18th-century France. The word “mousse” literally translates to “foam,” describing the airy texture achieved by folding whipped egg whites or cream into a chocolate base. It was originally known as “mayonnaise de chocolat”—thank goodness that name didn’t stick!
The concept of layering mousse on top of cake is a more contemporary evolution, likely popularized in European cafes in the mid-20th century as refrigeration became standard. Combining the dense, American-style chocolate cake (which gained popularity with the discovery of baking soda and powder in the 1800s) with the delicate French mousse created a hybrid dessert that offers the best of both worlds. Today, this style of cake, often called a “mousse cake” or “entremet” in professional circles, is a staple for celebrations where a standard buttercream cake just won’t cut it.
Why This Recipe Works
This recipe is a triumph of textural contrast. A standard chocolate cake can sometimes feel heavy or dry, while a bowl of mousse might feel too ephemeral to be a satisfying dessert on its own. By combining them, we create a structural balance. The cake base provides a sturdy, chewy foundation that requires chewing, grounding the palate.
The mousse layer works because we stabilize it with a small amount of gelatin. Without gelatin, a mousse layer this thick would collapse under its own weight or squish out when you try to slice it. The gelatin creates a microscopic network that holds the air bubbles from the whipped cream in place, ensuring clean, professional slices. Finally, the ganache isn’t just for looks; the high ratio of heavy cream to chocolate creates a “melt-in-your-mouth” sensation that coats the tongue before you hit the airy mousse, delivering an immediate hit of chocolate flavor.
Why You’ll Love This Recipe
- ✓Three distinct textures: Fudgy, Airy, and Silky
- ✓Looks professionally made but requires no fancy decorating skills
- ✓Can be made up to 2 days in advance
- ✓Perfect for chocolate lovers—uses real chocolate, not just cocoa powder
- ✓Feeds a crowd—it is rich, so small slices go a long way
Equipment You’ll Need
- ✓9-inch Springform Pan
- ✓Electric Hand Mixer or Stand Mixer
- ✓Medium Saucepan
- ✓Heat-proof Mixing Bowls
- ✓Rubber Spatula
- ✓Whisk
- ✓Parchment Paper
- ✓Acetate Cake Collars (Optional, for cleaner edges)
Ingredients
- ✓For the Cake Base:
- ✓1/2 cup All-purpose flour
- ✓3/4 cup Granulated sugar
- ✓1/3 cup Unsweetened cocoa powder (Dutch-processed preferred)
- ✓1/2 tsp Baking soda
- ✓1/4 tsp Baking powder
- ✓1/4 tsp Salt
- ✓1 large Egg, room temperature
- ✓1/4 cup Buttermilk
- ✓1/4 cup Vegetable oil
- ✓1/2 tsp Vanilla extract
- ✓1/4 cup Hot brewed coffee (enhances chocolate flavor)
- ✓For the Chocolate Mousse:
- ✓1 tsp Unflavored gelatin powder
- ✓1.5 tbsp Cold water
- ✓1 1/2 cups Semisweet chocolate chips (high quality)
- ✓2 cups Heavy whipping cream, cold and divided
- ✓1/4 cup Powdered sugar
- ✓1 tsp Vanilla extract
- ✓For the Chocolate Ganache:
- ✓1/2 cup Semisweet chocolate chips
- ✓1/2 cup Heavy whipping cream
Instructions
- Step 1: Bake the Cake Base. Preheat your oven to 350°F (175°C). Grease a 9-inch springform pan lightly and line the bottom with parchment paper. In a large bowl, whisk together the flour, sugar, cocoa, baking soda, baking powder, and salt.
- Add the egg, buttermilk, oil, and vanilla to the dry ingredients. Mix until just combined. Carefully pour in the hot coffee and whisk gently until the batter is smooth. It will be thin—that is normal!
- Pour the batter into the prepared pan and bake for 20-25 minutes, or until a toothpick inserted comes out clean. Remove from the oven and let it cool completely in the pan on a wire rack. Do not remove the ring yet.
- Step 2: Prepare the Mousse. While the cake cools, sprinkle the gelatin over the 1.5 tablespoons of cold water in a small bowl. Let it sit for 5 minutes to ‘bloom’ (it will look like applesauce).
- Heat 1/2 cup of the heavy cream in a saucepan until it just begins to simmer (do not boil). Remove from heat and stir in the bloomed gelatin until fully dissolved. Pour this hot cream mixture over the 1 1/2 cups of chocolate chips in a heat-proof bowl. Let sit for 2 minutes, then stir until smooth and glossy. Let this mixture cool to room temperature (it must not be hot when you mix it with the whipped cream!).
- In a stand mixer or with a hand mixer, whip the remaining 1 1/2 cups of cold heavy cream, powdered sugar, and vanilla until stiff peaks form.
- Gently fold about 1/3 of the whipped cream into the cooled chocolate mixture to lighten it. Then, fold in the remaining whipped cream carefully using a spatula until no white streaks remain. Be gentle to keep it airy!
- Step 3: Assemble and Chill. If you have acetate strips/cake collars, line the inside of the springform pan ring now (this makes removal easier, but isn’t strictly necessary). Pour the mousse directly over the cooled cake base in the pan. Smooth the top with a spatula. Refrigerate for at least 4 hours, or overnight.
- Step 4: The Ganache Topping. Once the mousse is set, place the 1/2 cup chocolate chips in a small bowl. Heat the 1/2 cup heavy cream until simmering, then pour over the chips. Let sit for 3 minutes, then whisk until smooth.
- Let the ganache cool slightly (so it doesn’t melt the mousse) but ensure it is still pourable. Pour over the chilled mousse layer. Tilt the pan to spread it evenly.
- Return to the fridge for another 30 minutes to set the ganache. Run a thin knife dipped in hot water around the edge of the pan before releasing the springform ring. Slice and serve!
Expert Cooking Tips
- ✓Room Temperature Eggs: Ensure your egg for the cake is at room temperature so it emulsifies properly with the oil.
- ✓Bloom the Gelatin: Don’t skip the blooming step! If you dump dry gelatin into hot liquid, it will clump and give you gummy bits in your mousse.
- ✓Cool the Chocolate: When making the mousse, if your melted chocolate base is too hot, it will deflate your whipped cream, resulting in a dense, flat layer instead of a fluffy one.
- ✓Clean Slices: To get those picture-perfect slices, dip your knife in hot water and wipe it dry between every single cut.
- ✓Quality Matters: Since chocolate is the main flavor, use a brand you enjoy eating plain. Ghirardelli or Guittard are great supermarket options.
Substitutions and Variations
If you don’t have buttermilk, you can make a quick substitute by adding 1 teaspoon of lemon juice or vinegar to regular milk and letting it sit for 5 minutes. For a gluten-free version, swap the all-purpose flour for a high-quality 1:1 Gluten-Free Baking Flour blend (like Bob’s Red Mill). If you want to avoid gelatin (making the mousse vegetarian), you can use agar agar, though the texture will be slightly firmer and less creamy. Follow package instructions for setting 2 cups of liquid.
Common Mistakes to Avoid
The biggest mistake people make is rushing the cooling process. If you pour the mousse onto a warm cake, the mousse will melt and turn into a puddle. Similarly, if you pour hot ganache onto the cold mousse, you might melt the top layer. Patience is the secret ingredient here! Another common issue is over-whipping the cream for the mousse; stop as soon as you hit stiff peaks, otherwise, it can turn buttery and grainy.
Serving Suggestions
This cake is incredibly rich, so serve small slices! It pairs beautifully with fresh tart berries like raspberries or strawberries to cut through the richness. A dollop of unsweetened whipped cream on the side adds a nice balance. For a festive touch, sprinkle shaved white chocolate or sea salt flakes on top of the ganache before serving.
Storage and Reheating Tips
Store the cake in the refrigerator, loosely covered with plastic wrap or in a cake dome. It will stay fresh for up to 4 days. You can also freeze the whole cake or individual slices! Wrap tightly in plastic wrap and then foil. Thaw in the refrigerator overnight before serving. Do not freeze the cake with fresh fruit garnishes.
Nutrition Facts (Estimated)
| Serving Size | 1 Slice |
| Calories | 580 |
| Fat | 42g |
| Saturated Fat | 24g |
| Unsaturated Fat | 16g |
| Trans Fat | 0g |
| Cholesterol | 125mg |
| Sodium | 210mg |
| Carbohydrates | 48g |
| Fiber | 4g |
| Sugar | 38g |
| Protein | 7g |
Frequently Asked Questions
Can I make this cake ahead of time?
Absolutely! In fact, it is better made a day ahead. This allows the mousse to fully set and the flavors to meld. Just add fresh fruit garnishes right before serving.
My mousse layer isn’t setting, what happened?
This usually happens if the gelatin wasn’t dissolved properly or if the mousse wasn’t chilled long enough. Ensure the gelatin is fully melted into the hot cream before mixing.
Can I use milk chocolate instead of semi-sweet?
You can, but the cake will be significantly sweeter. If you use milk chocolate, I recommend reducing the sugar in the whipped cream slightly to balance it out.
What if I don’t have a springform pan?
It is very difficult to remove this cake from a standard cake pan without damaging the layers. If you don’t have a springform pan, you can assemble it in a clear glass trifle bowl for a ‘scoopable’ version instead.
Do I really need the coffee in the cake?
You won’t taste coffee in the final product! Coffee enhances the depth of the chocolate flavor. However, you can substitute it with hot water if you prefer.
How do I get the sides to look smooth?
Using acetate cake collars inside the springform pan is the pro trick. If you don’t have them, run a thin knife dipped in hot water around the edge before unlatching the ring.
Why is my ganache grainy?
Grainy ganache usually means the chocolate got too hot or was mixed with a wet utensil. Heat the cream gently and pour it over the chocolate rather than heating the chocolate directly.
Can I use cool whip instead of heavy cream?
I don’t recommend it. Real heavy cream provides the structure and stability needed for a layer cake. Cool Whip is too soft and contains different stabilizers that might not hold up the ganache.
Conclusion
And there you have it—the chocolate cake of your dreams! Whether you are making this for a birthday, an anniversary, or just because it’s a Tuesday and you deserve a treat, this Chocolate Mousse Layer Cake is guaranteed to impress. It is one of those recipes that builds confidence in the kitchen; once you see those beautiful layers revealed, you’ll feel like a master pastry chef. Don’t forget to snap a picture before it disappears—it won’t last long! Happy baking!