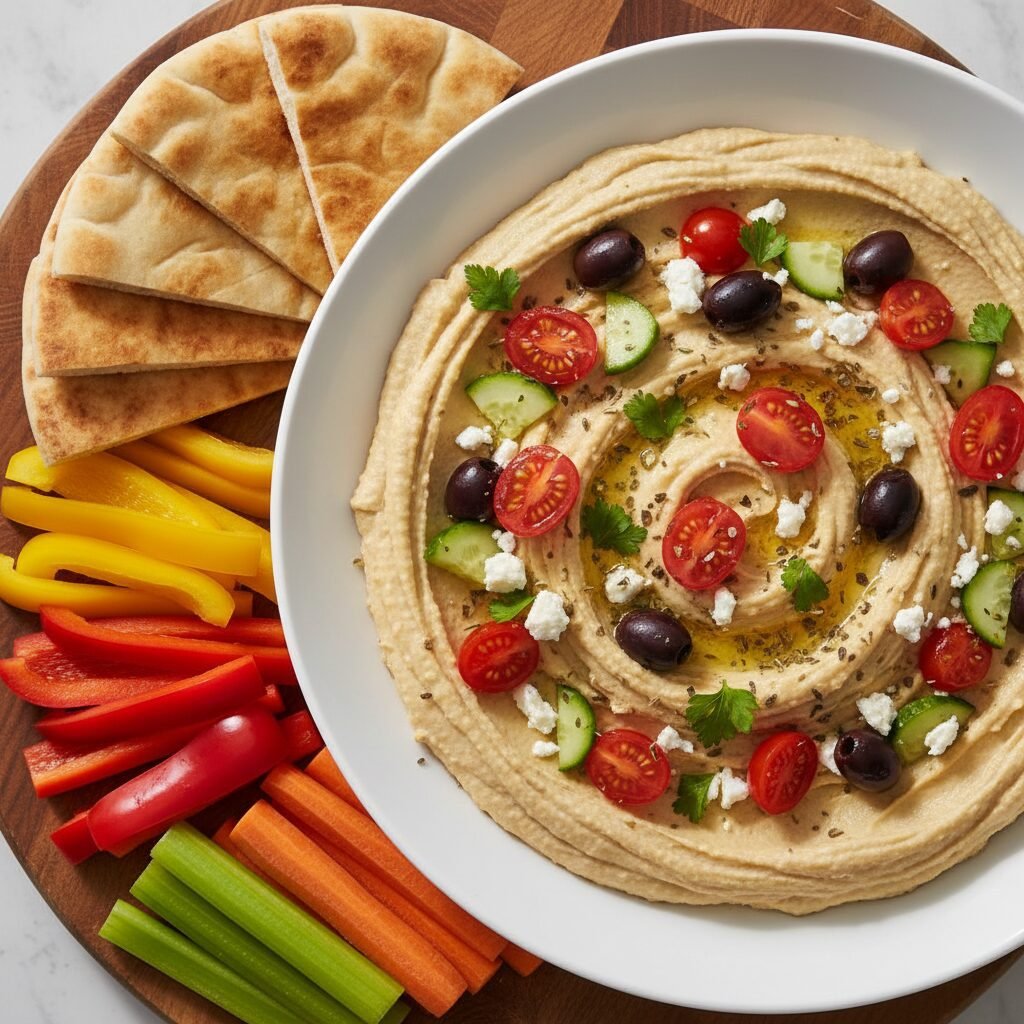
Easy Greek Hummus Dip
Transform a simple can of chickpeas into a gourmet Mediterranean masterpiece in minutes. This layered Greek Hummus Dip is creamy, zesty, and topped with a mountain of fresh veggies and salty feta—perfect for busy moms and hungry kids!
15 minutes
0 minutes
15 minutes
6 servings
Appetizer / Snack
No-Cook / Blender
Mediterranean / Greek Fusion
Vegetarian
Let’s be real for a second: finding a snack that is healthy, delicious, and something the kids will actually eat feels like winning the lottery. We’ve all been there, standing in front of the pantry at 4 PM, staring at a bag of pretzels and wondering if we can call it dinner. Enter this Easy Greek Hummus Dip. It is my absolute go-to recipe when I need to feel like a culinary goddess but only have about 10 minutes of energy to spare.
There is something so incredibly satisfying about the Mediterranean diet. It’s fresh, it’s vibrant, and it doesn’t make you feel weighed down. This dip takes the classic creamy comfort of homemade hummus and dresses it up with the bright, punchy flavors of a Greek salad. We are talking crisp cucumbers, juicy tomatoes, briny Kalamata olives, and enough crumbled feta cheese to make your heart sing.
I started making this for my kids as an after-school snack because they love dipping things (what kid doesn’t?), and I loved that they were getting a solid dose of plant-based protein and fiber. But honestly? It quickly became my favorite lunch when the house is quiet, and I just want something fresh. Whether you are hosting a girls’ night, needing a potluck showstopper, or just trying to survive Tuesday, this dip is your new best friend.
History & Origins
Hummus itself is an ancient dish with roots deep in the Middle East, dating back to at least the 13th century in Egypt. The word hummus actually just means “chickpeas” in Arabic! Traditionally, it is a smooth blend of cooked chickpeas, tahini (sesame paste), lemon juice, and garlic.
This particular recipe is a “Greek-style” layered dip, which is a modern American fusion concept. While hummus isn’t strictly Greek (it’s more Levantine), the toppings we are using—feta, oregano, Kalamata olives, and fresh garden vegetables—are quintessentially Greek. This fusion brings together the creamy texture of Levantine spreads with the fresh, salad-like crunch of Greek cuisine, creating a texturally diverse dish that celebrates the best of the Mediterranean region.
Why This Recipe Works
The magic of this recipe lies in the contrast of textures and temperatures. By starting with a base of ultra-smooth, room-temperature hummus, you provide a rich and savory canvas. We use ice water in the blending process, which is a chef’s secret to getting that fluffy, almost whipped consistency rather than a dense paste.
Then comes the topping layer: cold, crisp vegetables and crumbly cheese. The acidity from the lemon juice and the brine from the olives cuts through the richness of the tahini, cleansing the palate with every bite. The addition of dried oregano adds an earthy aroma that ties the fresh veggies to the savory base. It works because it hits every flavor note: salty, creamy, crunchy, acidic, and savory.
Why You’ll Love This Recipe
- ✓Ready in under 15 minutes
- ✓Packed with plant-based protein and fiber
- ✓Naturally gluten-free and vegetarian
- ✓Perfect for meal prep and lunchboxes
- ✓Kid-friendly dipping fun
- ✓Uses pantry staples you likely already have
Equipment You’ll Need
- ✓Food Processor or High-Speed Blender
- ✓Sharp Chef’s Knife
- ✓Cutting Board
- ✓Rubber Spatula
- ✓Serving Platter or Shallow Bowl
- ✓Citrus Juicer
Ingredients
- ✓1 (15 oz) can Chickpeas (Garbanzo beans), drained and rinsed
- ✓1/3 cup Tahini (good quality sesame paste)
- ✓1 large Lemon, juiced (approx. 3 tbsp)
- ✓1 clove Garlic, peeled (add 2 if you love garlic)
- ✓2-3 tbsp Ice Water (crucial for fluffiness)
- ✓1/2 tsp Ground Cumin
- ✓1/2 tsp Sea Salt (plus more to taste)
- ✓2 tbsp Extra Virgin Olive Oil
- ✓1/2 cup English Cucumber, diced small
- ✓1/2 cup Cherry Tomatoes, quartered
- ✓1/4 cup Kalamata Olives, pitted and sliced
- ✓1/3 cup Feta Cheese, crumbled
- ✓1 tbsp Fresh Parsley or Dill, chopped
- ✓1 tsp Dried Oregano
Instructions
- Prep the Chickpeas: Drain and rinse the can of chickpeas thoroughly in a colander. Tip: If you have an extra 5 minutes, pinch the skins off the chickpeas for the smoothest possible hummus, but don’t stress if you’re in a rush!
- Blend the Base: In your food processor, combine the tahini and lemon juice. Process for about 1 minute until creamy and pale. This whips air into the tahini.
- Add Flavor: Add the olive oil, garlic clove, cumin, and salt to the whipped tahini. Process for another 30 seconds, scraping down the sides and bottom of the bowl.
- Blend Chickpeas: Add the rinsed chickpeas to the food processor. Process for 1 to 2 minutes. The mixture will be thick and slightly grainy at first.
- The Ice Water Trick: With the motor running, slowly drizzle in the ice water, one tablespoon at a time. Watch as the hummus transforms from chunky to ultra-creamy and pale. Continue blending until you reach your desired consistency.
- Taste Test: Taste the hummus. Does it need more salt? More lemon? Adjust now.
- Spread: Spoon the hummus onto a serving platter or shallow bowl. Use the back of a spoon to create swoops and swirls, making little pockets for the toppings to sit in.
- Top It Off: Scatter the diced cucumber, cherry tomatoes, and sliced olives over the hummus. Sprinkle generously with crumbled feta cheese.
- Garnish: Finish with a drizzle of olive oil, the dried oregano, and fresh parsley or dill.
- Serve: Serve immediately with warm pita bread, pita chips, or extra fresh veggies for dipping.
Expert Cooking Tips
- ✓Tahini Quality Matters: Use a smooth, runny tahini. If your jar has separated, give it a really good stir before measuring.
- ✓Garlic Potency: Raw garlic can be sharp. If you want a milder flavor, roast the garlic clove first or soak the minced garlic in the lemon juice for 10 minutes before blending.
- ✓The Skin Trick: Seriously, removing chickpea skins makes a difference. To do it fast, toss rinsed chickpeas with baking soda in a hot skillet for 2 minutes, then rinse vigorously under water—the skins fall right off.
- ✓Make Ahead: You can make the hummus base up to 3 days in advance. Just store the toppings separately so they don’t make the dip watery.
- ✓Serving Temp: Hummus tastes best at room temperature, not ice cold. If pulling from the fridge, let it sit on the counter for 20 minutes before serving.
Substitutions and Variations
No tahini? No problem! While tahini gives that classic nutty flavor, you can substitute it with a tablespoon of unsweetened Greek yogurt for a tangier, creamier version, or even a little sunflower seed butter for a nut-free option. If you aren’t a fan of feta, goat cheese works beautifully here too. For a vegan version, simply omit the cheese or use a dairy-free feta alternative. If you don’t have fresh lemons, bottled juice works in a pinch, but fresh is always zestier!
Common Mistakes to Avoid
The biggest mistake people make is not blending long enough. You want to let that food processor run longer than you think—at least 3-4 minutes total—to break down the graininess. Another mistake is overloading the garlic. Raw garlic intensifies as it sits, so start with one clove; you can always add more, but you can’t take it out! Finally, avoid using watery vegetables without drying them first; pat your cucumbers and tomatoes dry with a paper towel so your dip doesn’t turn into a soup.
Serving Suggestions
This dip is the centerpiece of a perfect snack board. Serve it alongside:
- Warm, fluffy pita bread or toasted pita chips.
- Colorful raw veggies like bell pepper strips, carrot sticks, and radishes.
- Sugar snap peas for extra crunch.
- Grilled chicken skewers to turn it into a full meal.
- Falafel balls for a vegetarian feast.
Storage and Reheating Tips
Store the hummus base in an airtight container in the refrigerator for up to 5 days. If you have already added the veggie toppings, it is best eaten within 24 hours, as the vegetables will release water and soften. If you want to meal prep this, store the hummus in small jars and keep the chopped veggies in a separate baggie or container until you are ready to eat.
Nutrition Facts (Estimated)
| Serving Size | 1/2 cup |
| Calories | 210 kcal |
| Fat | 14g |
| Saturated Fat | 4g |
| Unsaturated Fat | 9g |
| Trans Fat | 0g |
| Cholesterol | 15mg |
| Sodium | 380mg |
| Carbohydrates | 16g |
| Fiber | 5g |
| Sugar | 2g |
| Protein | 8g |
Frequently Asked Questions
Can I use dried chickpeas instead of canned?
Absolutely! Dried chickpeas are actually superior in flavor. Soak them overnight and boil them with a pinch of baking soda until they are very soft (almost falling apart) before blending.
Why is my hummus grainy?
This usually happens if the chickpeas still have skins on or if you didn’t blend it long enough. Try adding another tablespoon of ice water and blending for another full minute.
Is this recipe gluten-free?
Yes, the dip itself is naturally 100% gluten-free. Just ensure you serve it with gluten-free crackers or veggies instead of regular pita bread.
Can I freeze this hummus?
You can freeze the plain hummus base for up to 3 months! However, do not freeze it with the fresh toppings (cucumber, tomato, feta) as they will turn mushy upon thawing.
Do I have to use a food processor?
A food processor is best for texture, but a high-speed blender (like a Vitamix) works great too. If using a blender, you might need a tiny bit more liquid to get the blades moving.
Is this kid-friendly?
Yes! My kids love it. If your kids are picky about ‘green bits,’ you can serve the toppings on the side or just do a plain cheese topping for them.
Can I make this spicy?
Oh, definitely. Add a pinch of cayenne pepper to the blender, or top the finished dip with red pepper flakes or a swirl of chili oil.
What is the best olive oil to use?
Since you are eating it raw, use a high-quality Extra Virgin Olive Oil (EVOO) that you love the taste of. The flavor will really shine through.
Conclusion
And there you have it—a restaurant-quality appetizer right in your own kitchen! This Easy Greek Hummus Dip proves that healthy food doesn’t have to be boring or time-consuming. It’s vibrant, fresh, and brings people together around the table (or the kitchen island). Next time you are assigned to bring a dish to a party or just need a midday pick-me-up, give this recipe a try. I promise, once you make hummus from scratch, you will never want to go back to the store-bought stuff again!