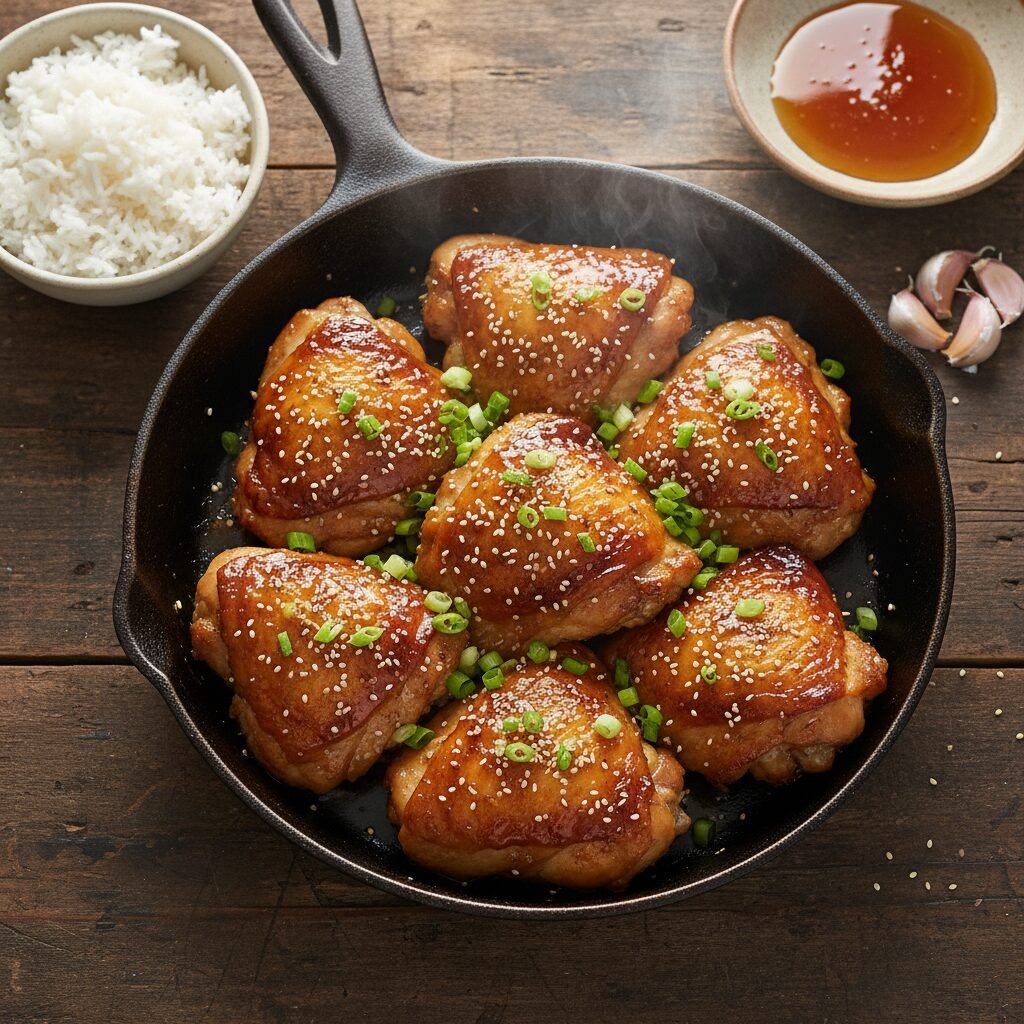
Baked Honey Garlic Chicken
This recipe transforms humble pantry staples into a restaurant-quality meal with minimal effort. Succulent chicken thighs are baked to perfection in a sticky, garlic-infused honey glaze that will have your entire family begging for seconds.
10 minutes
35 minutes
45 minutes
4 Servings
Dinner
Baking
Asian Fusion
Dairy Free
In the bustling rhythm of modern family life, finding a dinner recipe that ticks every box—nutritious, delicious, quick, and kid-approved—can feel like searching for a needle in a haystack. Enter this Baked Honey Garlic Chicken. This dish is not just a meal; it is a weeknight savior that brings the comfort of a home-cooked dinner to the table without the stress of complex preparation or a sink full of dirty dishes.
Imagine the aroma of roasted garlic and caramelized honey wafting through your kitchen, signaling to everyone that something special is happening in the oven. The magic of this recipe lies in its simplicity. By combining fresh garlic, rich soy sauce, and floral honey, you create a glaze that thickens and intensifies as it bakes, coating the chicken in a glossy, irresistible layer of flavor. Unlike frying, baking the chicken allows the meat to remain incredibly tender while the skin crisps up beautifully under the broiler.
Whether you are a busy mom looking for a reliable rotation dinner or a food enthusiast craving Asian-inspired flavors without the grease of takeout, this recipe delivers. It pairs perfectly with steamed rice and broccoli, soaking up that extra sauce, ensuring that not a single drop of flavor goes to waste. Let’s dive into how to create this masterpiece in your own kitchen.
History & Origins
The combination of honey and garlic is a culinary pairing as old as time, traversing various cultures from the Mediterranean to East Asia. However, the specific iteration of Honey Garlic Chicken that we know and love today is largely a product of North American Chinese cuisine. It emerged as a fusion concept, adapting traditional Cantonese flavors to suit Western palates that favor a distinct balance of high-impact sweetness and savory umami notes.
Originally, this dish was often prepared deep-fried, similar to General Tso’s chicken or Sweet and Sour pork. As home cooking trends shifted towards health-conscious preparation methods in the late 20th and early 21st centuries, the baked version gained immense popularity. It retained the sticky, finger-licking profile of its takeout predecessor but stripped away the heavy batter and deep-frying oil. Today, it stands as a testament to how global flavors can be adapted into wholesome, home-cooked comfort food.
Why This Recipe Works
This recipe succeeds due to the scientific principles of reduction and caramelization. When you mix honey and soy sauce, you are creating a balance of sugar and salt. As the chicken bakes, the water content in the sauce evaporates, concentrating the sugars from the honey. This reduction creates a thick, sticky glaze that clings to the protein rather than sliding off.
Furthermore, the inclusion of an acid, such as apple cider vinegar, is crucial. It cuts through the richness of the dark meat chicken and the intense sweetness of the honey, providing a bright finish that keeps the palate interested. Baking the chicken bone-in and skin-on is also a technical choice; the bone acts as an insulator to keep the meat moist, while the rendering fat from the skin emulsifies with the sauce, adding a depth of flavor that boneless, skinless cuts simply cannot achieve.
Why You’ll Love This Recipe
- ✓Ready in under 45 minutes for easy weeknight cooking.
- ✓Uses common pantry staples you likely already have.
- ✓High-protein meal that appeals to both kids and adults.
- ✓One-pan preparation minimizes cleanup time.
- ✓Versatile sauce that works on vegetables and other proteins.
- ✓Dairy-free and easily adaptable for gluten-free diets.
Equipment You’ll Need
- ✓9×13 inch Baking Dish or Cast Iron Skillet
- ✓Small Mixing Bowl
- ✓Whisk
- ✓Measuring Cups and Spoons
- ✓Chef’s Knife
- ✓Garlic Press
- ✓Meat Thermometer
Ingredients
- ✓8 bone-in, skin-on chicken thighs (approx. 2.5 lbs)
- ✓1/3 cup honey (local raw honey preferred)
- ✓1/4 cup low-sodium soy sauce (or Tamari for gluten-free)
- ✓4 cloves garlic, minced (approx. 1 tablespoon)
- ✓1 tablespoon apple cider vinegar
- ✓1 tablespoon olive oil
- ✓1 teaspoon dried oregano (optional for earthiness)
- ✓Salt and freshly cracked black pepper to taste
- ✓1 tablespoon cornstarch mixed with 1 tablespoon water (slurry, optional for thicker sauce)
- ✓Garnish: Chopped green onions and toasted sesame seeds
Instructions
- Preheat and Prepare: Preheat your oven to 400°F (200°C). Lightly grease a 9×13 inch baking dish or a large oven-safe skillet with cooking spray or a brush of oil.
- Season the Chicken: Pat the chicken thighs dry with paper towels. This step is critical for crispy skin. Season both sides generously with salt, pepper, and the dried oregano if using. Arrange them skin-side up in the baking dish.
- Create the Sauce: In a small mixing bowl, whisk together the honey, soy sauce, minced garlic, apple cider vinegar, and olive oil until fully combined and emulsified.
- Glaze: Pour the sauce evenly over the chicken thighs, ensuring each piece is well-coated. Use a brush or spoon to scoop sauce from the bottom of the pan and re-coat the tops.
- Bake: Place the dish in the oven and bake for 25-30 minutes. The chicken should be cooked through, reaching an internal temperature of 165°F (74°C).
- Baste: Halfway through the cooking time (around the 15-minute mark), carefully remove the pan and spoon the pan juices over the chicken. This builds layers of flavor.
- Thicken Sauce (Optional): If you prefer a very thick, sticky glaze, remove the chicken to a plate after baking. Pour the pan juices into a small saucepan, add the cornstarch slurry, and simmer for 2 minutes until thickened. Return chicken to the pan and coat with the thickened sauce.
- Broil for Color: Turn the oven to broil (high). Place the chicken back in the oven for 2-4 minutes. Watch closely! The honey in the glaze can burn quickly. You are looking for a deep amber color and slightly charred edges.
- Garnish and Serve: Remove from the oven and let rest for 5 minutes. Garnish generously with chopped green onions and sesame seeds before serving hot.
Expert Cooking Tips
- ✓Dry the Chicken: Always pat the chicken dry before seasoning. Excess moisture creates steam, which prevents the skin from getting that appetizing golden-brown color.
- ✓Fresh Garlic is Best: While jarred garlic is convenient, fresh minced garlic provides a punchier, more aromatic flavor profile that is essential for this recipe.
- ✓Don’t Skip the Acid: The apple cider vinegar might seem insignificant, but it balances the sugar. Without it, the dish can taste one-note and overly sweet.
- ✓Watch the Broiler: Honey has a low smoke point. When broiling at the end, do not walk away from the oven. It can go from caramelized to burnt in seconds.
Substitutions and Variations
Chicken Cuts: You can use boneless, skinless chicken breasts or thighs if you prefer a leaner option. However, reduce the cooking time to roughly 20-25 minutes to prevent drying out. If using breasts, pounding them to an even thickness helps them cook evenly.
Sweeteners: Maple syrup or agave nectar can replace honey. Maple syrup will give a more autumnal, woody flavor profile, while agave is more neutral.
Soy Sauce Alternatives: For a gluten-free version, use Tamari or Coconut Aminos. Coconut Aminos are naturally sweeter, so you may want to slightly reduce the amount of honey used.
Add Heat: If your family enjoys spice, add a teaspoon of Sriracha or a pinch of red pepper flakes to the sauce mixture.
Common Mistakes to Avoid
The most common mistake with honey garlic chicken is burning the garlic. Because the oven temperature is high (400°F), minced garlic on top of the chicken can burn before the meat is cooked. To avoid this, mix the garlic thoroughly into the liquid sauce so it is protected by moisture, or tuck the garlic pieces under the chicken thighs.
Another issue is watery sauce. Chicken releases juices as it cooks. If you find the sauce is too thin for your liking, do not hesitate to use the cornstarch slurry method mentioned in the instructions, or simply remove the chicken and reduce the sauce on the stovetop for a few minutes.
Serving Suggestions
This sticky chicken demands a side dish that can soak up the incredible sauce. Steamed Jasmine or Basmati rice is the classic choice. For a healthier twist, try cauliflower rice or quinoa.
For vegetables, the sweetness of the chicken pairs beautifully with roasted broccoli, garlicky green beans, or bok choy. A crisp cucumber salad with a vinegar dressing also offers a refreshing contrast to the rich, savory glaze.
Storage and Reheating Tips
Refrigeration: Store leftovers in an airtight container in the refrigerator for up to 3-4 days. The sauce may gelatinize when cold but will liquefy again upon heating.
Freezing: You can freeze the cooked chicken for up to 3 months. Thaw overnight in the refrigerator before reheating.
Reheating: For best results, reheat in the oven at 350°F until warmed through to maintain the texture of the skin. Microwaving is faster but may result in softer skin.
Nutrition Facts (Estimated)
| Serving Size | 2 Thighs |
| Calories | 420 kcal |
| Fat | 22g |
| Saturated Fat | 6g |
| Unsaturated Fat | 14g |
| Trans Fat | 0g |
| Cholesterol | 145mg |
| Sodium | 580mg |
| Carbohydrates | 20g |
| Fiber | 0.5g |
| Sugar | 18g |
| Protein | 32g |
Frequently Asked Questions
Can I make this recipe in a slow cooker?
Yes! Place the chicken and sauce ingredients in a slow cooker. Cook on Low for 4-5 hours or High for 2-3 hours. Note that the skin won’t be crispy, and the sauce will be thinner, so you may need to reduce the sauce in a saucepan before serving.
Is this recipe gluten-free?
It can be easily made gluten-free by swapping the standard soy sauce for Tamari or gluten-free soy sauce. Ensure your cornstarch is also certified gluten-free.
Why is my sauce not sticky?
The stickiness comes from the reduction of sugar (honey) and the gelatin in the chicken bones. If it’s too runny, you likely need to bake it longer or use the cornstarch slurry step to thicken it artificially.
Can I marinate the chicken beforehand?
Absolutely. You can combine the chicken and the sauce ingredients in a ziplock bag and marinate in the fridge for up to 24 hours. This will result in even deeper flavor penetration.
Can I use frozen chicken?
It is not recommended to bake chicken directly from frozen as it affects the texture and cooking time significantly. Always thaw chicken completely in the refrigerator before baking.
How do I make the skin extra crispy?
Ensure the skin is very dry before adding oil and seasoning. Avoid pouring the sauce directly on top of the skin at the very beginning; instead, pour it around the chicken, then baste later. The final broil is essential for crispiness.
Can I double the sauce?
Yes, and it is highly recommended if you love extra sauce for your rice! Simply double all the sauce ingredients. You may need to simmer the sauce on the stove to thicken it if there is too much liquid in the pan.
Is this dish spicy?
No, this standard recipe is not spicy. It is sweet and savory, making it very kid-friendly. You must add chili flakes or hot sauce if you want heat.
Conclusion
Baked Honey Garlic Chicken is more than just a recipe; it is a reliable cornerstone for your culinary repertoire. It proves that you do not need complex techniques or obscure ingredients to create a meal that tastes like a celebration. The glossy amber glaze, the tender meat, and the ease of preparation make it a winner for mothers, professionals, and food lovers alike.
Next time you are staring at a package of chicken thighs and wondering what to make, remember this dish. It is comfort food redefined—simple, wholesome, and utterly delicious. Don’t forget to pin this recipe to your favorite board and share it with a friend who needs a dinner win tonight!