Banana Bread With Oil
Ditch the butter and grab the vegetable oil for the softest, most tender banana bread you’ve ever tasted. This one-bowl wonder is incredibly moist, comes together in minutes, and stays fresh on the counter for days—if it lasts that long!
10 minutes
55 minutes
1 hour 5 minutes
1 Loaf (10-12 Slices)
Breakfast / Snack
Baking
American
Vegetarian
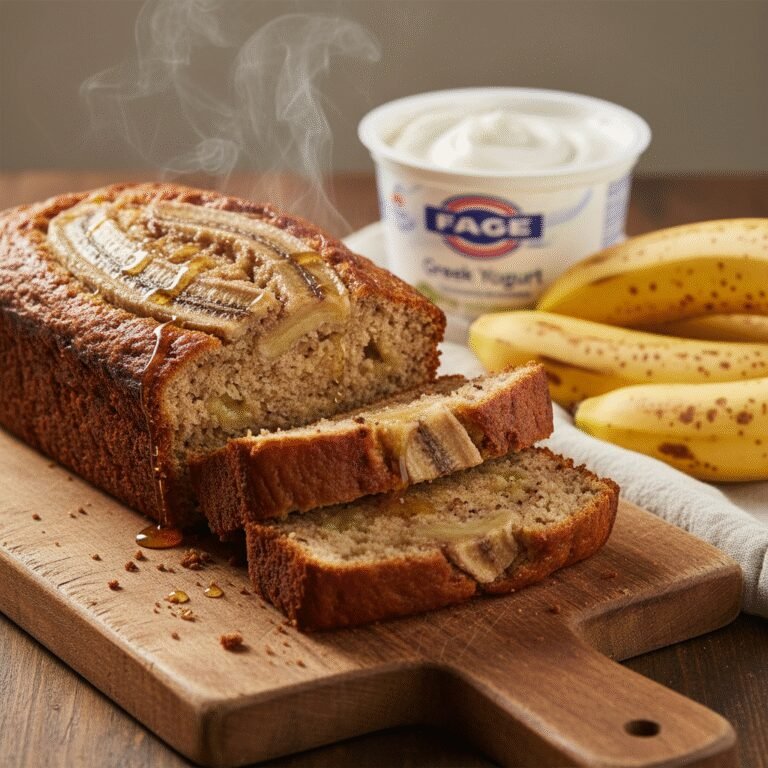
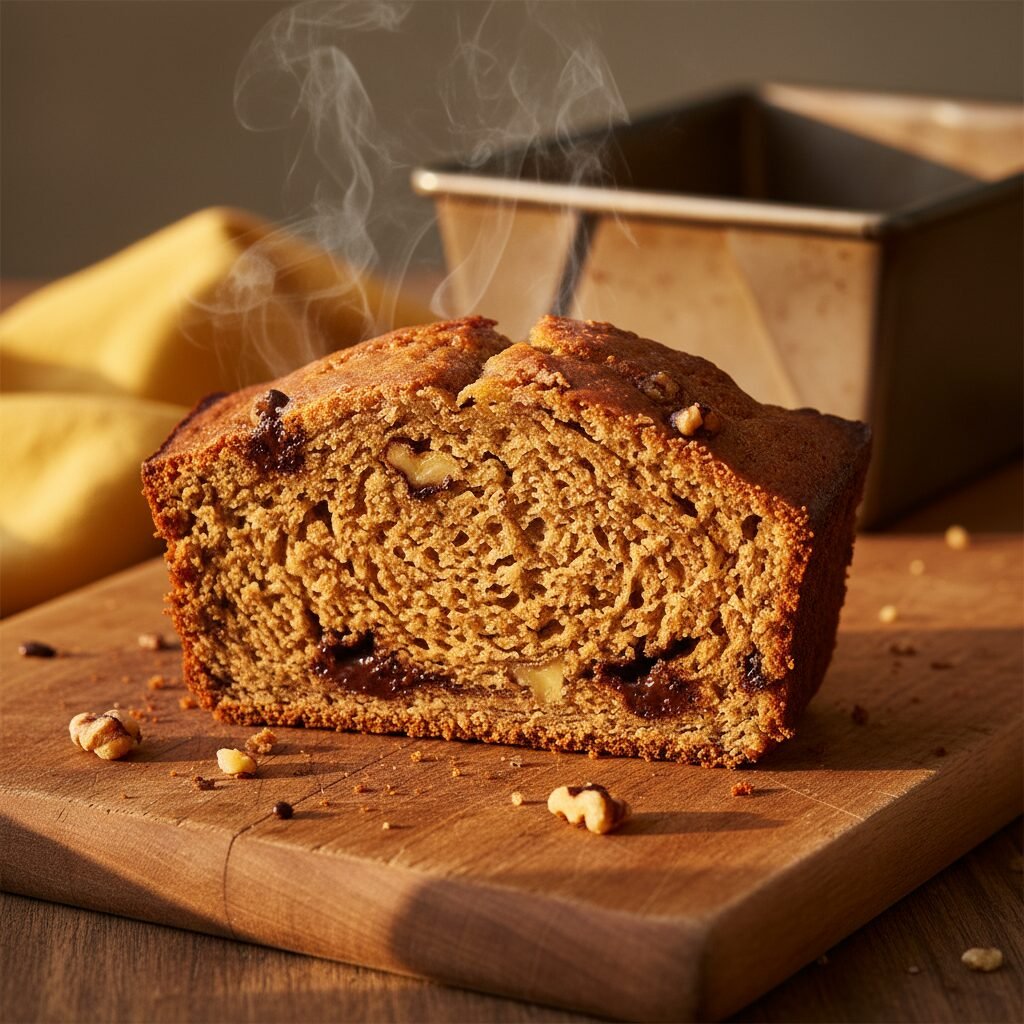
Let’s be honest, we have all been there. You walk into the kitchen, look at the fruit bowl, and see those three or four bananas staring back at you. They are brown, spotty, and arguably looking a little sad. But to a baker (or a busy mom looking for a quick win), those bananas are pure gold. While I love a classic butter-based loaf, today we are talking about banana bread with oil. If you have never tried swapping out the butter for oil, prepare to have your mind blown.
Why make the switch? It is all about texture. Using oil creates a loaf that is undeniably superior in moistness. It has a tender, plush crumb that feels almost like a high-end bakery cake. Plus, it is incredibly forgiving. You don’t need to wait for butter to soften, you don’t need a stand mixer to cream ingredients, and you certainly don’t need a lot of clean-up time. This is a “dump and stir” kind of recipe that fits perfectly into the chaos of school mornings or lazy weekends.
This recipe has become a staple in my home because it is just so consistent. Whether you use canola, vegetable, or even melted coconut oil, the result is always a tall, golden, sweet-smelling loaf that slices perfectly without crumbling. It is the ultimate comfort food, ready to be slathered with cream cheese or just eaten plain right out of the pan.
History & Origins
Banana bread is a relatively modern invention in the grand timeline of baking history. While bananas have been around for ages, banana bread as we know it didn’t truly take off until the 1930s in America. This rise in popularity coincided with two major events: the Great Depression and the mass production of baking soda and baking powder. During the Depression, food waste was a huge no-no. Throwing away overripe bananas was simply not an option for frugal housewives, so they needed a way to repurpose them.
The transition from butter to oil in quick breads has its own interesting lineage. During World War II, butter rationing made oil and shortening necessary substitutes. Home bakers quickly realized that while they missed the flavor of butter, oil actually produced a moister cake that stayed fresh longer. Over the decades, as vegetable oils became a pantry staple, the “oil method” became the secret weapon for muffins, carrot cakes, and yes, the humble banana bread. Today, using oil is often a deliberate culinary choice rather than a necessity, prized for the incredible texture it provides.
Why This Recipe Works
You might be wondering, “Can oil really be better than butter?” Scientifically speaking, for texture, the answer is often yes. Here is the breakdown: Butter is a solid fat at room temperature, while oil is a liquid fat. When you bake a cake or quick bread with butter, it tastes amazing, but as it cools down, the butter begins to resolidify slightly. This can lead to a crumb that feels drier or denser the next day.
Oil, on the other hand, remains liquid at room temperature. This means that your banana bread stays incredibly soft, moist, and tender even days after baking. Furthermore, oil is 100% fat, whereas butter is roughly 80% fat and 20% water. That extra fat content in oil coats the flour proteins (gluten) more effectively, preventing them from bonding too strongly. Less gluten formation results in a more tender, melt-in-your-mouth texture rather than a chewy or tough bread. It is the perfect vehicle for carrying the heavy moisture of the bananas without getting soggy.
Why You’ll Love This Recipe
- ✓Incredibly moist texture that lasts for days
- ✓One-bowl recipe means minimal cleanup
- ✓No electric mixer required
- ✓Dairy-free friendly (if you skip mix-ins)
- ✓Uses pantry staple ingredients
- ✓Perfect way to use up overripe bananas
Equipment You’ll Need
- ✓9×5 inch Loaf Pan
- ✓Large Mixing Bowl
- ✓Medium Mixing Bowl
- ✓Whisk
- ✓Rubber Spatula
- ✓Wire Cooling Rack
- ✓Measuring Cups and Spoons
Ingredients
- ✓3 large overripe bananas (mashed, about 1.5 cups)
- ✓1/2 cup vegetable oil (or canola/neutral oil)
- ✓3/4 cup granulated sugar
- ✓1/4 cup brown sugar (packed)
- ✓2 large eggs (room temperature)
- ✓1 teaspoon vanilla extract
- ✓2 cups all-purpose flour
- ✓1 teaspoon baking soda
- ✓1/2 teaspoon salt
- ✓1/2 teaspoon ground cinnamon (optional)
- ✓1/2 cup walnuts or chocolate chips (optional mix-ins)
Instructions
- Preheat your oven to 350°F (175°C). Grease a 9×5 inch loaf pan with non-stick spray or line it with parchment paper for easy removal.
- In a large mixing bowl, mash the peeled bananas with a fork or potato masher until they are smooth but still have a few small chunks for texture.
- Add the vegetable oil, granulated sugar, brown sugar, eggs, and vanilla extract to the mashed bananas. Whisk vigorously until the mixture is completely combined and smooth.
- In a separate medium bowl, whisk together the flour, baking soda, salt, and cinnamon. This ensures the leavening agents are evenly distributed.
- Pour the dry ingredients into the wet ingredients. Switch to a rubber spatula and gently fold the batter together. Stop mixing as soon as the flour streaks disappear. Do not overmix!
- If you are using nuts or chocolate chips, gently fold them in now.
- Pour the batter into the prepared loaf pan and smooth the top with your spatula.
- Bake for 50 to 60 minutes. Test for doneness by inserting a toothpick into the center of the loaf; it should come out clean or with just a few moist crumbs attached.
- Let the bread cool in the pan for about 10 minutes, then transfer it to a wire rack to cool completely before slicing.
Expert Cooking Tips
- ✓The darker the better: Use bananas that are heavily spotted or even black. They contain the most natural sugars and provide the strongest banana flavor.
- ✓Don’t overmix: Once the flour hits the wet ingredients, be gentle. Overmixing develops gluten which can make the bread rubbery instead of tender.
- ✓Room temperature eggs: If you have time, let your eggs sit out for 30 minutes. They incorporate better into the batter, creating a more uniform rise.
- ✓Tent with foil: If the top of your bread is browning too quickly but the center is still raw, loosely cover the pan with aluminum foil for the last 15 minutes of baking.
- ✓The parchment trick: Leave an overhang of parchment paper on the long sides of the pan. This creates ‘handles’ that let you lift the entire loaf out easily.
Substitutions and Variations
This recipe is wonderfully versatile. If you want to make it healthier, you can swap half the all-purpose flour for whole wheat flour, though the texture will be slightly denser. For the oil, melted coconut oil works beautifully and adds a subtle tropical flavor, or you can use a light olive oil for a more savory undertone. To make this vegan, substitute the eggs for ‘flax eggs’ (2 tbsp ground flaxseed meal mixed with 6 tbsp water) and ensure your sugar is vegan-certified. If you are out of brown sugar, you can use all white sugar, but the brown sugar adds a lovely depth of flavor and moisture.
Common Mistakes to Avoid
The most common mistake is slicing the bread while it is too hot. I know, the smell is irresistible! But banana bread needs to set as it cools. Cutting it hot releases the steam too quickly and can result in a gummy texture. Another pitfall is measuring flour incorrectly. If you scoop the measuring cup directly into the flour bag, you pack it down and end up with too much flour, leading to a dry loaf. Instead, use the ‘spoon and level’ method: spoon flour into the cup and level it off with a knife.
Serving Suggestions
This banana bread is a star on its own, but you can elevate it effortlessly. Try toasting a thick slice and slathering it with salted butter or cream cheese. For a decadent breakfast, top it with a dollop of Greek yogurt, a drizzle of honey, and some crushed walnuts. It also makes incredible French toast! Just dip stale slices in egg batter and fry them up for a weekend treat that the kids will go crazy for.
Storage and Reheating Tips
Because this recipe uses oil, it stores beautifully at room temperature. Wrap the cooled loaf tightly in plastic wrap or store it in an airtight container on the counter for up to 4 days. In fact, it often tastes better on day two as the flavors meld! For longer storage, you can refrigerate it for up to a week. To freeze, slice the loaf and wrap individual slices in plastic wrap, then place them in a freezer bag. They will keep for up to 3 months—perfect for grabbing a quick snack on the go.
Nutrition Facts (Estimated)
| Serving Size | 1 Slice |
| Calories | 265 kcal |
| Fat | 11g |
| Saturated Fat | 1.5g |
| Unsaturated Fat | 9g |
| Trans Fat | 0g |
| Cholesterol | 35mg |
| Sodium | 210mg |
| Carbohydrates | 38g |
| Fiber | 2g |
| Sugar | 18g |
| Protein | 4g |
Frequently Asked Questions
Can I reduce the sugar in this recipe?
Yes, you can reduce the sugar by about 1/4 cup without drastically affecting the texture. The bananas provide plenty of natural sweetness. However, sugar also contributes to moisture, so don’t cut it out completely.
Why did my banana bread sink in the middle?
This usually happens if the bread is underbaked. Even if the top looks done, the center might be raw. Always use the toothpick test. It could also result from over-leavening (too much baking soda) or opening the oven door too often.
Can I use olive oil instead of vegetable oil?
Absolutely! Light or extra-light olive oil works best as it has a neutral flavor. Extra virgin olive oil will add a distinct savory, fruity flavor which some people love, but it changes the classic taste profile.
My bananas aren’t ripe enough. Can I still bake?
You can ripen them quickly in the oven! Place unpeeled bananas on a baking sheet and bake at 300°F for 15-20 minutes until the skins are black and the fruit is soft.
Can I bake this as muffins instead?
Yes! This batter makes excellent muffins. Grease a muffin tin or use liners, fill them 3/4 full, and bake at 350°F for 18-22 minutes.
Is this recipe dairy-free?
Yes, the base recipe is 100% dairy-free since it uses oil instead of butter. Just make sure any mix-ins (like chocolate chips) are also dairy-free.
Why is my bread gummy at the bottom?
This is often caused by overmixing the batter or the oven temperature being too high, causing the outside to cook too fast while the inside stays wet. Double-check your oven temp with a thermometer.
Can I add frozen blueberries?
Sure! Toss frozen berries in a teaspoon of flour before folding them in to prevent them from sinking to the bottom. You may need to add 5 minutes to the baking time.
Conclusion
There you have it—the secret to the moistest, most reliable banana bread you will ever bake. By swapping butter for oil, you ensure a tender crumb that stays fresh for days, making this the ultimate recipe for meal prepping or gifting to friends. Next time you see those spotty bananas on the counter, don’t despair; get excited! Grab your mixing bowl, preheat that oven, and get ready to fill your kitchen with the most comforting aroma in the world. Happy baking!