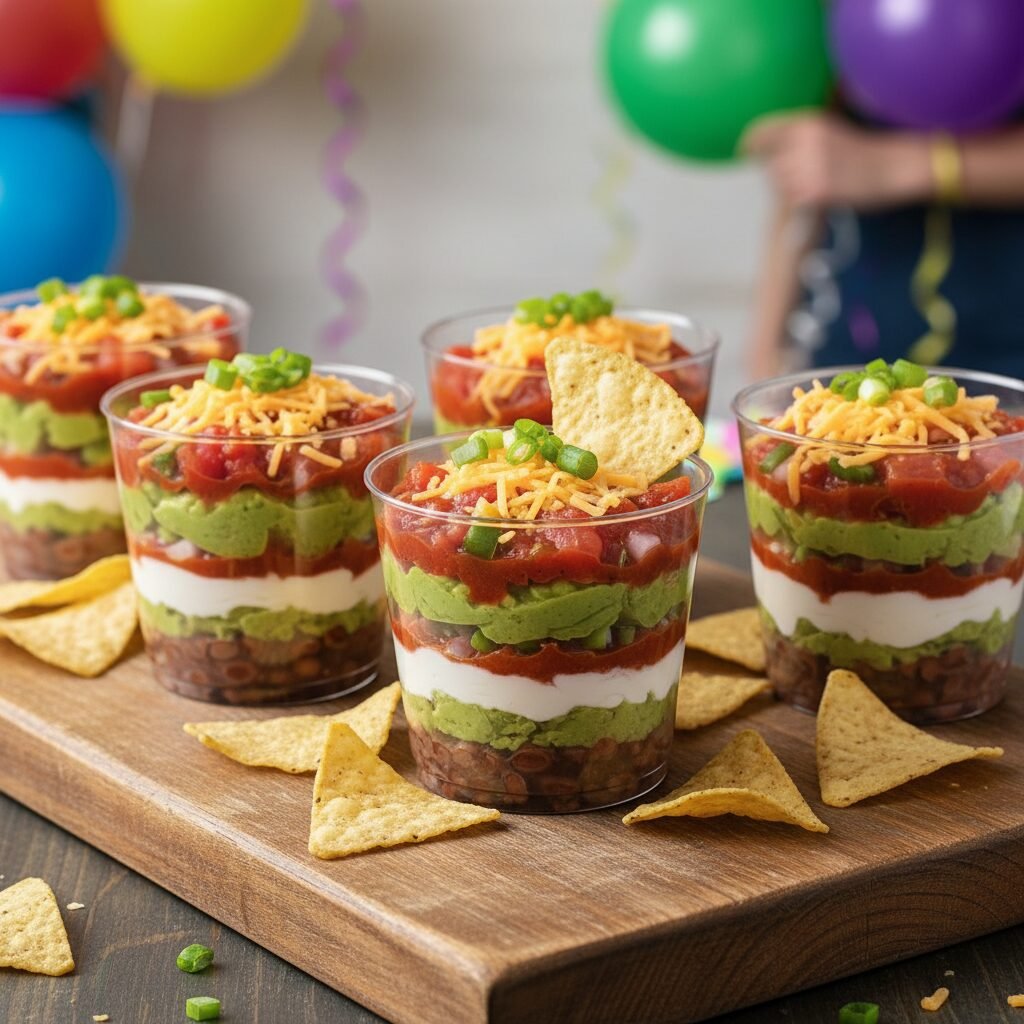
5 Layer Party Dip Cups
Say goodbye to the dreaded double-dip disaster! These individual 5 Layer Party Dip Cups are not only adorable but pack every classic Tex-Mex flavor into a personal-sized serving. Perfect for game days, baby showers, or just a fun Friday night snack.
20 minutes
0 minutes
20 minutes
12 servings (9oz cups)
Appetizer
Assembly
Tex-Mex
Vegetarian
Hey there, party planners and busy mamas! Let’s talk about the elephant in the room at every potluck or game day gathering: the communal dip bowl. We all love a good 7-layer dip, but there is always that lingering anxiety about the double-dipper, or the person who scoops all the guacamole off the top, leaving just dry beans for the rest of us. It’s a tragedy, really. But I have the ultimate solution that is going to change your hosting game forever: 5 Layer Party Dip Cups.
These little cups of joy are exactly what they sound like—individual servings of your favorite Tex-Mex dip, layered beautifully in clear cups so everyone gets the perfect ratio of ingredients in every single bite. No more fighting for the cheese layer! Plus, let’s be honest, they look absolutely stunning on a buffet table. The vibrant stripes of brown beans, bright green guacamole, cool white sour cream, red salsa, and orange cheese create a rainbow of deliciousness that screams ‘party time.’
I started making these for my daughter’s birthday parties because they are so easy for kids to grab and go. No messy plates, no hovering over a bowl. But I quickly realized the adults loved them even more. There is something so satisfying about having your own personal dip. It feels indulgent, clean, and thoughtful. Whether you are prepping for the Super Bowl, a bridal shower, or just need a fun after-school snack hack, these dip cups are about to become your new signature dish.
History & Origins
The concept of the layered dip has its roots deep in the Americanized Tex-Mex cuisine explosion of the early 1980s. The classic ‘Seven-Layer Dip’ became a staple in magazines like Family Circle and Southern Living, quickly ascending to the throne of potluck royalty. Originally, it was a way to showcase the abundance of fresh ingredients and convenient pantry staples like canned refried beans and jarred salsa.
However, the evolution into individual dip cups is a distinctly modern phenomenon, largely fueled by the rise of visual social media platforms like Pinterest in the early 2010s. As food photography became more focused on aesthetics and ‘miniature’ versions of classic foods became trendy (remember cake pops?), savvy home cooks and bloggers realized that deconstructing the messy casserole-dish dip into clean, transparent cups solved both the visual appeal and the logistical nightmare of communal eating. It transformed a messy scoop into a chic, grab-and-go appetizer that fits perfectly with the modern desire for single-serve, hygienic party food.
Why This Recipe Works
From a culinary perspective, these dip cups work because they guarantee the perfect bite every time. In a traditional wide dish, the heavy ingredients sink, and the lighter ones stay on top. When you scoop, you often get too much of one thing. By stacking the ingredients vertically in a narrow vessel, you force the tortilla chip (or spoon) to pass through all five distinct flavor profiles at once.
The textural contrast is key here. You have the dense, creamy richness of the refried beans anchoring the cup, followed by the buttery smoothness of the guacamole. The sour cream adds a tangy, cooling element that cuts through the spice, while the salsa provides a fresh, acidic crunch. Finally, the shredded cheese adds a savory chew. Because the cups are individual, the structural integrity of the layers lasts longer than in a large bowl where the ingredients would eventually bleed together into a brown mush after a few scoops.
Why You’ll Love This Recipe
- ✓Eliminates double-dipping completely
- ✓Perfect ratio of ingredients in every bite
- ✓Can be made up to 24 hours in advance
- ✓Highly customizable for dietary needs
- ✓Kid-friendly and mess-free
- ✓Looks professionally catered with minimal effort
Equipment You’ll Need
- ✓12 clear plastic cups (9oz tumblers work best)
- ✓3 piping bags or large Ziploc bags
- ✓Mixing bowls
- ✓Spatula
- ✓Scissors
Ingredients
- ✓2 cans (16 oz each) Refried Beans (traditional or black bean)
- ✓1 packet (1 oz) Taco Seasoning, divided
- ✓2 cups Guacamole (homemade or store-bought)
- ✓1.5 cups Sour Cream (full fat is best for stability)
- ✓1.5 cups Chunky Salsa or Pico de Gallo, well drained
- ✓1.5 cups Shredded Mexican Blend Cheese
- ✓1 bunch Green Onions, chopped (for garnish)
- ✓1 bag Tortilla Chips (scoops or rounds) for serving
Instructions
- Prep the Beans: In a medium mixing bowl, combine the refried beans with half of the taco seasoning packet. Stir well until the seasoning is fully incorporated. If the beans are too stiff, add a tablespoon of milk or sour cream to loosen them up just slightly. Transfer this mixture to a piping bag or a large Ziploc bag.
- Season the Cream: In a separate small bowl, mix the sour cream with the remaining half of the taco seasoning. This simple step elevates the flavor profile immensely! Transfer this mixture to a second piping bag.
- Prep the Guac: If your guacamole is homemade, make sure it has plenty of lime juice to prevent browning. Transfer the guacamole to a third piping bag. Tip: Snip a large corner off the bags—about 1 inch wide.
- Layer 1 – Beans: Squeeze a layer of the bean mixture into the bottom of each plastic cup. Aim for about 1 inch of beans. You can tap the cup gently on the counter to flatten the layer.
- Layer 2 – Guacamole: Pipe a generous layer of guacamole directly on top of the beans. Piping is much cleaner than spooning and keeps the layers distinct so they look pretty from the outside.
- Layer 3 – Sour Cream: Pipe the seasoned sour cream over the guacamole. Try to seal the guacamole in with the sour cream (touching the edges of the cup) to help prevent air from reaching the avocados.
- Layer 4 – Salsa: Spoon the drained salsa over the sour cream. It is crucial that the salsa is drained well so liquid doesn’t seep down and muddy the white sour cream layer.
- Layer 5 – Cheese: Sprinkle a generous amount of shredded Mexican blend cheese on top.
- Garnish & Chill: Top with chopped green onions. Place a tortilla chip standing upright in the center just before serving, or serve chips on the side. Refrigerate for at least 30 minutes before serving to let flavors meld.
Expert Cooking Tips
- ✓Drain the Salsa: This is the most critical tip! Put your salsa in a mesh strainer for 10 minutes before assembling. Excess liquid will ruin the beautiful layers.
- ✓Use Piping Bags: While you can use a spoon, using Ziploc bags with the corner cut off makes filling the cups so much faster and keeps the sides of the cups clean.
- ✓Buy Short Cups: Look for ‘squat’ 9oz tumblers or ‘rocks’ glasses. Tall, skinny cups are harder to eat out of with a standard tortilla chip.
- ✓Room Temp Beans: If your beans are cold from the fridge, they are hard to pipe. Let them come to room temp or zap them for 15 seconds in the microwave to make them pliable.
Substitutions and Variations
This recipe is incredibly forgiving and easy to adapt to your diet!
- Make it Vegan: Use vegan sour cream and plant-based cheddar shreds. Ensure your refried beans are vegetarian (no lard).
- Lighten it Up: Swap full-fat sour cream for plain Greek yogurt. It adds extra protein and tastes almost identical once mixed with taco seasoning.
- Meat Lovers: Add a layer of cooked, seasoned ground beef or turkey between the beans and the guacamole. Make sure the meat is cooled completely before assembling.
- Spice Level: Use jalapeño-infused refried beans or hot salsa if your crowd likes a kick.
Common Mistakes to Avoid
The biggest mistake people make is not draining the wet ingredients. Watery salsa or separating sour cream can create a pool of liquid at the bottom of the cup, which looks unappealing. Another common error is assembling them too far in advance without sealing the guacamole. While the sour cream layer helps, if you prep these more than 24 hours ahead, the avocado may start to brown slightly. Lastly, don’t overfill the cups! Leave a little headspace at the top so guests can dip their first chip without ingredients spilling over the edge.
Serving Suggestions
Serve these cups on a large platter or a tiered cupcake stand for a dramatic display. Place a single round tortilla chip or a ‘scoop’ chip standing vertically in the cheese layer like a garnish. Provide a large bowl of extra chips on the side. If you are serving these at a wedding or fancy shower, tie a small wooden spoon to each cup with a piece of twine for a rustic, elegant touch.
Storage and Reheating Tips
These cups are best eaten within 24 hours of assembly. Store them in the refrigerator. If you need to stack them, place a sheet of plastic wrap over the top of the cups, or store them in a deep Tupperware container. Do not freeze these, as the sour cream and salad ingredients will release water and ruin the texture upon thawing.
Nutrition Facts (Estimated)
| Serving Size | 1 cup |
| Calories | 210 |
| Fat | 14g |
| Saturated Fat | 6g |
| Unsaturated Fat | 7g |
| Trans Fat | 0g |
| Cholesterol | 25mg |
| Sodium | 450mg |
| Carbohydrates | 16g |
| Fiber | 5g |
| Sugar | 2g |
| Protein | 7g |
Frequently Asked Questions
Can I make these the night before?
Absolutely! In fact, they taste better after sitting for an hour or two. You can make them up to 24 hours in advance. Just keep them tightly covered in the fridge.
What size cups should I buy?
I recommend clear hard plastic 9oz tumblers. They are wide enough to dip a chip into but small enough to be a single serving.
How do I keep the guacamole from turning brown?
Make sure your guacamole has plenty of lime juice. Also, when you pipe the sour cream layer on top, ensure it covers the guacamole completely, touching the sides of the cup to create an air seal.
Can I add meat to this?
Yes! Ground beef or shredded chicken works great. Just make sure the meat is fully cooked and cooled to room temperature before layering so it doesn’t melt the cheese or sour cream.
Do I really need piping bags?
You don’t need professional piping bags; gallon-sized Ziploc bags work perfectly. Spooning the layers is possible but tends to smear the sides of the cup, ruining the clean layered look.
What chips work best?
Tortilla ‘Scoops’ are the gold standard here because they hold a lot of dip. Sturdy corn tortilla rounds are also good. Avoid thin, restaurant-style chips as they might break in the dense bean layer.
Is this gluten-free?
Generally, yes! Most corn chips, beans, and dairy products are gluten-free. Just double-check your taco seasoning packet, as some brands use wheat flour as a thickener.
Can I use black beans instead of refried?
Yes, but I recommend mashing them slightly so they stay in place. Whole beans tend to roll around and make scooping difficult.
Conclusion
There you have it, ladies! The 5 Layer Party Dip Cups that are guaranteed to make you the MVP of your next gathering. They are cute, customizable, and honestly, just plain fun to eat. No more hovering over the dip bowl wondering if it’s safe to dive in—now everyone gets their own little cup of Tex-Mex heaven. Give these a try for your next game day or birthday bash, and don’t forget to snap a picture for Pinterest before they disappear!